Showing posts with label jillibean soup. Show all posts

Wednesday, May 20, 2020

Rap Sign

Sometimes something you crate just makes you happy. This simple rap sign is like that for me.


This sign was super simple to create with some vinyl. I cut some fonts I had on my computer with my Silhouette Cameo and then added them to a Jillibean Soup Mix the Media frame.


The saying itself is a little bit serious and a little bit silly, so it fit my personality well. Like I said at the beginning, the sign just makes me happy. I smile when I see it.


I hope you have a good day as well!

Wednesday, May 6, 2020

Dog Sign

I have something a little fun. It's been a while since I've made a home decor project for my blog. I've had the supplies for this project for months, but I finally got around to making this dog sign this past week.


We are definitely dog people. We especially love our basset, Kevin.


He's pretty goofy, and he just turned 1. The house definitely needed a sign to commemorate him.


The sign base is from Jillibean Soup Mix the Media. I used my Silhouette to cut the blue paw shaped words. The cut file also happens to be from Jillibean Soup. There was a lot of weeding, but the final result was totally worth it.


The wood basset hound was something I found on Etsy. I stained it with some Tim Holtz Distress Ink and attached it to the sign with some Pop Up Glue Dots®. This sign is now hanging on the wall in my living room, and I love it!

Tuesday, January 28, 2020

Valentine's Day Decor

Valentine's Day is right around the corner, so today I have a bit of Valentine's Day decor to share.


This past month at Creativation, Glue Dots® debuted a new product: Glue Dots Adhesive Sheets for die cutting. I've been having a lot of fun playing around with them. There are a ton of fun uses for them. They work beautifully with my Silhouette Cameo and my manual die cutting machine!


Just peel the paper backing of the adhesive sheet.


 Place it on the paper you've chosen to cut, and run through your die cutting machine.


Peel the liner off. 


If you peel slowly, the liner will do most of the weeding for you (which is my favorite thing about the new adhesive sheets).
 

I added my die cut heart and a die cut phrase to a simple Mix the Media frame from Jillibean Soup to create my Valentine's Day decor.


I wrote this post while participating on the Glue Dots® Design Team.

Thursday, October 17, 2019

Welcome My Pretties Front Door Decor

My old Halloween welcome sign was getting a bit sun faded, so I decided it was time to create something new. I came up with this Welcome My Pretties front door decor.


I started with a 12 x 12 wood hanging chalkboard from Jillibean Soup's Mix the Media collection. I wanted to keep it simple so I decided to go with "Welcome my pretties." cut with my Silhouette Cameo. I used a font I had on my computer and used the offset feature to add a shadow/outline cut to the phrase.


I used papers from Paper House Wicked Good collection for the background patterned paper and for the letters. I added some card stock stickers (with pretty orange foil) from the collection for a finishing touch.


I hope you have some wicked good fun planned for Halloween. Remember you can always use my affiliate code PH19SAMANTHA for 20% off your entire purchase at Paper House.

I wrote this post while participating on the Paper House Creative Team.

Wednesday, May 2, 2018

Celebrate Birthday Layout

I'm not going to lie...life has gotten the better of me lately, and I've had so little time to scrap it seems. When I do get something done, it seems to be even harder to find time to blog about it. I guess that's just the season I'm in right now, but I've got a few free minutes now, so I'm finally going to share this Celebrate Birthday Layout that I created a month ago.


I've always been one to scrap out of order. I scrap photos as I find the right paper for them. The good part about that, is that I have a pretty great system for keeping my photos (digitally) organized, so I usually know the story and dates behind photos, even if I'm scrapping them years later.


I can even tell you that my sister-in-law took these photos for me, so I could just do the cake and singing and enjoying the birthday boy thing and not have to worry about snapping the perfect photo.


A quick note about the details of this layout: The paper and embellishments used here are all from Jillibean Soup Souper Celebration collection. I's a fun and really versatile birthday collection.


Whatever season of life you're in right now, I hope you're finding time to enjoy and celebrate it!

Thursday, April 5, 2018

Happy Birthday Layout

For some reason, I'm never very good at getting birthday memories scrapped quickly. I don't know if it's because I have a hard time finding just the right paper because my kids' parties are usually heavily themed, or if I'm just not good with birthday layouts. I'm a few years behind, but today I have a Happy Birthday Layout.


If you're going to scrap a birthday, you'll need some great birthday themed paper. I grabbed Jillibean Soup Souper Celebration. The colors are perfect, and there are some really fun cake, candle, balloon, and llama (yes llama!) icons as part of this collection.


I used my Silhouette Cameo to cut the "Happy Birthday to You" circle out, and backed it with a fun party polka dot.


This 9th birthday had a Pokemon theme, which can be seen in the Pokeball cake that my husband and I baked for the birthday boy.


Only 2 years later, I have this Happy Birthday Layout done and in the scrapbooks!

Thursday, March 29, 2018

You Color My World Layout

I've been trying to work my way through my fairly big stash of paper, but recently I gave in a picked up a few new things from Jillibean Soup. Today I have a You Color My World Layout using some of those new papers.


I couldn't pass up Jillibean Soup's Shades of Color. I love the bright colors in this collection and the artsy feel of the patterns.


We don't get to go mini golfing too often, so when we had some extra family time when we were in Colorado last summer, we decided to take the kids to a place my husband and I had golfed a few times back when we were dating (many, many, many years ago).


Are you good at using your stash, or do you like to splurge occasionally like I did with this You Color My World Layout?

Wednesday, March 21, 2018

Adventure Awaits World Sign

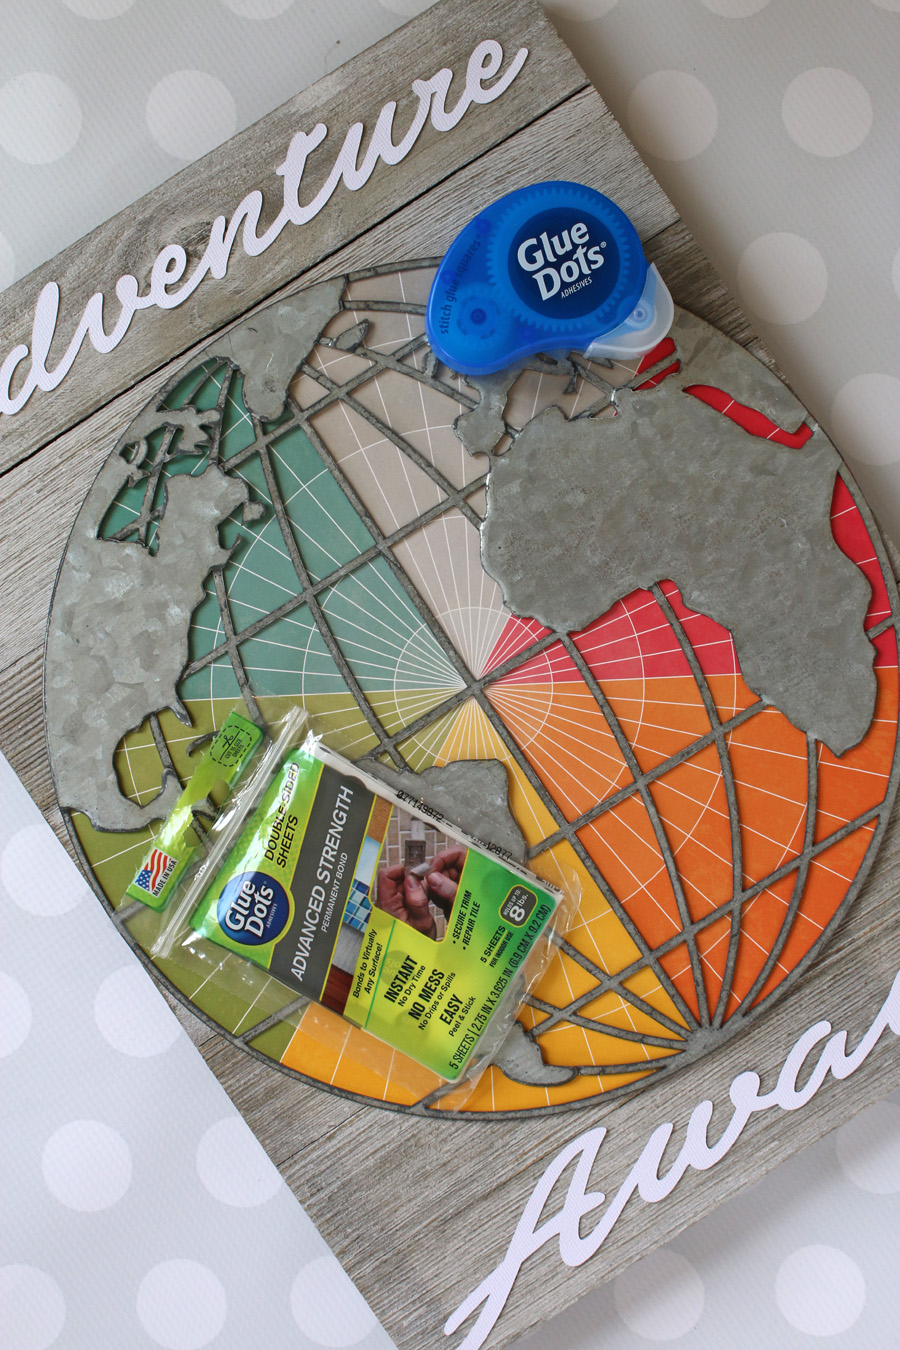
I really love creating customized decor for my home. today I have an Adventure Awaits world sign that I created to share with you.


This was a super fun project to put together. I ordered the galvanized world globe and 12x16 white wood panel from Jillibean Soup.


The galvanized world is a 12" circle, so  all you need is a single sheet of 12 x 12 patterned paper to back it. I tried a few different options, but decided on piece called Flashy Tint from Jillibean Soup Shades of Color. I love the multiple colors and how the pattern seems to be made for a circle.


I cut "Adventure Awaits" from white card stock with my Silhouette Cameo.


I always feel like the hardest part of a project like this is figuring out what adhesive to use and how to put everything together. I ended up using Glue Dots® Advanced Strength sheets to attach the patterned paper to the galvanized world. Advanced Strength Glue Dots® are made especially for heavy duty projects with things like wood, metal, and glass. I used the sheets, so I could cut custom sized pieces for the back side of the world. The world has a small hanger built into the back of it, so I just used a nail to attach the world to the wood Panel. Finally, I used Glue Dots® Glue Squares to attach my "Adventure Awaits" words to the wood panel. Glue Squares® are also made for use with materials like wood, but are much smaller, so they were sized perfectly for my project.


This Adventure Awaits World Sign is already up and hanging on my wall. I love the bright pop of color it adds. What home decor project is on your to make list?

I wrote this post while participation on the Glue Dots® Design Team.

Thursday, March 23, 2017

School Photo Scrapping

I'm working on some school photo scrapping again. This time I have my youngest son's 3rd grade photo.


Since I take photos of my kids every year, I don't get too worried about school pictures. I let them pick out whatever shirt they want as long as it's clean and not too out there. My kid wanted to wear his shirt that's currently his favorite and it is this crazy shade of bright orange-y yellow, and the logo is bright blue. I could not believe that Jillibean Soup had paper that coordinated with his shirt...and it's school themed! Alphabet Soup II really made this layout come together.


I knew I also had to use the "Be Silly, Be Honest, Be Kind" tag. If that phrase doesn't sum up this goofy kid with a big heart, I don't know what does. Since the colors on this layout are pretty bright, I kept the lines of my layout pretty clean. The large photo also helps draw your eye. I don't use 5x7 photos too often, but in this case, I thought the larger size worked really well.


Just a few more photos and I'll be all caught up on my school photo scrapping. Do you like scrapping school photos?

Friday, February 17, 2017

School Picture Layout

Oh, school pictures! I never get too concerned about how my kids look since I take annual photos every year on our own, but oh is it fun to see how they turn out... and making a school picture layout is always fun!


I like to use their school picture layouts to record a little about what school was like for them that year. What they were really excited about learning or what challenges they overcame that year.


For this layout, I chose Jillibean Soup Alphabet Soup II. It's a really fun school themed collection that's great for school photos, field trips, and school events.   


I used my Cameo to cut a number diecut overlay for the layout. In 3rd grade my son was super excited about learning multiplication and division, so the numbers were especially fitting.


While school photos aren't usually the best, it sure is fun to see how they grow and chance from school year to school year!

Tuesday, January 31, 2017

Love Is An Open Door Sign

I have a love is an open door sign that's super easy to make to decorate your door for Valentine's Day. It gives a subtle nod to Disney's Frozen and I'll show you how anyone can pull off a hand lettered look.
 

For this project, you'll need some wood for your sign (I chose a 12"x12" Jillibean Mix the Media wood sign), paint in your chosen colors, a paint brush, some vinyl, and a way to cut vinyl (I created my vinyl stencil with my Silhouette Cameo).


I have terrible penmanship, so I can't pull off the hand lettered look without help. I used the vinyl to create a stencil for my words.


Instead of using the vinyl as a mask and painting all of the negative space, I used the vinyl as a template. I used a calligraphy style bamboo paintbrush to follow the lines of the vinyl, but didn't paint all the way to the edge. 


This works especially well for textured, bumpy woods when using the vinyl as a more traditional mask leads to the paint bleeding.


If you're hanging this on a metal door, you can also add a little strip magnet to the bottom of the back side of your sign. That will keep it from banging against your front door when you open and close it.


Here's a shot of what it looks like on my front door. It's just the perfect little welcome sign for February!


Thanks for stopping by! If you don't want to miss my other crafting ideas, you can find me on FaceBook and Instagram.

Want more? 
I've teamed up with over 40 other bloggers to bring you some amazing Valentines Day project ideas. Check them out bleow!

Tuesday, September 27, 2016

Kayaking Layout

One of the things my oldest really loves to do is go kayaking at his granparents' lake home. This summer was no exception. He couldn't wait to hop in and take off. I was quick enough to grab a few photos, so today I have a kayaking layout to share.


I based my whole layout off of SRM's Say it With Stickers Mini Kayaking sticker set. It's not easy to find anything kayaking themed, so I was pretty excited to get these from SRM!


I paired the stickers with Jillibean Soup's Fur Fusion. While I initially picked up Fur Fusion to scrap photos of our dog, I've found so many other uses for the collection. The colors are rich and bright, and there are a lot of really fun, non-pet themed papers in the collection. Just make sure to check both sides of the paper!


I love how happy kayaking makes this kid, and I'm so happy to have some fun stickers for this kayaking layout. What outdoor activity makes you happy?

Monday, September 12, 2016

Camping Layout

My boys are never so happy as when we go camping. Until I had boys, camping wasn't something I did, but now I love it, because I get to see it through their eyes. Today I have a camping layout created with some of the photos from our last camping trip from before school started this year.


I was pretty proud of myself after this week of camping. I took my boys up for 3 days of camping all by ourselves before my husband joined us for the weekend. This is the first time I've braved camping by myself, and it was so worth it. We had a blast, swam a lot, explored even more, and stayed up waaaay too late watching the Olympics at night. It was pretty great to get some extra days in by going up early!


 Since we do more and more camping every year, I'm always on the look out for fun camping collections. Jillibean Soup Mushroom Medley totally fits the bill. It's playful and rustic. It has some great pops of color that keep it from being too dark.


Since I chose a bit of a darker color (the green paper) for the main part of my layout, I kept the photos bright by matting them in white. I also used plenty of bright blue, yellow, and orange embellishments to keep the overall feeling of the layout bright and playful. 


I love that I have this camping layout to remind me next year that I can totally brave camping for a few days by myself with my boys! Do you ever camp alone, or do you always make sure you have back up?