Wednesday, March 27, 2013

Folder Mini Album

I really like making mini albums. However, I don't like making them out of the same old things all the time, so I'm always thinking about how I can turn something into a mini album.  Enter these cool mini file folders from Authentique:


I saw them and thought, "Hey I could turn those into a cool mini album!".  I layered them up and used a bit of twine to bind them together, and ta-da! a mini album was created. I didn't think to take any pictures during the book binding process, but it was really easy. If you're interested in trying binding something like this, just search "book binding" on the web, and you'll find lots of great tutorials on different ways to do it (or feel free to shoot me an e-mail, and I'll do my best to explain what I did). Here are a few of my favorite pages from the album:


I grabbed a number of pieces of paper and a bunch of the embellishments from the Authentique Renew Collection, which made this album come together quite cohesively.

Thanks for stopping by!


Sunday, March 17, 2013

Thursday, March 14, 2013

St. Patty's Day Cards

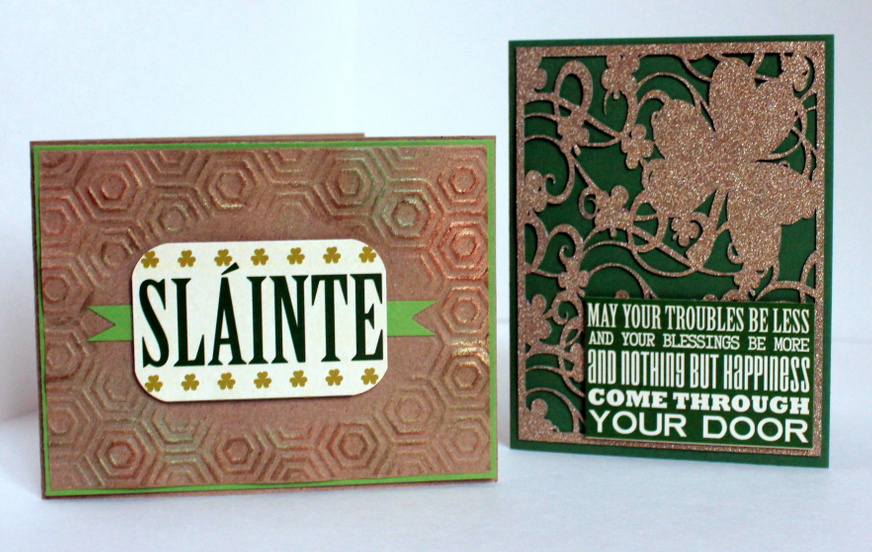
This Irish girl LOVES St. Patty's Day. I always send cards to my grandparents to celebrate.  These are the cards I made this year:


I kept the outsides and the insides simple this year. I was a bit sick when I made them, so I wasn't really big on the idea of taking hours to create them. I kept the insides simple too. Instead of stamping I used stickers from Reminisce Shamrock Collection.


To add a little pizazz to the cards, I decided to add a little shimmer. For the Salante card (similar to saying "Cheers") I ran the background paper through my Big Shot with a honeycomb embossing folder.


 Then I rubbed a little Versamark ink over it and dusted it with copper and green Perfect Pearls.

 For my second card I added shimmer by cutting a background from American Craft Pow! Glitter Paper with my Silhouette.

 I love how easy it is to cut Pow! paper with my Silhouette. Even the intricate details of this background!

Thanks for stopping by, and have a great St. Patty's Day!


Thursday, March 7, 2013

Glue Dots® Slap It

I have a lot of Glue Dots® sitting around the house. We often grab them for non-crafty endeavors. Recently we found a fun way to use Removable Glue Dots® with flash cards. Any flashcards will work. We are currently working on letters and sight words, so those are the flash cards you see in my photos.However, the sky is the limit...math flash cards, foreign language, numbers, colors...anything will work!

Supplies:
Removable Glue Dots®
1 Spatula Per Child
Flashcards


How to PlayYou can play this with 1 child or multiple children. I set up a different set of flashcards per child.
You will want to play this game on the floor. Kids seem to really love the slapping part of this game, and you'll want to be on a surface that can take some abuse.


Place a removable Glue Dot® on the back of a spatula.


Place about 8 - 10 flashcards from your stack onto the floor in front of the child.
Call out an item from one of the flashcards on the floor.


The child needs to find the flashcard with that item (word, color, number, etc.) and slap it. The card will stick to the Glue Dot®


The child shows the card to the adult for verification. The "used" flashcard is then moved to a completed pile, and a flashcard from the unused pile can be placed into the empty space left by the "used" flashcard.
Repeat until all the flashcards are gone.
You may need to occasionally replace the Glue Dot® on the spatula.


The best part is Removable Glue Dots® are on sale right now. Available at your local Walgreens in the arts and crafts section next to the poster board. On sale Buy One, Get One 50% off with card. Offer ends 3/31. Equal or lesser value.

I wrote this post while participating on the Glue Dots® Design Team

Sunday, March 3, 2013

AWDML's 10th Anniversary


As many of you know, I work at, teach classes at, and design for A Walk Down Memory Lane. I feel blessed every time I pick up a piece of scrapbook paper to have met Lisa, the owner, and that I have been given the opportunity to work with such wonderful people at such an amazing scrapbook store. This month, AWDML is celebrating it's 10th year in business, and I can't wait to see what the next 10 will bring. While I have the extra blessing of being able to shop in store, AWDML began on-line long before there was a physical Brick & Mortar store. Everything in store can be found on-line, and wouldn't you know, for the entire month of March Lisa is offering 10 fabulous deals (and she not only ships everywhere in the US, but internationally as well!).  Happy shopping!

10th Birthday Specials


Buy 10 Copic Markers
get 1 FREE
(we will manually adjust your total)


ALL Magnolia Stamps are
50% OFF


ALL Just Rite Stamps are
75% OFF


ALL Slim Steel Dies are
25% OFF


  ALL Mists are
40% OFF 


  Buy 1 Unity Stamp

get 1 FREE(we will manually adjust your total) 
 
ALL Punches are
25% OFF

Alphabet Stickers are
30% OFF

ALL CC Designs Stamps
are 50% OFF

Everything else in the store
is 10% OFF  

Saturday, March 2, 2013

Easter Frame


Believe it or not, Easter is not that far off. I'm trying to add a little more seasonal decor to my home, so  I made this:


My favorite details are these little lilies made from Maya Road zipper trim.  


My original goal was to create an Easter lily from sipper trim, but I just couldn't get it to look quite right, so I created this Lily which, I think, looks a bit more like a calla lily.

If you'd like to try making the zipper lily for yourself, here's a little photo tutorial on how I did it.


Cut a 3" strip of zipper trim. Work with the zipper part facing up. 


Place a craft Glue Dot® about 1/4" from the middle on both the left and right sides.
With the zipper lying horizontally, fold both edges down from the center, so the ends are now pointed vertically. Cut the right hand tail of the zipper at an angle.


Wrap the right hand tail up into the left hand tail. Add another Craft Glue Dot® to the left hand tail as you wrap it up and around the right hand tail. Tack the end of the left hand tail down on the back side of the lily with another Craft Glue Dot®.
 

Create the center of the lily by wrapping a Craft Glue Dot® around a stick pin. then wrap about a 3/4" piece of yellow ribbon around the pin. Stick the ribbon wrapped pin into the center of your flower.

Once you get started, these zipper lilies are really easy and fun to make. In fact, I made 4 before deciding I was just going to use 2 on my frame. 

Easter Frame Supplies

Supplies:

Navy Card Stock
Picture Frame (My frame measures 13" x 6")

Thanks for stopping by! 

I wrote this white participating on the Glue Dots® Design Team.