Wednesday, December 27, 2017

Top Ten Posts of 2017

I've joined with a great group of craft bloggers to bring you our top ten posts of 2017.  Hopefully you came to me from Tenia Nelson's blog, and after you're done here, you can head over to
Rebecca Keppel's blog to check out her top ten posts of 2017. You can find the entire list at the end of 
the post. Now on to my top 10 favorite projects from this year:


1. I Am Redeemed Bible Journaling - Bible Journaling is a fairly new craft to me, and I love it. I love using this as a way to try new and different mixed media techniques while delving into my Bible studies.


2. 10 Years Layout - I love taking my kids' pictures every year and then journaling about who they are. I'm also in love with this patterned paper by Fancy Pants.


3. Wand Holder - Not only does the Harry Potter geek in me love this project, this has also been the most popular post on my blog this year.


4. Paradise Found Birthday Card - I joined Paper House's Design team for 2017 and loved every minute of it...and Paradise Found was one of my favorite collections. I mean, check out that super fun flamingo.


5. Halloween Mini Album - One of my favorite projects is the annual Halloween mini album that I make.


6. Love Is An Open Door Valentines Day Sign - If you need some Valentine decor, you can't go wrong with this Frozen themed sign.


7. Kids and Dog Layout - We love our Dog, and I love how my kids' pictures with him turned out this year.


8. Eight Years Layout - My younger son's annual layout.


9. Thanks So Much Card - Clean and simple is my go to style when it comes to card making. This card is the essence of what I love doing.


10. Love Layout - No roundup would be complete without a layout with a picture of me with my favorite guy.


I hope you enjoyed my favorite projects of 2017. I'm looking forward to lots of fun crafting in 2018! You can see all of the blog hop participants below for even more great inspiration.

Friday, December 22, 2017

Little Town of Bethlehem Bible Journaling

Did you know you can use vinyl in Bible jounaling? Check out how I used it for this little town of Bethlehem Bible journaling on the SRM blog.


Find all the details for creating this on SRM blog.

Thursday, December 14, 2017

Winter Coffee Thank You Card

The Coffee Lovers' Blog is having a winter themed blog hop. I had so much fun playing along with the fall hop that I couldn't pass up the chance to create something for the winter hop I came up with a clean and simple winter coffee thank you card.


For this card I used the coffee cup from SRM's Coffee Plans stamp set (which also happens to be one of the prizes you can win if you play along with the hop) and the snowflake from SRM's Seasonal Plans stamp set. The greeting is an SRM sticker from Thank You Sentiments.


I stamped my background with 3 different shades of blue Distress Ink. After stamping and adding my sentiment, I felt like the card still needed something, so I added a little glitter (with some Stickles) to the center of each snowflake.


Want some more winter coffee card inspiration? Head on over to the hop for hundreds of amazing card and project ideas!


I wrote this post while participating on the SRM Design Team.

Wednesday, December 13, 2017

Stamped Gift Boxes

You can find me over on the SRM blog today with some Stamped Gift Boxes.


Head over to the SRM blog to see all the details on how I created them.

Thursday, December 7, 2017

Kids and Dog Layout

Every year I take my kids' photos. I want the in time for the Christmas card, but I also love documenting in a bit more of a formal way how much they grow and change (and some times stay the same) every year. This year we mixed it up a bit and added our dog, Steve, to some of the photos. Today I have a kids and dog layout to share.


The photos with Steve were some of my favorite. Not only because he hammed it up in the photos, but because my kids actually smiled for real and looked natural and relaxed. Steve really is part of the family, and I'm so glad that we'll have these photos forever.


I'm trying to work through my rather large stash of paper (mostly so I have room to buy more). I dipped back into my stash of American Crafts True Stories. It may be a bit old, but man do I love the colors in this collection. I have a ton of True Stories and it's far too good to toss, so I decided to pull it back out for another round of paper crafting. You'll see it popping up in my layouts for the next month or so.


Oh, these photos! They just make me smile. Have you ever included a family pet in your annual photos? 


Monday, December 4, 2017

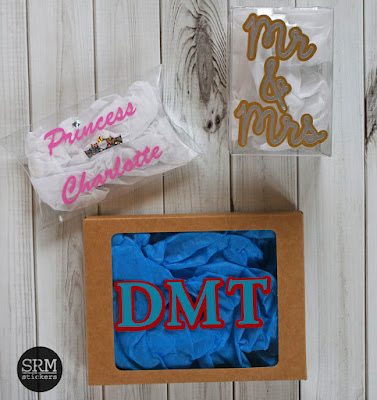
Personalized Containers

I'm over on the SRM blog today with some fun ways to personalize containers for gift giving.


Head on over to the SRM blog to get all the details on how I used SRM Vinyl to personalize these containers.

Monday, November 20, 2017

East West Bible Journaling

I'm over on the SRM blog today with some new East West Bible journaling.


Head on over to the SRM blog to get all of the details.

Wednesday, November 15, 2017

Halloween Mini Album

Ok, I know we're a couple of weeks past Halloween, but I have to get my Halloween mini album done every year before Thanksgiving. If I don't, it'll never get done.


I used Paper House Wicked Good collection. There are so many great papers and embellishments in this collection. The hardest part was trying to use all of the embellishments in one mini album (spoiler alert: I didn't use all of them, but I gave it a good effort!).

I kept my album really simple this year. I printed out my favorite photos in whatever direction the were going (horizontal or vertical) at the 3 1/2" x 5" size. I cut all of my paper to 4" x 6". Then I just put my book together sticking in both horizontal and vertical pages. You get a messier, overstuffed look to your album when you mix horizontal and vertical collections. I bound my album with just one ring in the center, but you could easily ad more binding down the edge if you want a sturdier album.


Now that my Halloween album's done, I can start working on setting up my December album! 

I wrote this post while participating on the Paper House Design Team.


Friday, November 10, 2017

Project Pad Home Decor

Hello! I'm playing around with Paper House Project Pads today here on my blog and on the Paper House blog. I've got a Project Pad home decor piece to share with you here, and if you hop on over to the Paper House blog, you can see some cards I created using the Hearts Project Pad.


For this 9"x9" home decor piece I used the Feathers Project Pad. I went with some redish orange feathers. I punched out about half a page of feathers and then started laying them out until I could make a recognizable heart shape (I didn't use all of the feathers I punched out, but this way I could mix and match sizes without stopping to punch more).


I used a bone folder to score the feathers down the center to give them a little more dimension. Then, I used Glue Dots® Glue Lines to attach the feathers to a piece of burlap printed Lake Life Paper House paper.


To pull in more orange, I layered another orange toned sheet under the burlap paper, and I added the "beyoutiful" orange and gold sentiment from Paper House Color Washed. I want to be able to swap out my decor as the seasons change, so I attached the whole thing to my wood pallet with Glue Dots® Removable Glue Squares®. They're strong enough to hold paper to wood, but still remove cleanly when I want to swap out the decor.


Want to see what else you can do with Paper House's Project Pads? Head on over to the Paper House blog where I'm sharing 2 cards made using the Hearts Project Pad.

I wrote this post while participating on the Paper House Design Team.
I wrote this post while participating on the Glue Dots® Design Team. 

Friday, November 3, 2017

Follow Me Bible Journaling

I'm over on the SRM blog today with this Follow Me Bible journaling.


Head on over to the SRM blog to see all the details.


Thursday, November 2, 2017

Anniversary Layout

Every year my husband and I take at least one photo while we're celebrating our anniversary. I scrap an anniversary layout from the photo, and the layouts go in their own book. It's so fun to look through and add to every year!


This year we celebrated 13 married years and went trap shooting with a group from my husband's work. We had some beautiful weather, and I always love getting to spend time with my husband in the middle of a work day!


I used some simple layers to record what we did and do a little journaling about the awesome husband he is. I primarily used DCWV's Miny Lace stack for the papers. I'm trying to use up my (very large) stash right now, so the rest of the embellishments are bits and pieces of what I had on hand.


Lately, I really like mixing black and brown. I've found it works really well if you use one color as a primary color and the other as an accent color. Here, black is one of my primary colors (with minty blue) and I used brown and pink as accent colors.


One more year and one more anniversary layout for the book!

Friday, October 27, 2017

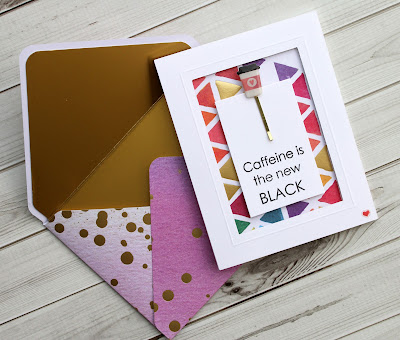
Coffee Greeting Card

Hello! Today I have a bright coffee greeting card to share. I created it just for the fun of it, with no recipient or occasion in mind. It's not too often that I do that!


 I love the papers in Paper House's Color Washed Paper Pad, so I used that as my starting point. I grabbed a coffee cup clip from Paper House Coffee and Donuts Epoxy Clips. Not only does it make a cute embellishment, but it can double as a planner clip for the recipient of the card.


SRM has a cute coffee stamp set called Coffee Plans that I then used for my sentiment. It's all held together with Glue Dots® Tape (my new favorite tape runner) and some Pop Up Glue Dots® for dimension.


I felt like this card deserved a matching envelope, so I used the 1-2-3 Punch board from We R Memory Keepers to create a quick envelope with matching liner.

I wrote this post while participating on the Paper House Design Team.
I wrote this post while participating on the SRM Press Design Team. 
I wrote this post while participating on the Glue Dots® Design Team.

Monday, October 23, 2017

Double Sided Welcome Sign

This double sided welcome sign is something I've wanted to make for a long time. I finally got it done, and we finally had some sun, and I finally remembered to grab some photos of it when the sun was out.


I am seriously lacking in cute front porch decor, so I decided I needed to work on that. To make storage easy, I made a fall sign on one side and a Christmas sign on the other. Two seasons in one sign means less to store in the off season!


On the fall side, I stained the fall side with 2 different colors of stain. I blended them together in the center of the board to give it an ombre look. I really like Minwax Express Color Wipe on Stain. They're very low odor and super easy to use.


For the lettering I used SRM vinyl in metallic gold and beige cut with the Silhouette Cameo. It's hard to tell from the photos, but SRM's metallic vinyl has this lovely matte sheen to it.


For the Christmas side of my sign, I went with a nice rich red paint. I love the pop of color this bright red brings to the front porch.


I used SRM white vinyl for the words. I'm super happy to have a few more decorations for the front of my house!

I wrote this post while participating on the SRM design Team.

Thursday, October 19, 2017

Pocket Calendar

You can find me over on the SRM blog today with a pocket calendar that features SRM's mini calendar stickers.


This calendar makes a great gift! Find all the details to make your own on the SRM blog.

Monday, October 9, 2017

Haunted House

Paper House is teaming up with Tombow this week. I'm up today with a fun Haunted House.


Supplies: Tombow Twintone Markers Brights, Wicked Spooky Moonlight, Wicked Spooky Ghosts, Wicked Spooky Washi Tape, Wicked Spooky Halloween Flake Stickers, Wicked Spooky Halloween Epoxy Stickers


I used Paper House's Wicked Spooky collection to paper over the chipboard house. I did a simple trace and cut of all of the sides. To get the detailed pieces (like windows and doors) cut out, I used a PenBlade.


Instead of papering over the roof, I used coordinating washi tape from Paper House. This not only gives the roof a different texture than the rest of the house, but it also the roof a shingled look due to the multiple strips of washi.


I always have bits of chipboard showing at the edges whenever I paper over something like this, so I used my Tombow Twintone Markers to color over any chipboard that was peeking out and trace the edges of the house, the windows, and the door. This step gives the house a much more finished look.


Wicked Spooky Flake Stickers and Epoxy Stickers were used to add the final decorations to my haunted house.


This little haunted house is going to make a great addition to my Halloween decor!

I wrote this post while participating on the Paper House Design Team.
I received Tombow Markers in exchange for their use during the writing of this post.

Friday, October 6, 2017

Colorful Colorado Layout

This summer we got to take road trip to Colorado. We lived there for 7 years before we had kids, so it was a really fun chance to show the kids why we loved Colorado. When we were getting close, my husband said, "You want to stop at the Colorado sign? It'll make a great picture." It was a great idea and a perfect way to kick off our trip. Here's my Colorful Colorado layout that I created with that picture.


Paper House's Discover USA is one of my very favorite collections. I love the bright colors and fun, regional patterns.


I really wanted to use this great USA patterned paper, but I'm not usually very good at using patterned paper with such a large focal print on it. I go the idea to stitch our route from Iowa to Colorado onto the map.


A single photo with journaling and a small cluster of embellishments seemed like the best way to highlight the photo but still be able to see the large map on the patterned paper.


This Colorful Colorado layout is pretty simple, but I love the way it turned out!

I wrote this post while participation on Paper House's Design Team.