Friday, July 29, 2011

Quick Card

I'm off to go do a little scrapping, but I thought I'd stop in here first and post a card that you can check out at A Walk Down Memory Lane in person (if you live in the area). If you don't live close, you'll just have to take my word for how sparkly it is.


This card was made with the Cosmo Cricket/Unity Delovely Whimsy stamp set. I love stamping on kraft card stock, there's just something lovely about it to me. The pear is also from that set. After stamping the pear I colored it in, put Score-tape over it, and covered it in Glitter Ritz warm highlight glitter. Finally, I cut the pear out and attached it to the card with foam dimensional adhesive. It sounds like a lot of steps, but it's actually a really fast, easy process...and totally worth the end result. Not only is the pear super pretty in person, it hast this great velvety texture, and the glitter doesn't rub off when you touch it.


Alright, I'm off to be creative for a little while. Have a lovely weekend!

Wednesday, July 27, 2011

Altered Art Challenge

This month Glue Dots® challenged its Dottesses to create some altered art. Well, I just happened to have a frame sitting around...I decided to make this piece of altered art. This is going to my (adult) sister who we've always referred to as princess. She also works and volunteers for Make-a-Wish, so it works perfectly for her. However, I'm thinking it would be a fun craft for little girls, too.


I started by gathering up the stuff I figured I would need...usually I miss a thing or 2 and end up grabbing a few things I won't need...but here's the official list of what I actually used to make the frame:


Frame
Glue Dots® (Micro, Mini, Memory Book)
Patterned Paper (Pebbles Ever After)
Rhinestones
Other Embellishments (SRM Stickers Princess)


Often, when altering art, I find that I must destroy it just a little to ready it for alteration. Here I used a butter knife to pry the back (which had been glued on) off of the frame.


When "artfully" destroying something, it's best to decide ahead of time where it is acceptable to have damage, and where it isn't. For example, I tried to avoid damaging the frame, but it was okay if the backing was torn up a bit, as my plan was to paper over it anyways.

I used Memory Book Glue Dots® to attach a new piece of paper to the back of the frame.

Then I used more Memory Book Glue Dots® to attach some more layers to the back.

After putting the back of the frame back onto the frame, I used Micro and Mini Glue Dots® to adhere rhinestones to the outside of the frame. I also used Mini Glue Dots® to attach the S monogram to the outside glass of the frame.

I decided to use my leftovers to create the matching wand. The plastic wand itself is from SRM Stickers. If you'd like learn how I made the top (folded) part of the wand, you can find a tutorial on my blog here.

I wrote this post while participating on the Glue Dots® Design Team.

Tuesday, July 26, 2011

Authentique Layouts

I have 2 layouts I would like to share today. I have so much I want to say about them, so I'll try not to jump around too much, but I'm not making any promises. First let me say, the second I saw Authentique's lines, I knew I had to have them. On the up side, A Walk Down Memory Lane ordered them right away. On the down side, I think the owner, Lisa, is enabling my paper addiction :-) If you haven't laid eyes or hands on this paper yet, let me tell you, you're going to love the look AND feel of this paper. The texture is nice and thick (think My Mind's Eye). I bought 2 of the lines and have them stashed for use on my Italy scrapbook (when I get as far as my Rome photos). However I had to buy some to use right away, and since I hadn't picked up any of the Splendid line, I grabbed that.
Okay, now to actually show you a layout:This line is really a "Jack of all trades". It lends itself nicely to distressing, and this rough style of layout, but it would be just as lovely used on a pretty, frilly layout or card as well. Kind of fun to think of all the possibilities.
I feel like this layout is really "me". I'm sort of in love with using photo collages lately. I tend to scrap with layers, and like to mix and match lots of patterned papers. I tried to make the journaling stand out a bit by adding word stickers into it. I like the effect, and it was kind of fun to do, too. I should mention the photos were all taken at the beginning of July when my boys, my husband, and I went for a ride on my grandparents' golf carts. Such great memories!


After I finished the above layout, I had another golf layout to do. I decided I would step (way, way) outside my comfort zone and try some different things on my layout. I'm not sure I love it, but I like it well enough, and I figure you'll never grow if you don't try. So, here it is:

It's definitely a bit grungier and more free form than what I usually do. I did do a fair bit of hand stitching to ground the different elements and tie them together. One of my favorite things about this layout is where I ripped it out to reveal a different paper underneath. It was a little scary to rip up my layout, but it was fun too. One other note: don't be afraid to change pre-made titles and stickers to say what you want them to say. For example, the strip beneath the center photo says, "a wonderful moment". Originally it said, "a majestic moment". While I liked that saying, it didn't really work for this layout, so I used a word sticker to change it. To make it look intentional, I added other similar word stickers to the layout in other places.

Alright, I think that's everything. Thanks for hanging in there through a post that's a little on the long side.

Saturday, July 23, 2011

I'd Rather Be Fishing


The title says it all for me on this one. My oldest was especially excited about fishing, and pretty patient about it, too. He caught his first fish this year, which was quickly followed by his 2nd and 3rd fish. My youngest, who isn't quiet as patient still managed to catch his first fish shortly after his brother did. I used what was left of my American Crafts' Campy Trails line on this layout. I really didn't want to "waste" any of this line by letting my leftovers just sit on my paper shelf. I used my We R Memory Keeper's Sew Easy tool to speed along the stitching around the edge. The fabric brads are from American Crafts' Hello Sunshine line, but just happened to work well with this layout. If you haven't used these brads before, I'd just like to point out that they're flat instead of rounded on top. It makes them lie much nicer inside of a page protector or in an envelope if you use them on a card.

Thursday, July 21, 2011

Magical Moments

As you know, it's not too often that I get to scrap "girlie" things, but when I do I like to make sure I do it up right. For example, what 's girlier than princess crowns, Cinderella castles, and lots of pink?

I stumbled across this photo of my sister and me in front of Cinderella's Castle at Walt Disney World (my parents instilled a love of Disney in us at a very early age), and I knew that Pebbles Ever After line would be perfect for scrapping it. Add a butterfly, some flowers, and a few rhinestones, and you have a perfectly girlie layout.

Wednesday, July 20, 2011

A little knitting

Paper crafting takes up most of my allotted "craft time". However, once in a while I get the itch to bust out the knitting needles or spinning wheel just to make sure I haven't forgotten. You see, back in college, I thought it would be fun to learn how to knit, so my Grandma taught me (she learned how to knit from her mother). Not too long after that, I stumbled across this amazing yarn and fiber shop in Fort Collins, CO (where we used to live). There I learned how to spin. Then I had a baby, and as he grew, he thought the spinning wheel seemed like a very fun toy, so the spinning wheel was relegated to a dark corner of my bedroom to be taken out again, "some day." Then I had baby #2 and decided scrapbooking would be fun. Little did I know I would fall head over heals in love with it...which would take up most of my crafting time. But, like I said, once in a while I like to take out the spinning wheel or my knitting needles just to make sure I still remember how to spin and knit, because some day I'll have more time...right?


I'm thinking about making a few of these for Christmas presents. It's about 5 1/2" across from point to point. I've made it into a pin so it can be fastened onto a coat. I'm just picturing it on my grey wool winter jacket. I also have this picture in my head of it attached to a fabulous wool purse...maybe I'll just have to take out my needles again some time soon to knit one.

Here's hoping you find time today to indulge in a little creative time of your own.

Tuesday, July 19, 2011

How to Eat a Marshmallow

Some things you just have your camera ready for. My youngest has eaten his fair share of s'mores, but this was first time he ate a good 'ole fashioned toasted marshmallow. While he ate, I stood there snapping away.


I used American Crafts Campy Trails for this layout. I had the papers and ribbon left over from this pop up mini album I created for A Walk Down Memory Lane. However, I had to run to the store to pick up that fun "so stinkin' cute" badge. My layout definitely would not have been complete without it.
I took close up of the badge and stitching, so you can get a better look at that part of the layout. The twine is from May Arts (I believe they call it twisted burlap). It's a little bit harder to stitch with than thread, but totally worth it for a rustic layout like this. I just wanted to mention, that if you're thinking about trying it, make sure to pierce your holes a bit bigger than normal, and use a thicker needle (with a large eye for threading) than usual. It also works best if you work with shorter strands. I used a strand that was about the length of my arm from my shoulder to my wrist. If you use too long a piece, the twine will start to gather and bunch in weird places.


Tomorrow I'll be back to mix things up with a knitted craft instead of a paper craft.

Monday, July 18, 2011

Big Kid


I have to admit, I fell in love with this photo the second I saw it. However, I also had one of those, "wow my baby's growing up" moments too. I chose the title "big kid" for this layout, because he's really starting to look like a kid instead of a little guy.


As you can see, I'm on a bit of a My Mind's Eye American Made kick right now. I'll be back with a layout tomorrow that uses a different paper, I promise!

Saturday, July 16, 2011

My New Favorite Holiday?

Ask me what my favorite holiday is and it used to be an easy answer for me: Christmas. Notice I said "used to be". The 4th of July is quickly becoming a contender for favorite holiday. For the last 2 years, we've head to my parents' lake house to swim, boat, fish, roast marshmallows, and have some quality family time.
My favorite part is going out on the boat to watch the fireworks. As you'll see from the layouts my oldest loves to get all dressed up in patriotic gear for the occasion. Love that kid!

Both layouts use My Mind's Eye American Made paper. I am totally in love with this collection. I can't imagine a better patriotic line.


For this layout I made some mini versions of the star medallions from this tutorial I did for Glue Dots®. Instead of 1/2" folds I did 1/4" folds and used smaller strips of paper (about 4" x 7 1/2" and 3" x 6 1/2").

Have a great weekend!

Thursday, July 14, 2011

SRM Stickers

I was thrilled to win all of SRM's new stickers (the ones they're debuting at this up coming CHA!). I've only had a little time to play around with them, but it's been a lot of fun. I was resistant to stickers at first, being a stamp girl and all, but when I tried out SRM stickers for the 1st time about 6 months ago, I was hooked. I won't be throwing out my stamps any time soon, but SRM stickers make a really nice addition to my craft arsenal. They go on like butter, and make putting cards together quick and easy.

The above card took all of 5 minutes and a little Fancy Pants Paper.

Even though it's a bit early for Christmas, I think this one (made with Fancy Pants Tradition paper) is my favorite of the bunch.

I don't have a Bar Mitzvah to go to any time soon, but stickers and stamps that celebrate Jewish heritage and beliefs are awfully hard to come by. This basic set makes customizing a card or gift really easy. The "Mazel Tov" strip on the inside is only adhered on 3 sides to form a pocket to slip a check, money, or gift card in. Oh, and P.S. the paper is from My Mind's Eye Lime Twist and is 25% off at AWDML right now.

Finally, I had to show off the stickers in combination with some Glitter Ritz glitter. It's tough to photograph, but in person this card sparkles. The whole cake layer is covered in Glitter Ritz Warm Highlight Glitter. LOVE that stuff!

I just finished scrapping a few photos from our 4th of July fun. I'm hoping to get those up on the blog tomorrow...if I'm not too tired. This very excited (nerdy) lady is headed to the Harry Potter midnight showing tonight! I'll get home way past my bed time, but it's totally worth it.

Wednesday, July 13, 2011

Taking Some time to Stamp

It's been a long time since I sat down with some stamps just for fun. Lately it seems like I've only been using my stamps for greetings on cards. Since stamping is what originally introduced me to the world of paper crafting, it seems a bit of a shame that I've been neglecting my stamps. Moxie Fab World has a Stamp It! challenge, and it just felt right to play along. I've got a card and a tag today.


Lawn Fawn is hands down one of my favorite stamp companies. It's a good thing I have at least a little self control, or I would own every one of their stamp sets. This adorable bike is from a set called Cruising Through Life. I'm a Copic novice, but I LOVE coloring on kraft card stock with my Copics.
I stamped the "hi" greeting on another one of my faves, stick pin flags. The paper, flags, and flower brads are all from The Girls' Paperie Jubilee collection.


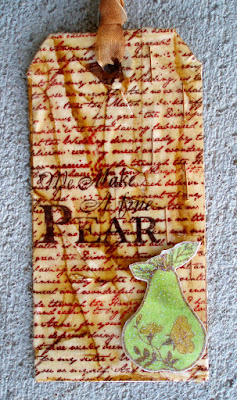
I've made a very similar tag to this before. However, this time I just had to try out covering that pear with my new Glitter Ritz warm highlights glitter. Gotta love a glitter that doesn't rub off easily.

The background is a tag, covered in ripped and layered masking tape. I sponged brown ink onto the tape, stamped it with a Glitz Designs word background stamp, and then sealed the whole thing with a thick coat of Glossy Glaze. When that was dry I stamped "We make a fine Pear" with staz-on ink directly onto the tag. The pear was stamped, colored in, covered in glitter, cut out, and adhered to the tag. The pear stamp is from Mark's Finest Papers.

It was fun to get a little inky, but tomorrow I'm going to switch things up with some cards made using SRM Stickers.

Monday, July 11, 2011

Treat Pockets


Usually I have a reason for creating something, but this little project is a "just because". I was playing around and thought it might be fun to make a little treat pouch.

I realized when it was finished that I didn't think to take any step-by-step photos, but here are the directions just in case you want to try this little project out for yourself.

~ Cut paper to 4" x 7" (I used Jillibean Soup Watermelon Gazpacho)
~ Score large fold at 2 3/4"
~ Turn paper and score both long sides at 1/4".
~ Trim the longer 1/4" scored sections (4 1/4" section) from the top down to the center score line.
~ Fold the remaining 1/4" scored areas around the back side and secure with Mini Glue Dots® to create pocket.
~ Round corners.
~ Embellish

Notes:
Finished size is 3 3/4 x 4 1/4"

Saturday, July 9, 2011

June Featured Manufacturers


Don't forget to swing by A Walk Down Memory Lane this month (in person, or on-line). The featured manufacturers are My Minds Eye (one of my personal all time favorite companies) and Kaiser Craft. Below are 2 of my favorite projects that I created for the store with My Minds Eye.

This layout is so much better in person. The damask patterned paper is flocked, and oh-so luscious to touch.

Being You
Paper: My Mind’s Eye Lush 2 (Turquoise Polka Dot, Turquoise Damask, Navy Polka Dot)
Accessories: My Mind’s Eye Lush 2 Navy Trims, Lush Decorative Brads (Blue), Cosmo Cricket Tiny Type (Navy), Bella Blvd Sunny Happy Skies Blurbs, Basic Grey Alphas, Imaginisce Brad Daddies (medium)
Tools: Imaginisce I-top, Imaginisce I-top Punch, Tattered Angel Mist, Fiskars Uppercrest Punch


And, I can't resist a good 6" x 6" paper pad for creating a mini. My boys and I walk a few times a week at a trail in our town when the weather's nice. I took my camera along one day to commemorate those walks.

Walking the Trail Mini
Album: Little Yellow Bicycle Banner Chipboard Album
Paper: My Mind’s Eye Lime Twist Out of the Blue 6 x 6 paper pad
Ink: Tim Holtz Broken China
Accessories: Lush 2 Navy Trim, My Mind’s Eye Lush 2 Brads (Orange), My Mind’s Eye Lush Brads (green), Jillibean Soup Watermelon Gazpacho Card Stock Stickers, Simple Stories 100 Days of Summer Expressions Card Stock Stickers, Echo Park Little Boy Alpha Stickers, Inkssentials White Journaling Pen, May Arts Twine By the Yard, Jenni Bowlin Vintage Sew-on Buttons (red, green), Maya Road Trinket Pins Leaf, Hero Hues Dots (Blue), Imaginisce I-rock Pearls
Tools: Inkssentials Sponging tool, Fiskars Uppercrest Punch, Imaginisce I-Rock

Wednesday, July 6, 2011

Rainy Day


Most of the time, I buy paper with a photo or 2 in mind. However, when I saw It's Raining It's Pouring by Nikki Sivils, I knew I didn't have any photos, and I still had to buy it. It was just too cute to pass up. So...it's been sitting in my craft room. I considered sending the kids out in the rain to play, just so I'd have photos, but for authenticity sake, I didn't force photos. I waited...and waited...and then, one rainy day (in the middle of about 5 rainy days) I took out a big long roll of paper, taped it to the floor, and let the boys go to town on it with markers. Of course, I took photos...and my "What to do on a Rainy Day" layout was born!


Just in case you haven't reached your quota of cute for today you can check out the new Nikki Sivils Scrapbooker lines that will be released at Summer CHA by clicking here. They are, like all things Nikki Sivils, ridiculously adorable!

Sunday, July 3, 2011

Play Ball


I think this may be my 1st sports layout. With 2 active boys, I know it's only the first of many! This was a pretty simple layout. I layered up papers from Scrappin' Sports and Crate Paper. I distressed and inked the edges to give it a grungier feel. Added a bit of stitching, and topped it all off with KI Baseball Puffies (I really love Puffies!).

Friday, July 1, 2011

Water Balloons


This year, my boys love having water balloon fights. It's always so much fun. I knew LYB's Sweet Summertime would be perfect for capturing the fun. Liz Qualman's sketch became the perfect base for this layout. Here's to summer fun!