Monday, August 29, 2016

Masculine Shaker Card

I really love shaker cards. It's a trend I hope never truly goes away. They're fun to make and fun to receive. I have a nephew who has a birthday coming up in about a week, so I decided to make a masculine shaker card for his birthday.


I had picked up some Jillibean Soup Fur Fusion to scrap some pictures of our lab, Steve, but I've really fallen in love with the colors and patterns in this collection. I decided to use it for this birthday
shaker card, and as you can see, it works great for non-pet themed projects, too.


There are a number of different ways to make shaker cards. One of my favorite ways is to use the We R Memory Keepers Photo Fuse Tool. Start by cutting two pieces of fuse material (a scrapbook page protector) to the needed size. Fuse the two pieces together on 3 sides.


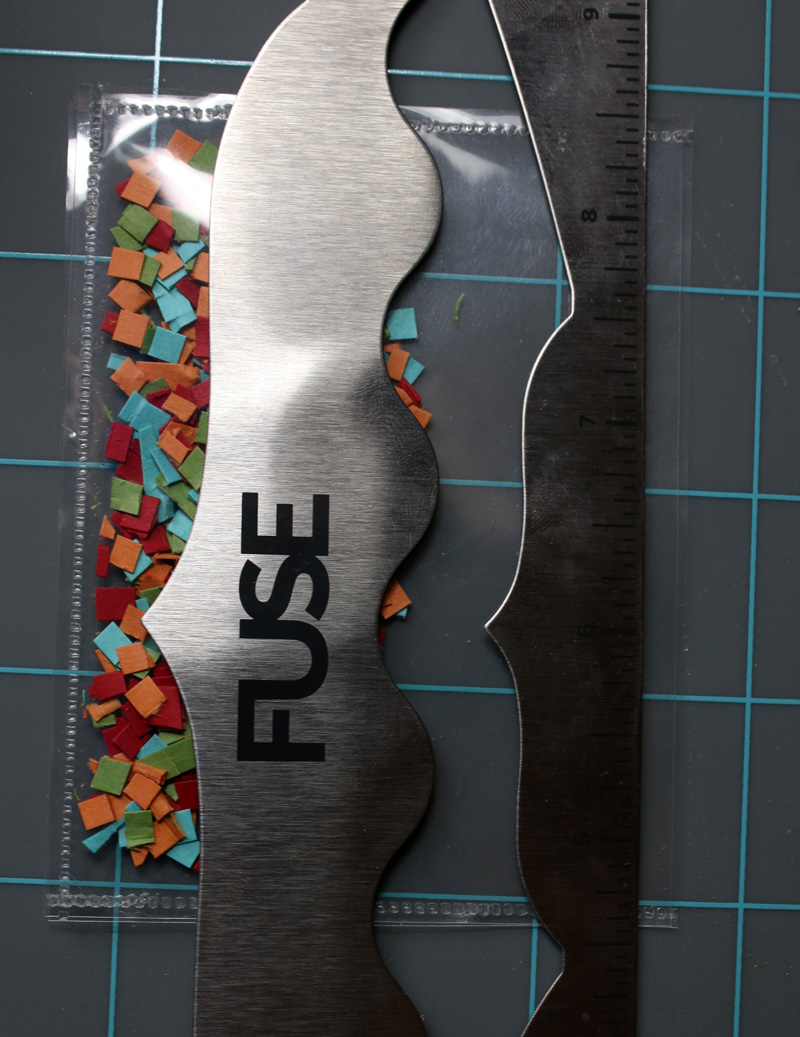
Fill your pocket with shaker material. I felt like sequins wouldn't look very masculine, so I cut a bunch of confetti pieces out of coordinating card stock using my fringe scissors. Then all you have to do is use the Fuse tool to seal the last edge of the shaker pocket.


I used the "happy" mini placemat from Jillibean Soup's Healthy Hello Soup collection as the window for my shaker. I added a "Birthday" sticker from SRM's Planner Icon Stickers to make it a happy birthday card.


I'm hoping this masculine shaker card brings a smile to my nephews face for his birthday. Have you made a shaker card?

Wednesday, August 24, 2016

Healthy Hello Soup Layout

One of our favorite 2 day trips to take during the summer is down to Omaha. We only live about 3 hours away, and we like to make it an overnight tirp and spend some time swimming at a hotel and wandering around Omaha one day and visiting to the zoo the next. Today, I'm scrapping one of my favorite pictures from that trip with Jillibean Soup Healthy Hello Soup.


There's a bridge in Omaha that you can walk out on and be in both Nebraska and Iowa at the same time. We get a kick out of standing in both states and getting a picture. It also helped that it was a gorgeous summer night with a beautiful sunset!


Healthy Hello Soup has these great acrylic shapes as part of the collection. I was planning on using it in it's natural clear state, but my layout really needed a pop of color. I ended up coloring the acrylic shape (the word "memories" up above) blue with an American Crafts blue Slick Writer marker. I love how it turned out. In person it has this great translucent, almost stained glass look.


I also really like the mini placemats from this collection. Not only are they great for pocket style layouts, but they make fun embellishments and journaling tags, too.


This Healthy Hello Soup layout was a really fun way to scrap one of my favorite photos from our recent overnight trip. Where's one of your favorite places to jet of to for a quick get away?

Friday, August 19, 2016

Home State Sign

I'm slowly working on a gallery style wall on what is a very large blank wall in our house. It's coming together with a mix of things I already had, a few things I've recently bought, and of course, a few things I'm making. Today, I have a home state sign that I made for my gallery wall.


I was inspired by one of my favorite t-shirts from My State Threads.


Just in case you notice that the states are different - I grew up in Wisconsin and much of my family still lives there. It will always be home. I've lived in Iowa for 9 years and built my family here. Most of my husband's family lives in Iowa, so it too is home.


Onto the making of my Home State Sign. I started with a USA Wood Plank from Jillibean Soup. The sign itself measures about 13.5" long by 11.5" tall. I wanted to paint my "home" in blue, but I really wanted it to pop on the dark wood, so I decided to outline "home" in white paint. To accomplish this, I stenciled the outline first and then overlaid it in blue. I created my "home" in Silhouette Design Studio. I had 2 cut files. One for the larger outline "home" that I painted in white, and a smaller one for the blue "home".  I cut both stencils from SRM vinyl with my Silhouette Cameo.


The color of the vinyl doesn't matter, since I'm using the vinyl as a stencil. The pink vinyl above is the stencil for my white paint.


After the white paint dried, I layered on my second stencil (also cut from SRM Vinyl) for my blue paint. This part wasn't as tricky as I thought it might be to get lined up. 


When I pulled off my second stencil, I was left with "home" that really pops on the rustic wood sign.


There's a cute little wood heart pin that comes with the sign. I finished up the sign by placing the pin into the little corner of Iowa where we live. I can't wait to get this Home State Sign up on my gallery wall. What state is home for you?

This is a personal blog. All editorial content and projects are intellectual property of Taylor Stamped. I  receive material product from SRM Stickers to develop my craft posts, but all ideas and opinions are my own.

Monday, August 15, 2016

Masculine Birthday Card

My dad's birthday was at the beginning of August, so of course I needed a masculine birthday card. One of my favorite birthday stamp sets right now is Altenew Birthday Greetings, so I grabbed it to see what I could come up with.


I like that even in a simple birthday greeting stamp set, Altenew offers some options for layering up stamps to create some depth. In this set there is a balloon stamp and a stamp to create the effect of light shining off the balloon. I decided to use those stamps to create the background for my card.


To keep a masculine feel to the card I wanted to keep the colors a bit more masculine so I used blue, orange, and yellow. I used 2 shades of each color, one lighter and one darker. I stamped the balloon first in the lighter color, and then the shadow on the balloon in the darker shade of the same color.


I finished up with a simple birthday greeting. A straight font also helps lend a masculine feel to the card. When is the last time you had to make a birthday card for a guy in your life?

Tuesday, August 9, 2016

Happy Camper Layout

We've done a lot of camping this summer...which is why I've been a bit bad about blogging this summer. While I'm not looking forward to school starting (we just have waaay too much fun in the summer), I am looking forward to a little more time in my craft room. I did get a chance to scrap a few photos from our first trip out camping this summer. Here's my Happy Camper Layout.


In a strange twist, I'm actually in these photos and my husband isn't. Usually it's the other way around! I'm not sure who loves camping more; the kids or the dog!


I'm always looking for good camping lines, so months ago I snapped up My Mind's Eye Happy Camper when it hit the shelves. Besides the gorgeous, rich colors and fun patterns, there are a ton of fabulous embellishments. I used a lot of them by bunching them up in little clusters, but I hardly made a dent in my stash. Which is okay, because you'll be seeing many more layouts using this collection soon.


As you can see, there's everything from chip stickers, to enamel shapes, to die cuts. There are even some fun brads that I didn't get a chance to use on this layout. 


If you like to camp, or even just go on some fun hiking adventures, Happy Camper is a fantastic collection. What's the best adventure you've been on so far this summer?

Tuesday, August 2, 2016

Decorating a Flower Pot with Vinyl

I am over on the SRM Blog today with a fun home decor project. I'm sharing a few tips and tricks for decorating a flower pot with vinyl.


Head on over to the SRM blog for all the details!

Monday, August 1, 2016

Basketball Box Card

I love making 3-D box cards with my Silhouette. They're pretty easy to make, are super customizable, and are just darn cute. One of my nephews just turned 17 over the weekend, so I whipped up a basketball box card for him.


Not only does he love basketball, but he's pretty good player, too! Our school colors are orange and black, so that made color choice easy for me. I wanted to make sure it felt like a birthday card, too so I decorated the box with some coordinating black and white birthday paper from Pebbles Inc Birthday Wishes.


I needed somewhere to stash a little birthday money, so I created a small pocket with the We R Memory Keepers 123 Punch Board and stuck it inside the box, too.


One more note about these box cards, they fold down flat, so you can mail them! If you have a Silhouette, check out the box cards in the online store. They really are fun and easy to make. If you have made one I'd love to hear what theme you made!