Friday, July 29, 2016

Using the Mini Alphabet Punch on a Layout

Summer gets soooo busy! I'm been trying really hard to make a few minutes here and there to sneak off to my craft room and scrap a page. I popped into my craft room the other day and manages to make a quick layout of a photo from earlier this month. I also got to use my We R Memory Keepers Mini Alphabet punch again, and let me tell you, using the mini alphabet punch on a layout is lots of fun! 


We were in Wisconsin vacationing at my parents' place. This is a photo of my parents and my boys after we got home from church. I have so many photos from vacation, but this one felt like a good place to start. I wanted a great big title, so using the WRMK Mini Alphabet Punch was perfect for this. I needed the letters to pop a little more on the page, so a inked the edges with a bit of gray ink. 


For my paper, I ended up with a mix of Bella Blvd Color Chaos and Doodlebug Love Bugs. Aqua, gray, and red is always one of my favorite color combos.


 I kept my embellishments clean and simple with stickers from SRM's Labels by the Dozen Valentine, Sticker Sentiments Love, and We've Got Your Border Bright.


Have you used the WRMK Mini Alphabet Punch yet? I've now made a banner with it, dressed up an envelope with it, and created a layout title. I can definitely tell this is going to be one of those tools I reach for a lot!

Tuesday, July 26, 2016

Shrimp Boil Layout

Every year over the 4th of July weekend, my dad makes an incredible shrimp boil. We look forward to it every year! Every year, after we're all done eating, we remember that we should have taken some photos. This year we (well, my mom) finally remembered to take some photos, so of course I needed to make a shrimp boil layout.


We didn't have this meal on the 4th of July, but we had it over the holiday weekend, so I decided to grab some patriotic paper. I used Simple Stories Stars and Stripes collection kit. This collection came out last summer, but I can't help but love the rustic feel of it!


I added some red and blue enamel dots in addition to the stick embellishments that come in the collection kit. I used some Pop Up Dots to attach the journaling tag to the layout. It adds a bit of dimension to the page.


I'm happy to finally have some photos of this fun tradition, and even happier that I have this shrimp boil layout scrapped and in an album! Is there a family tradition that you have that you just keep forgetting to get pictures of?

Thursday, July 21, 2016

Simple 2 Page Layout

I took a bit of a break from blogging for the past week or so. Honestly, it wasn't on purpose, summer just got the better of me. I've been creating a bit still, but I just haven't gotten around to sharing it. Today, I'm getting back into blogging with this simple 2 page layout.


I needed a 2 page layout for my photos from Belfast. I decided on the super pretty My Mind's Eye Hello Gorgeous collection. There are pretty florals grounded with jade greens and soft sages. There are even pops of glitter on some of the patterns.


I layered up a few large squares of the patterned paper. To add some interest and pops of color, I added some large triangles in the corners made up of a glittery floral from Hello Gorgeous.


I had some memorabilia to scrap from the day as well. I wanted to save my map of Belfast. I added it in a pocket that has been Fused to my page protector. You can see a tutorial for how to make a memorabilia pocket with the Photo Fuse here.


 I finished up by adding a few titles on some enamel shapes to my simple 2 page layout.


Friday, July 8, 2016

Lots of Patterns

Happy Friday! I'm on the tail end of vacation, but wanted to share a quick layout. I really love mixing and matching patterned papers. Today I thought I share a layout that has lots of patterns in it, and talk a little bit about my thought process and why I think they all work together.


I never want the important stuff (like my photos and journaling) to get swallowed up by all the busy patterns. I've found one of the best ways to make your photo pop on a layout is to make sure the mat the photo. For this layout, I chose a bright color to help the photo stand out. Clustering embellishments around the photo also helps draw the eye to the photo.


I started this layout with the fun, bright striped paper from Elle's Studio. It has a lot of colors going on, so I wanted one of my other patterned papers to be more neutral. The grey star paper is still patterned, but reads a bit more like a neutral since it's light grey on dark grey.


All of the embellishments also pull their color palette from the stripped paper. To keep things looking cohesive, I chose to mirror the stars from the grey paper in some of the papers (like the strip below).


I love working with lots of patterns with scrapbooking. What's your style?

Tuesday, July 5, 2016

Sweet Summer Mini Alphabet Punchboard Banner

This is a personal blog. All editorial content and projects are intellectual property of Taylor Stamped. I  receive financial compensation and material product from American Crafts to develop my craft posts, but all ideas and opinions are my own.
I got my hands on the new We R Memory Keepers Mini Alphabet Punch Board, and have had some time to play around with it now. You guys, it is so much fun! There are so many ways to use these smaller letters; cards, layouts, party decor...and today I'm using it to make a Sweet Summertime Mini Alphabet Punchboard banner.


This board works just like the original Alphabet Punch Board, but starts with 1 1/2" x 2 1/2" rectangles of paper for a smaller set of letters. It's super easy to use, and becomes really intuitive after a few letters...but don't worry if it doesn't become intuitive, there's a step by step guide for making each letter.


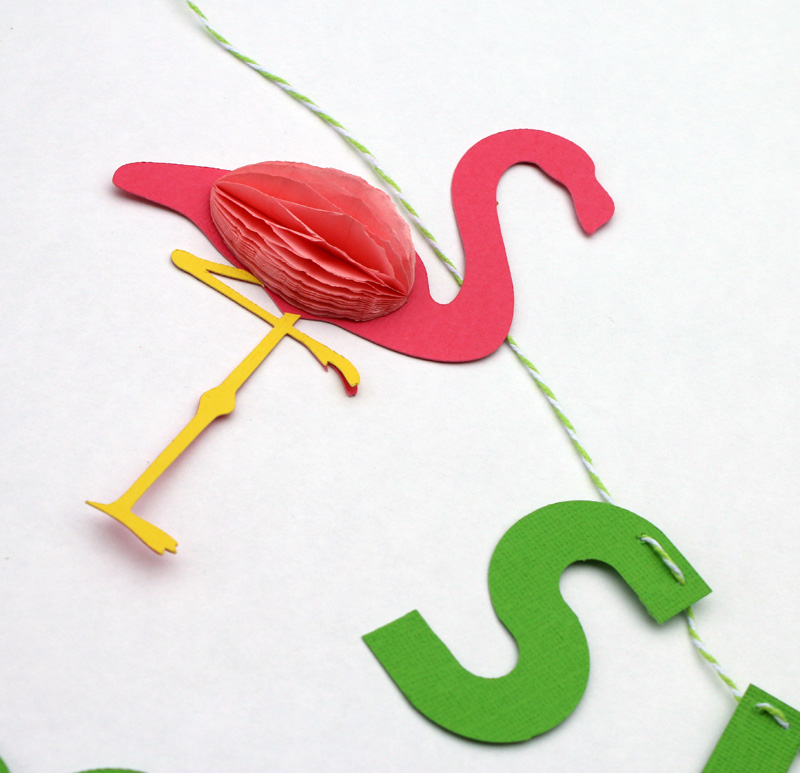
It only took me a few minutes to create my letters for my Sweet Summer banner with the Mini Alphabet Punch Board. Since creating the letters was so fast, I decided to dress them up with a few summery icons.


I used my Silhouette Cameo to cut some flamingos and pineapples, because what says summer more than flamingos and pineapples?


Then I added some fun dimension to them with the We R Memory Keepers Honeycomb Stencils and some Honeycomb paper (yellow for my pineapples and pink for my flamingos). They turned out so cute! A little honeycomb paper adds so much.


I pierced little holes through each letter, and used some bakers twine to string it all up. Now I have a bright new summer banner to hang up.


If you're loving this new Mini Alphabet Punchboard, you can pick it up from HSN on July 6. HSN is having a 24 hour craft event on July 6, and there will be live demonstrations during the day of this super fun and versatile new tool. You'll be able to see live how easy it is to use (and order one for yourself!). 

Friday, July 1, 2016

Stamping on Yupo

I've talked about creating a marbled background with Yupo paper, die cutting Yupo paper, creating an alcohol drop ink background on Yupo, now today I want to talk about stamping on Yupo.


I started my card by creating a marbled Yupo background with Copic markers. Then I used and Echo Parke die to die cut the edge. Finally, I stamped a simple greeting on the card.


 Since Yupo is a plastic paper, you can't use just any ink on the card. I have tried a few different kinds and found that Ranger Archival Ink works the very best. Give your stamped greeting or image a full 20 minutes to dry, and you'll be good to go! I did try Stazon Ink, and that worked as well. However, if you want to color an image in with Copic markers after stamping on Yupo do not use Stazon. Stazon and Copics don't play well together, and you can ruin your Copic marker.


As you can see, there are lots of fun ways to use Yupo! Have you tried any of these techniques yet?