Every few months May Arts host a challenge. There's always a theme (this time it was nautical) and a group of ribbons to choose from to create something. I got to play along this month, and here's what I came up with:
I created a nautical summer
serving tray to use outside during backyard BBQ's. My favorite element
is the red and white anchor that I cut from Solid Stripes 365-2-14 ribbon. There was no solid bottom to the tray, so I cut a piece of cardboard the size of the bottom, covered it in Fancy Pants Down By the Shore paper and added ribbon details. I set the paper and thin ribbon with a spray on polyurethane sealer so the bottom of tray will be water resistant and I can wipe it clean with a damp cloth if needed.
If you head on over to May Art's Blog today, you'll get to see all of the contest entries. If you've never played along with a May Art's challenge before, I highly recommend it. They're always lots of fun!
Showing posts with label may arts. Show all posts
Monday, June 17, 2013
Wednesday, April 3, 2013
Scrapping from the Archives
I didn't start scrapbooking until a few years ago, so once in a while a break out an old photo of my kids or even myself to scrap. Authentique's Renew collection seemed perfect for one of these trips back in time.
Yup, that photo's nearly 10 year's old now, but it's a great photo to have scrapped for those trips down memory lane, and the soft colors of Renew seemed just right, plus those paper frames were really fun to layer up!
Thanks for stopping by!
Yup, that photo's nearly 10 year's old now, but it's a great photo to have scrapped for those trips down memory lane, and the soft colors of Renew seemed just right, plus those paper frames were really fun to layer up!
Thanks for stopping by!
Labels:
Authentique,
may arts
Saturday, December 1, 2012
12 Days of Christmas

The 12 Days of Christmas has begun over at A Walk Down Memory Lane. Each day from today until December 12 you'll find some amazing deals and some inspiring holiday projects. You can check out day 1 by clicking here.
I created the project for day 1, and it might just be one of my favorite Christmas Creations. I'll give you a little sneak peak here, but you'll have to head on over to AWDML's blog to see all the close up photos and check out the supply list.
...and don't forget to check out AWDML's blog each and every day from now until December 12 for a new project and a new deal.
Labels:
Echo Park,
Lifestyle Crafts,
may arts,
maya road,
The Twinery
Thursday, October 25, 2012
Santa's Key
I'm continuing to try to work ahead on my Christmas projects this year.
We don't have a fire place, so this year I decided to make a magic key for Santa to use. You see, when Santa picks it up it magically turns into the right shape to fit the lock on our front door.
I used some of my favorite ribbons from May Arts for this project (they can be found by the yard at A Walk Down Memory Lane's Brick & Mortar Location).
To create the red bow, I cut 4 pieces of the red ribbon about 7" long. Then I secured the ends into a loop shape with an Ultra Thin Glue Dot®. I added another Glue Dot® to the inside seam of the loop and pinched it to create a bow shape. Then I layered all 4 loops on top of each other (securing each loop to the next with a Glue Dot®) into a large bow shape.
When I completed the bow I sewed it in place on the key. I also embellished the key with stickers from Simple Stories Handmade Holiday, Echo Park This & That Christmas, a snowflake punched from Pow Glitter Paper with this punch from Martha Stewart, a Prima Crystal, and last but not least a Christmas Token from Tim Holtz.
I can't wait to show this to my boys when it gets closer to Christmas time!
I wrote this post while participating on the Glue Dots® design team.
We don't have a fire place, so this year I decided to make a magic key for Santa to use. You see, when Santa picks it up it magically turns into the right shape to fit the lock on our front door.
I used some of my favorite ribbons from May Arts for this project (they can be found by the yard at A Walk Down Memory Lane's Brick & Mortar Location).
To create the red bow, I cut 4 pieces of the red ribbon about 7" long. Then I secured the ends into a loop shape with an Ultra Thin Glue Dot®. I added another Glue Dot® to the inside seam of the loop and pinched it to create a bow shape. Then I layered all 4 loops on top of each other (securing each loop to the next with a Glue Dot®) into a large bow shape.
When I completed the bow I sewed it in place on the key. I also embellished the key with stickers from Simple Stories Handmade Holiday, Echo Park This & That Christmas, a snowflake punched from Pow Glitter Paper with this punch from Martha Stewart, a Prima Crystal, and last but not least a Christmas Token from Tim Holtz.
I can't wait to show this to my boys when it gets closer to Christmas time!
I wrote this post while participating on the Glue Dots® design team.
Labels:
American Crafts,
Echo Park,
Martha Stewart,
may arts,
Prima,
Simple Stories,
Tim Holtz
Monday, October 22, 2012
Merry Christmas Banner
Are you thinking about your projects for Christmas yet? I've been starting to pick up the papers and collections that I like, and in the process needed to clear out last year's papers. I decided to finish off the last of last year's papers by making a Merry banner for my hallway (although, I hung it on my front door to take a photo of it, and it sure looks pretty there too!).
To give the banner a different shape, I cut 5 banner pieces with a Spellbinders Nestabilities Label Die from leftover Echo Park Season's Greetings paper. Then I used Pop Up Glue Dots® to attach Maya Road Snowflake Transparencies to the banner. Glue Dots® work really well for attaching clear and acrylic embellishments because they hold firmly and are almost invisible under the clear embellishment.
I strategically placed my alphabet stickers directly over where I put my Glue Dot® to camouflage it even further.
After I finished adding the snowflakes and "merry" letters to my banner, I went in and embellished each piece with rhinestones, ribbon, buttons, and left over stickers from Echo Park's Season's Greetings and Crate Paper's Pepermint Collection (also left over from last year's stash).
Finally I added strips of really wide ribbon behind each banner piece with Ultra Thin Glue Dots®. I like that this ribbon treatment is a little different than the normal banner style where the ribbon comes out the sides and connects each banner piece.
The best part is, this banner came together really quickly. Since I was working with leftovers, I couldn't over think the project, and it still turned out well.
Thanks for stopping by!
I wrote this post while participating on the Glue Dots® Design Team.
To give the banner a different shape, I cut 5 banner pieces with a Spellbinders Nestabilities Label Die from leftover Echo Park Season's Greetings paper. Then I used Pop Up Glue Dots® to attach Maya Road Snowflake Transparencies to the banner. Glue Dots® work really well for attaching clear and acrylic embellishments because they hold firmly and are almost invisible under the clear embellishment.
I strategically placed my alphabet stickers directly over where I put my Glue Dot® to camouflage it even further.
After I finished adding the snowflakes and "merry" letters to my banner, I went in and embellished each piece with rhinestones, ribbon, buttons, and left over stickers from Echo Park's Season's Greetings and Crate Paper's Pepermint Collection (also left over from last year's stash).
Finally I added strips of really wide ribbon behind each banner piece with Ultra Thin Glue Dots®. I like that this ribbon treatment is a little different than the normal banner style where the ribbon comes out the sides and connects each banner piece.
The best part is, this banner came together really quickly. Since I was working with leftovers, I couldn't over think the project, and it still turned out well.
Thanks for stopping by!
I wrote this post while participating on the Glue Dots® Design Team.
Labels:
crate paper,
Echo Park,
Glue Dots,
may arts,
maya road
Sunday, October 21, 2012
A Fall Frame and a Pumpkin Patch Layout
I really love this time of year; not only are there lots of great outdoor activities, but there are some fabulous fall paper lines out right now to scrap those activities! Today I have 2 projects I made using October Afternoon's Witch Hazel. Witch Hazel is technically a Halloween line, but it's really lovely for all fall things. In fact, the first project I made with it was an autumn frame.
I made this frame for A Walk Down Memory Lane, so you can find the step-by-step directions for it here.
I also made a layout of my youngest son picking out his pumpkin this year. I really love the mix of traditional Halloween images with non traditional colors and patterns. It makes for a very versatile and fresh feeling line of papers and embellishments.
Please excuse the burst of light in the photo. It was a beautiful, sunny day...and when a 4 year old decides he wants his picture taken, you take it even if the sun is right in the background!
Thanks for stopping by!
I made this frame for A Walk Down Memory Lane, so you can find the step-by-step directions for it here.
I also made a layout of my youngest son picking out his pumpkin this year. I really love the mix of traditional Halloween images with non traditional colors and patterns. It makes for a very versatile and fresh feeling line of papers and embellishments.
Please excuse the burst of light in the photo. It was a beautiful, sunny day...and when a 4 year old decides he wants his picture taken, you take it even if the sun is right in the background!
Thanks for stopping by!
Labels:
may arts,
Memory Box,
October Afternoon
Monday, September 3, 2012
Making a Few Embellishments
Once in a while, I like to just stock up on some hand made embellishments. Today I thought I'd make a couple quick flowers from Glue Dots® and some May Arts ribbon.
To make the first embellishment, I paired some Jute with an XL Glue Dot®
To start, take the top piece of paper off of an XL Glue Dot®. Stick the end of your jute or twine firmly to the center of the Glue Dot®.
Next, start wrapping the jute around your center point working in a circle from the center out. Press the jute firmly to Glue Dot® as you wrap. When you're all done it should look something like this:
To give it a little more pizazz, I used a Mini Glue Dot® to adhere a button to the center of the embellishment.
For my second embellishment I used a more traditional ribbon and an XXL Glue Dot®
This ribbon from May Arts is 1.5 inches wide, but you can use any width ribbon you'd like.
This project starts the exact same way as the one above. Adhere the end of your ribbon firmly to the center of your XXL Glue Dot®
However, when working with ribbon, you'll want to twist the ribbon a bit while wrapping it around the center starting point.
Keep twisting and wrapping until you hit the end of the Glue Dot®. You can tuck your raw end under some of the other ribbon around the edge to hide it.
Once again, I added a button to the center to finish off my embellishment. You can use these embellishments right away, or you can leave them on the plastic backing and set them aside to use on a future project.
Thanks for stopping by!
Friday, June 1, 2012
Summer Fresh
You know how sometimes you see a new line and you just know that you can do pretty things with it, that it's going to be so much fun to work with, that you won't be able to get enough of it? Yeah, that's me with Simple Stories Summer Fresh. I really, truly just love this line.So far, I've made a 2 page layout, a single page layout, and banner. Today I'll share the layouts. You'll have to come back next week for the banner.
First up is the single page layout:
My favorite thing about this layout is the little cluster of details found here:
That little calendar piece with the twine and the pin and the rhinestone added to it just make me happy. I know, it's the little things, right?
Now on to the 2 page layout. I actually made this layout first. I was waiting for Summer Fresh to come out so that I could scrap these photos from Easter. Sometimes, I really like a paper line, but when I start to work with it I struggle and I just can't seem to put it together right. Summer Fresh is the exact opposite of that for me...it mixes and matches beautifully and I can't seem to get enough of it.
Okay, I know that picture's a bit tiny, so here are individual shots of the left side:
and right side:
In case you're wondering what we're doing, here's a close up on the journaling about Magic Jelly Beans (please note this is not my original idea, I read about it somewhere, and I really don't know where otherwise I'd absolutely give that person the credit for coming up with such a fun idea).
And, finally, I have to share one last photo of my favorite detail from this layout:
This bit of burlap with the twine and button is the last thing I added to the layout, and it just just made the whole thing feel complete.
Thanks for stopping by today. I'm quite behind on keeping up with blogging the current projects I have completed, but I'm trying to do better...really I am! In the mean time, I've been busy over at Stamp School,
so you can find a bright and cheery card with a Gelato video tutorial done by yours truly here.
You can find a a wedding card I created with a matching envelope here.
and you can find one last video tutorial on making this inky embossed background here.
Have a great weekend!
Labels:
Hero Arts,
may arts,
maya road,
Prima,
Simple Stories,
Stamp School
Monday, May 14, 2012
End of School Year Gifts Part 1
Hello! I have an end of school year gift to share today, and I'll be back tomorrow with a second one. My son's last day of school is Wednesday, but his school has a classroom grandparent program, and his classroom grandma's last day of school is today. I wanted to give her a little something to thank her for all her time, so today I took in these (one for the classroom grandma, one for the wonderful aide who holds open the school door and greets all the children in the morning, and one for the school office admin):
Inside each of these hand made bags is a fresh baked loaf of bread. Here's the truth: I'm not a very good sewer. I learned a long time ago how to sew, and I just don't do it very much. However, I found this awesome tutorial on making bread bags from dish towels, and I knew that even I could sew this pattern. I love baking bread, so that part wasn't a problem. Last week I found some lovely towels at Target and spent an afternoon cutting and sewing. I was pretty pleased with myself when I finished them. The best part is, after giving 3 away, I still have 3 more bags to put away for the next time I need a fun hand made gift.
When you sew the bags, you sew a bit of ribbon into the seam for tying the bag shut. I just happen to have a lot of fun ribbon from May Arts, so I just raided my stash and found a number of different ones that worked with the colors of the bags.
Just because I would feel completely out of my element if I didn't add something paper crafted, I also made little thank you tags from Echo Park paper, SRM stickers, and Maya Road Flowers. I tied the tags on with a bit of twisted burlap from May Arts Ribbon.
Thanks for stopping by today! I'll be back tomorrow with another teacher gift idea, and a short tutorial.
Inside each of these hand made bags is a fresh baked loaf of bread. Here's the truth: I'm not a very good sewer. I learned a long time ago how to sew, and I just don't do it very much. However, I found this awesome tutorial on making bread bags from dish towels, and I knew that even I could sew this pattern. I love baking bread, so that part wasn't a problem. Last week I found some lovely towels at Target and spent an afternoon cutting and sewing. I was pretty pleased with myself when I finished them. The best part is, after giving 3 away, I still have 3 more bags to put away for the next time I need a fun hand made gift.
When you sew the bags, you sew a bit of ribbon into the seam for tying the bag shut. I just happen to have a lot of fun ribbon from May Arts, so I just raided my stash and found a number of different ones that worked with the colors of the bags.
Just because I would feel completely out of my element if I didn't add something paper crafted, I also made little thank you tags from Echo Park paper, SRM stickers, and Maya Road Flowers. I tied the tags on with a bit of twisted burlap from May Arts Ribbon.
Thanks for stopping by today! I'll be back tomorrow with another teacher gift idea, and a short tutorial.
Tuesday, February 7, 2012
You and Teddy
I have a table full of framed photos that my kids take annually right around their birthdays. There are always the most recent ones up, but I also keep up a number of my favorites as well. There's no rhyme or reason to the ones I keep up longer, just a few of my faves. Eventually, though, when old ones finally get switched out, they must get scrapped. This is one of those photos, taken when my now 5 yr old was 3.
My son used to take his stuffed bear, Teddy, everywhere and the photographer thought it would be fun to snap a few photos with the 2 of them together (he still sleeps with Teddy by the way). I'm not sure anything captures childhood quite like a kid and his favorite stuffed animal!
A few notes about the actual making of this layout. The papers and stickers are all left over from some calendar projects I made back in December. You can check them out here if you'd like to see them. All of the paper and the stickers are from Simple Stories' Year-O-Graphy collection. That heart is actually an intricate knot made from twine. I learned how to tie it from this video. It was really fun to do, and a different way to add some texture to the layout. The buttons are from Bo Bunny's Forever Fall and Snowfall lines.
Thanks for stopping by!
Labels:
Bo Bunny,
may arts,
Simple Stories
Friday, December 30, 2011
A Few Things for the New Year
I'm super excited that the countdown has started for the release of new stamp sets from the BRAND NEW COMPANY Stamp School:
The first 2 stamp sets will be released January 1, but if you head over to Stamp School's Blog right now, you can see projects made by the owner, Lisa, and by the design team using the new sets. I'll also be back here tomorrow with a card or 2 I've made using the new sets and some info about the card stock, ink, and felt Stamp School will be carrying as well. If you can't tell, I'm super excited to be starting out my new year as the design team coordinator for this awesome new company.
Now on to 2 projects using the same base pieces. About 2 weeks ago A Walk Down Memory Lane handed out these fun packs of kraft calendars (2 sets of calendars per pack) from Maya Road for customer appreciation day. Before that day, Lisa gave me a pack and said, "can you do something with these?" Oh...music to my ears, and challenge accepted!
Up first is a purse/pocket calendar made 6 badge holders tied together.
You can find the badge holders at just about any office supply store or office section of a big box store. I paired the calendar pieces with paper and stickers from Simple Stories' Year-O-Graphy collection. I kept the embellishments flat and minimal to keep this calendar from being bulky in your purse. It's cute, simple, and fun to put together.
If you're looking for a bit more of a challenge you can try making a wall calendar:
This starts out as a calendar, but turns into a photo display. The calendar cards are attached with Removable Glue Dots®, that way when the month is done, you just take the calendar off to reveal the photo underneath. The paper is again from Simple Stories Year-o-Graphy. All of the circles (photo and patterned paper) were cut with the Lifestyle Crafts Nesting Circle Dies.
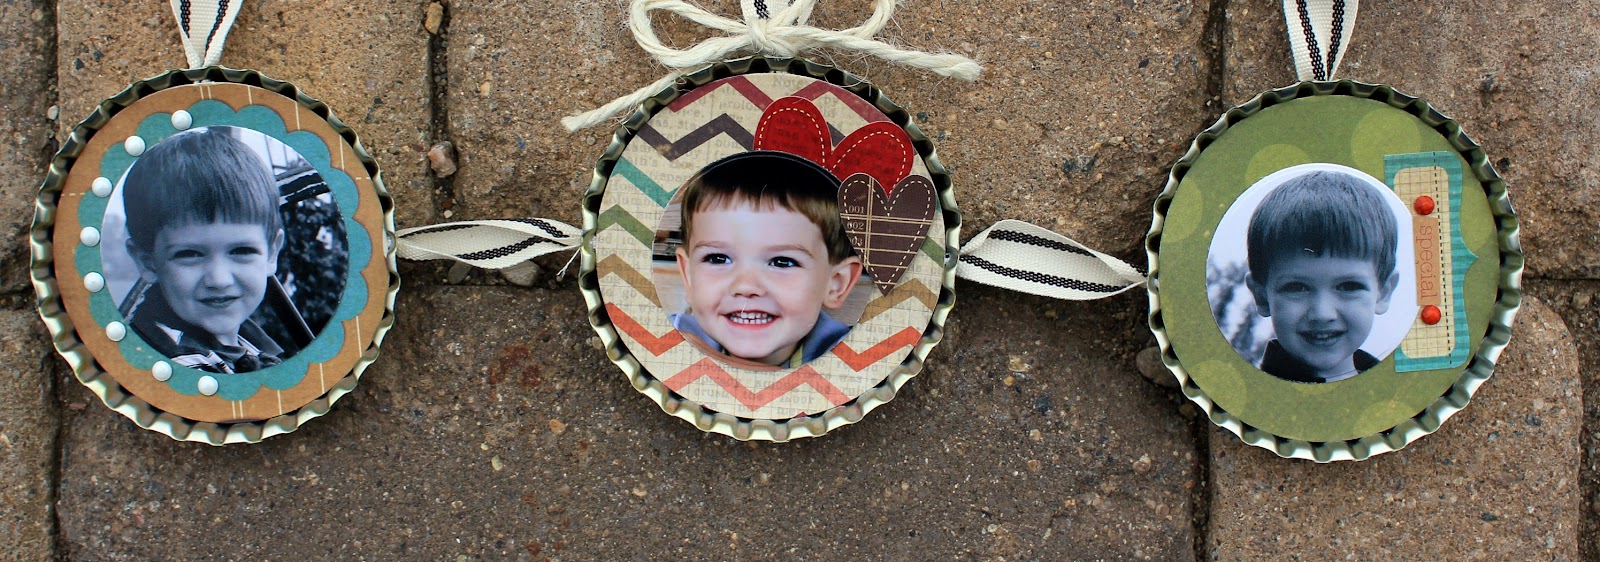
I punched holes through the Maya Road 3″ Super Mega Bottle Caps, and strung some May Arts ribbon (that you can buy by the yard. You’ll need about 3 yards total) through the holes. Then you can use the stickers from the Simple Stories Year-o-graphy line to embellish the photos and calendar pieces as you like. This is a really fun project that can be hung in your house long after the calendar year is over!
Thanks for stopping by!
The first 2 stamp sets will be released January 1, but if you head over to Stamp School's Blog right now, you can see projects made by the owner, Lisa, and by the design team using the new sets. I'll also be back here tomorrow with a card or 2 I've made using the new sets and some info about the card stock, ink, and felt Stamp School will be carrying as well. If you can't tell, I'm super excited to be starting out my new year as the design team coordinator for this awesome new company.
Now on to 2 projects using the same base pieces. About 2 weeks ago A Walk Down Memory Lane handed out these fun packs of kraft calendars (2 sets of calendars per pack) from Maya Road for customer appreciation day. Before that day, Lisa gave me a pack and said, "can you do something with these?" Oh...music to my ears, and challenge accepted!
Up first is a purse/pocket calendar made 6 badge holders tied together.
You can find the badge holders at just about any office supply store or office section of a big box store. I paired the calendar pieces with paper and stickers from Simple Stories' Year-O-Graphy collection. I kept the embellishments flat and minimal to keep this calendar from being bulky in your purse. It's cute, simple, and fun to put together.
If you're looking for a bit more of a challenge you can try making a wall calendar:
This starts out as a calendar, but turns into a photo display. The calendar cards are attached with Removable Glue Dots®, that way when the month is done, you just take the calendar off to reveal the photo underneath. The paper is again from Simple Stories Year-o-Graphy. All of the circles (photo and patterned paper) were cut with the Lifestyle Crafts Nesting Circle Dies.
I punched holes through the Maya Road 3″ Super Mega Bottle Caps, and strung some May Arts ribbon (that you can buy by the yard. You’ll need about 3 yards total) through the holes. Then you can use the stickers from the Simple Stories Year-o-graphy line to embellish the photos and calendar pieces as you like. This is a really fun project that can be hung in your house long after the calendar year is over!
Thanks for stopping by!
Labels:
Lifestyle Crafts,
may arts,
maya road,
Simple Stories
Saturday, December 17, 2011
Sketch Support Week 2
'Tis the season for neglecting my blog it seems like. I'm just popping in here to let you know that I have another layout over on Sketch Support. This week the sketch is a 2-page layout.
Head over to Sketch Support to check out (and download) the sketch this layout was created from.
Thanks for stopping by!
Head over to Sketch Support to check out (and download) the sketch this layout was created from.
Thanks for stopping by!
Labels:
American Crafts,
DCWV,
may arts,
Prima
Subscribe to:
Posts (Atom)