Showing posts with label DCWV. Show all posts

Wednesday, April 27, 2022

3 Fast Travel Layouts

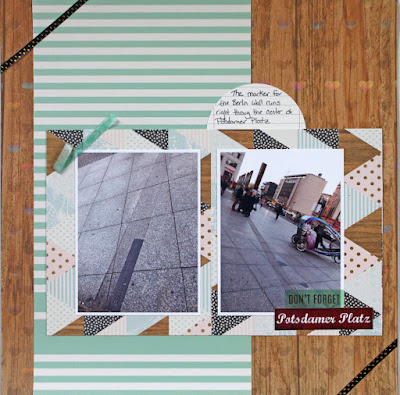
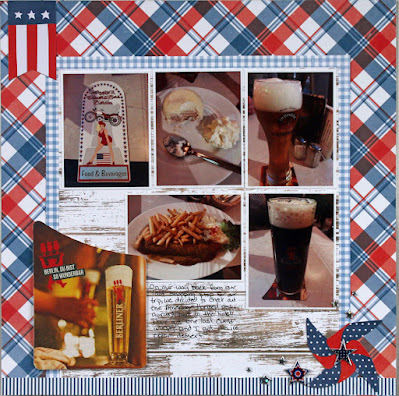
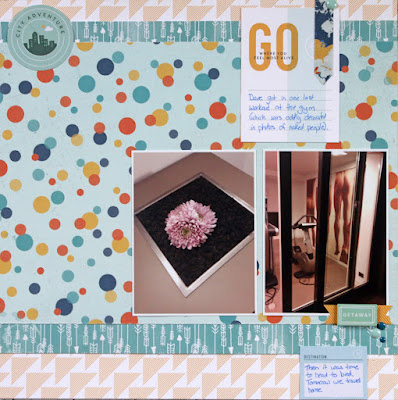
I have 3 fast travel layouts to share. These are 3 of the last 4 layouts in my Germany album. 


This is the plaza of the area we stayed at in Berlin. Postamer Platz is pretty cool, as it used to be a no man's land with the Berlin Wall running through it. Now it's a vibrant, busy area. There is a marker that runs through the Platz so you can see where the wall was.


We had a last beer and bite to eat at an American themed restaurant right next to our hotel. My husband was able to get a currywurst there, so I'm not sure it was too Americanized.


One last stop, the gym at the hotel. It was one of the nicest gyms (not surprising as it was a really nice hotel). 

Next week I'll have my last layout from this trip.

Friday, May 4, 2018

You can find me over on the SRM Blog today with this wedding card.


Head on over to the SRM Blog for all the details.

Thursday, November 2, 2017

Anniversary Layout

Every year my husband and I take at least one photo while we're celebrating our anniversary. I scrap an anniversary layout from the photo, and the layouts go in their own book. It's so fun to look through and add to every year!


This year we celebrated 13 married years and went trap shooting with a group from my husband's work. We had some beautiful weather, and I always love getting to spend time with my husband in the middle of a work day!


I used some simple layers to record what we did and do a little journaling about the awesome husband he is. I primarily used DCWV's Miny Lace stack for the papers. I'm trying to use up my (very large) stash right now, so the rest of the embellishments are bits and pieces of what I had on hand.


Lately, I really like mixing black and brown. I've found it works really well if you use one color as a primary color and the other as an accent color. Here, black is one of my primary colors (with minty blue) and I used brown and pink as accent colors.


One more year and one more anniversary layout for the book!

Thursday, October 19, 2017

Pocket Calendar

You can find me over on the SRM blog today with a pocket calendar that features SRM's mini calendar stickers.


This calendar makes a great gift! Find all the details to make your own on the SRM blog.

Tuesday, January 24, 2017

Boys Layout

Sometimes when you're taking pictures of your kids you capture those moments. You know, the ones that really show who they are and how they interact with each other. The ones where you can see them, not just the activity. I have a set of photos like that to share today with my Boys Layout.


I was trying to get a nice picture of the two of them for our Christmas card, but I managed to capture something even better.


DCWV has a gorgeous paper collection called the Minty Lace stack. I love a good minty blue color and paired with the black and wood grain brown, I just couldn't resist!


Besides the beautiful colors and lovely patterns, there are a mix of textures in the stack, too. You can see in the photo above that there are iridescent hearts printed on the wood grain paper. They are so pretty when they catch the light, and add a little something extra to the layout.


Photos like this remind me why I scrap and why I love taking pictures. This boys layout is everything I love about how my boys interact in 3 simple photos.

Friday, September 23, 2016

Wedding Card

We have a wedding to attend this weekend, so I needed a card. Lately, I'm really enjoying the mix of black, white, and gold. I figured it would make a great color combo for a wedding card.


I started with DCWV's Modern Metallic Stack. The stack has a ton of beautiful black and white, black and gold, and solid gold papers in it. It's super yummy! The pops of shiny gold metallic make for a really elegant wedding card.


I wanted to keep it elegant but simple, so I grabbed a Mr. & Mrs. sticker and a Happily ever after sticker from SRM's Stickers By the Dozen Wedding sticker sheet to uses as sentiments. I thought they fit well with the overall modern feel of the card.


The final touch for this card is a handmade matching envelope. The little heart pattern is perfect for an envelope for a wedding card!

Saturday, December 17, 2011

Sketch Support Week 2

'Tis the season for neglecting my blog it seems like. I'm just popping in here to let you know that I have another layout over on Sketch Support. This week the sketch is a 2-page layout.


Head over to Sketch Support to check out (and download) the sketch this layout was created from.

Thanks for stopping by!

Thursday, February 18, 2010

3 Random Projects

Here are 3 random projects I've done recently for you viewing entertainment.
Random project 1:This is a charm and chain from Stampin' Up. The 1" x 1 1/4" charm plus chain cost just under $30 total, and I have to tell you, I'm really pleased with the quality. It opens like a locket. There's glass on both sides, so you could make this a double-sided charm if you wanted too. The glass on the front is beveled and the glass on the back is flat. The beveled glass also gives you a little room for layers and embellishments. I used My Mind's Eye's Ooh La La paper on the inside and added a Kaiser Craft Rhinestone for a little pizazz. I just put it together quickly to match an outfit I was going to wear. What I love the most, is that I can change it up as I please. So easy!

Random Project 2:
This is a frame I did for my sister who works for Make-A-Wish. I think I've mentioned before how much I love that organization and all the people who make MAW such a success. Just a little something for her office. Do you see those little half pearls inside the stars in the background? Well those (and the big pearls) are actually on top of the glass to add a little dimension to the project. The paper is from DCWV's Luxury Stack. "Wish" was cut from vinyl with my Silhouette SD. The star background was also cut with my Silhouette. It's hard to tell, but the layer under the stars is actually a pale shade of blue, not white. Oh, and that frame (mat and all) cost me a whopping $3 at Walmart.

Random project #3:
Did you know Scraptiv!ty post a new sketch on their website every month with 3 different layouts examples? I was one of the layout creators this month, and the above is what I came up with. Are you curious now about what the sketch looks like? Click here and you'll be sent straight to this month's sketch and examples. The paper and buttons are from Fancy Pants. I picked it up at A Walk Down Memory Lane, which just happens to have everything by Fancy Pants on sale this month for 25% off. Oh, and they also have Hero Arts Stamps on sale for 25% off too! Woo, hoo! Those artists at work are my boys, painting away on a canvas.

Thursday, November 26, 2009

Gobble Gobble

That's turkey for Happy Thanksgiving! I have so very much to be thankful for, that I won't bore you with my whole list, but I will say that I'm thankful for the chance to relax with my family, watch some Packer football, and eat a little turkey (okay, maybe more than a little). Here's another thing I'm thankful for, a chance for crafty time to make projects like this:
While this is a bit of a girlie spring version, it also translates nicely to Christmas. In fact, a friend and I have teamed up to make a dozen of these out of Christmas paper. This version takes 20 equal sized paper circles. Just score a triangle onto each circle, fold up the edges, and attach into a ball shape. Slide a wood dowel into the ball and "plant" into a painted clay pot.
Here I used:
Paper: Die Cuts With A View Sweet Stack Card Stack
Ribbon: SU! Rose Red Double Stitch Ribbon
Button: SU! Corduroy button

Have a wonderful Thanksgiving!

Friday, September 4, 2009

A Vintage Chirstmas Idea

Here's my 3rd entry in Moxie Fab World's "Stretch Your Style Challenge", and this one really was a stretch for me. Today is Vintage and Shabby. I love Vintage looks, but don't usually venture into this style too much. Nothing says vintage Christmas to me more than a pretty Christmas stocking, so I chose to take that idea and turn it into a little gift card holder with lots of pretty details. Here it is:


And a close up of the top which is covered in White Sparkly Fluff:


I really love the realistic feel the Sparkly Fluff adds. I cut 2 stocking shapes with my Silhouette SD from paper from DCWV's Luxury Stack. I then folded about 1/4 inch of the edge to the inside of the stocking, and then sewed the 2 pieces together to form a pocket. You can then slip a gift card, or small goody (like candy canes, or maybe a couple of new Copic markers) inside. I used a sanding block to scuff up my button a little and give it more of a vintage feel. The "Merry Christmas" stamp is from Stampin' Up!'s Teeny Tiny Wishes set. Hope you enjoyed my little stocking stuffer!

Thursday, September 3, 2009

Classy and Elegant Christmas Challenge

Today is my 2nd attempt at completing a "Stretch Your Style" Challenge for Moxie Fab World's Christmas celebration. For this challenge I got back to my roots and stamped a card. Before I show you the card, I thought I'd talk a little about my creative process for this card just in case you're daring enough to wonder how my often crazy mind works. Just like my style, my creative process tends to be all over the place; sometimes I have a clear idea of where I want to go, sometimes I don't, and sometimes I have a clear idea of where I want to go, but never end up there. For today's card I decided that I wanted to use a color combo that I love, but always forget to use: Kraft, Whisper White, and shades of blue. I also love how stamping colored ink onto kraft paper looks, so I knew I wanted to do that. I figured snowflakes lend themselves nicely to a blue and white theme, so there was my stamp choice. After that I found my patterned paper (from DCWV's Luxury Stack). After picking my papers, I just started stamping, cutting and embellishing. Here's what I came up with:

I'd love to draw your attention to a few fun details. The white snowflakes have tiny little white pearls in the center. So petite and so pretty! Also, there is a bit of stitching along the edge of the Bashful Blue paper lining the patterned paper. I love stitching by hand. I have found that I like using DMC's cross stitch floss better than sewing thread when hand stitching. Finally, the bow is tied through the "Glory to God" tag, not just adhered on top. I think this gives the card a little more elegance. If you haven't already, take the time to check out Moxie Fab World and all the amazing "Stretch Your Style" entries.

RECIPE

Stamps: Snowflakes are from Circle Circus and Holiday Blitz sets - Stampin' Up!
Glory to God stamp is a personalized creation made for my Christmas cards one year
Card Stock: Kraft and Bashful Blue - Stampin' Up!
Patterned Paper: Luxury Stack - Die Cuts With A View
Ink: Whisper White, Bashful Blue, and Night of Navy - Stampin' Up!
Ribbon: Blue Ribbon - Walmart
Rhinestones: Blue Rhinestones - Kaisercraft
Pearls: White Pearls - Kaisercraft

Tuesday, August 4, 2009

Travel Fun

Today I have a fun, fast, inexpensive, and super cute project: Luggage Tags. Our MOPS theme for the year is Planet Motherhood and we're doing a world travel take on this theme. We're having our steering (leadership group) meeting tomorrow, and I offered to make these adorable luggage tags for each mom on our steering.


On the left is a standard luggage tag (this one's mine) with a single initial. "T" for my last name, Taylor. The middle tag is for someone with a split last name. "VM" for Ver Mulm. This format would also work with someone who has a hyphenated last name, or if you want to do first and last initials. The tag farthest to the right is the back side of the tag. This is where identifying info/contact info can be written. I attached the white paper with temporary adhesive so the paper could be removed and replaced if the information changes. The patterned paper is from DCWV's Sweet Stack. Look below for a close up. Can you see that it sparkles? The card stock is from Stampin' Up! (in Whisper White, Apricot Appeal, Certainly Celery, and Rose Red). The brads, felt flower, and ribbon are also SU!. I cut the celery frames and monogram letters with my Silhouette SD. Finally, I slipped all of this into a clear name badge holder that I found at Wal-mart. You can buy a 12 pack for under $2. This is a great project to use up left over scraps of paper and embellishments. Remember, these aren't just for luggage. They can be put on diaper bags, duffel bags, and tote bags too!

Wednesday, July 29, 2009

Wedding Scrapbook

I think I mentioned that a few weekends ago I was in my cousin's wedding. We had a great time, and I was able to get some really beautiful pictures. Including this one of My sister, her husband, my husband, and me (my husband and I are on the left).


I have so many great pictures, that I decided I would do a scrapbook for the bride as a surprise. I just completed the first page of the book. This page is very simple. I wanted the picture to be the focal point, not my amazing ability to embellish (I'll showcase that later on throughout the book :-) The paper doesn't photograph well, but it is a lovely pearlized paper from DCWV.
The words were cut from SU! silver card stock with my Silhouette SD.

I stamped on the bottom right hand corner with Versamark ink using a stamp from Baroque Motifs (SU!). I sprinkled a little silver embossing powder on, heated, and added a few dimensional wedding stickers from K & Company. Now a little note about embossing on photos. Photos don't like heat, so this must be done VERY carefully. I also wouldn't recommend doing this on a treasured heirloom photo, heating the photo may ruin it. Heat just until the powder starts melting. If your photo bubbles from the heat, let it cool. Don't touch or try to smooth the bubble out. Many times it will deflate on its own. That being said, if you have success with this technique it really is a beautiful, unexpected touch.

I have one more picture for you. It's a little closer so you can see more of the beautiful detail of this paper and some of the dimension of the embellishments.

Tuesday, July 21, 2009

Celebrations

I am in Wisconsin this week visiting family for a number of celebrations. My cousin was married on Saturday, and my sister and I got the honor of being in the wedding party. So fun! Yesterday we celebrated both of my parents' 50th Birthdays. They both turn 50 in the next couple of weeks, and since we were all together we thought it would be fun to do it up right with cake, a favorite meal, presents, and of course, a couple of hand made cards. I thought I'd get fancy and try my hand at the popular tri-shutter card for my mom's 50th card. You can find the fantastic card and tutorial by Bonnie Szwalkiewicz here. It's surprisingly easy, and so fun to add embellishments to this card. I used A LOT of different products on this card. About half of the products are from American Crafts (the flair, patterned paper, thickers, and the fun little pink and brown flower). There's also a Stampin' Up! stamp (Celebrate Everything) card stock, ribbon, and rubons. The colored cupcake rubons are from DCWV. I even cut some words on my Silhouette SD. The first picture is of the card closed.


Now one of it open

Have fun trying your hand at this great tri-shutter card!

Thursday, June 18, 2009

Great Dads

I feel so blessed some days. I am surrounded by more great dads than anyone should be allowed. My husband, of course is an amazing dad. My father is fantastic. My father-in-law is truly wonderful. Even my grandpa is great! So here's a card I made for one of the wonderful fathers in my life as we're getting ready to celebrate Father's Day. The "Happy Father's Day" was created by coloring directly on the stamp with my markers.


Recipe:
Patterned Paper: Citrus Stack - DCWV
Cardstock : Whisper White - SU!
Stamps: All Holidays - SU!
Markers: Certainly Celery, Tempting Turquoise, Apricot Appeal - SU!
Circle Brad - Making Memories
Ribbon: Certainly Celery - SU!
Punch: Spiral - SU!