I did some stash diving for this Great Times layout.
I'm not going to lie, I have a lot of paper...like a lot. I've been trying really hard to use what I have in my stash and from my design team kits only.
When looking for paper to scrap these photos from our Germany trip, I found an old collection from Paper House called Capture Life. I had a few pieces from that collection and the whole sticker sheet.
I also found that piece of cloud paper from Bella Blvd. I thought it went well with the other papers and it looked great with my mountain top photos. I created my own journaling tag from another piece of ombre blue patterned paper that seemed to fit with the other papers as well.
How often do you do a deep dive into your paper stash for scrapping?
Showing posts with label Bella Blvd. Show all posts
Wednesday, May 27, 2020
Wednesday, May 15, 2019
Simple Thank You Cards
It's the time of year where I feel like I need about 400 thank you cards. If end of the school year has you in the same boat, check out these simple thank you cards that are easy to make assembly line style.
In reality, I mad about a dozen of these. All you need is a die that says thankful or thank you and a stamp that goes with it. The die I used was My Favorite Things Words of Gratitude, and the stamps I used were from Hero Arts Thanks stamp and die set. This is also a great set of cards for using up scraps of patterned paper.
I stuck with white card stock, but this works equally as well on colored or kraft card stock.
This time of year always feels like a crazy sprint to the finish, so when ever possible I keep it simple!
In reality, I mad about a dozen of these. All you need is a die that says thankful or thank you and a stamp that goes with it. The die I used was My Favorite Things Words of Gratitude, and the stamps I used were from Hero Arts Thanks stamp and die set. This is also a great set of cards for using up scraps of patterned paper.
I stuck with white card stock, but this works equally as well on colored or kraft card stock.
This time of year always feels like a crazy sprint to the finish, so when ever possible I keep it simple!
Labels:
Bella Blvd,
hero arts.,
My Favorite Things
Monday, March 4, 2019
12 Years Layout
My son turned 12 back in August, and I took his annual photos in October. I always love creating a snapshot of who they are that year. It's so fun to see how their personalities change and grow over the years. Today I have that 12 years layout to share.
I'm continuing to work through my (very large) stash of paper. This is mostly Bella Blvd's Oh My Stars with a little Bella Blvd Alex mixed in.
There's always so much I want to say on these annual photo layouts. I actually write it down on scratch paper first so I can get everything out as concisely as possible. Since I have so much to get down, I used multiple journaling cards and layered them up to make them part of the design element of the page.
I think 12 has been one of my favorite ages. This kid has grown up so much this year, and it's been so fun to watch!
I'm continuing to work through my (very large) stash of paper. This is mostly Bella Blvd's Oh My Stars with a little Bella Blvd Alex mixed in.
There's always so much I want to say on these annual photo layouts. I actually write it down on scratch paper first so I can get everything out as concisely as possible. Since I have so much to get down, I used multiple journaling cards and layered them up to make them part of the design element of the page.
I think 12 has been one of my favorite ages. This kid has grown up so much this year, and it's been so fun to watch!
Labels:
Bella Blvd
Monday, February 25, 2019
Love in Action Layout
Today I have a layout about love in action. It's one of those moments that makes you proud of your kid, but one of those events you wish didn't have to happen.
My son's friend has cancer. It's a big thing for a bunch of kids to understand. They shaved their heads when their friend lost his hair, because it was the best way they knew to support him. At the end of their friend's year of chemo, their friend's mom put together a fundraiser for St. Baldrick's Foundation to celebrate chemo being over. Elias immediately knew he wanted to be a part of this head shaving event, and set to fund raising. He met his goal (and even though he got a little stage fright having to go up in front of all those people watching to have his head shaved), and got his head shaved by his friend (with some help from a professional) for the fundraiser.
I was digging through my stash and found this paper from Bella Blvd's Oh My Stars collection. It was just the right fit for this special photo. I paired it with a Silhouette cut file, and kept the embellishments simple to keep the photo and journaling the focus of the layout.
Unfortunately, this story doesn't have a happy ending yet. They recently found a new spot of cancer, and his friend has started a new round of chemo. We will continue to encourage these moments of love in action, and continue to pray.
My son's friend has cancer. It's a big thing for a bunch of kids to understand. They shaved their heads when their friend lost his hair, because it was the best way they knew to support him. At the end of their friend's year of chemo, their friend's mom put together a fundraiser for St. Baldrick's Foundation to celebrate chemo being over. Elias immediately knew he wanted to be a part of this head shaving event, and set to fund raising. He met his goal (and even though he got a little stage fright having to go up in front of all those people watching to have his head shaved), and got his head shaved by his friend (with some help from a professional) for the fundraiser.
I was digging through my stash and found this paper from Bella Blvd's Oh My Stars collection. It was just the right fit for this special photo. I paired it with a Silhouette cut file, and kept the embellishments simple to keep the photo and journaling the focus of the layout.
Unfortunately, this story doesn't have a happy ending yet. They recently found a new spot of cancer, and his friend has started a new round of chemo. We will continue to encourage these moments of love in action, and continue to pray.
Labels:
Bella Blvd,
silhouette
Wednesday, January 30, 2019
You at 10 Layout
I have been taking annual photos of my kids for quite a few years now. One of my favorite things to is to scrap one of those photos and write up a bit of a summary about who my kid is at that age. Today I have my youngest son's You at 10 layout from his most recent annual photos.
These are some of my very favorite layouts to create, but the journaling is often the hardest. I love hitting on the highlights of who my kid is. Sometimes it can be tough to sum up their likes, ideas, and best things about them in a few sentences, but the end result is so worth it. These are the best layouts to go back and look at years later.
I'm continuing to work my way through my stash. This layout is created from a pile of Bella Blvd and Illustrated Faith paper. I literally plopped a pile of all my non-holiday Bella Blvd paper on my desk and just started pulling pieces that I liked with the photo. E's gray and red shirt made pulling gray and red paper a no brainer. They simple color combo lets the photo take center stage.
Since the journaling is a big part of this layout, I used my journaling cards as a big part of design of the layout as well. I've got to be honest, this You at 10 layout gets me right in the feels. I'm pretty sure my kids are growing up way too fast!
These are some of my very favorite layouts to create, but the journaling is often the hardest. I love hitting on the highlights of who my kid is. Sometimes it can be tough to sum up their likes, ideas, and best things about them in a few sentences, but the end result is so worth it. These are the best layouts to go back and look at years later.
I'm continuing to work my way through my stash. This layout is created from a pile of Bella Blvd and Illustrated Faith paper. I literally plopped a pile of all my non-holiday Bella Blvd paper on my desk and just started pulling pieces that I liked with the photo. E's gray and red shirt made pulling gray and red paper a no brainer. They simple color combo lets the photo take center stage.
Since the journaling is a big part of this layout, I used my journaling cards as a big part of design of the layout as well. I've got to be honest, this You at 10 layout gets me right in the feels. I'm pretty sure my kids are growing up way too fast!
Labels:
Bella Blvd,
Illustrated Faith
Monday, December 19, 2016
Gift Card Box
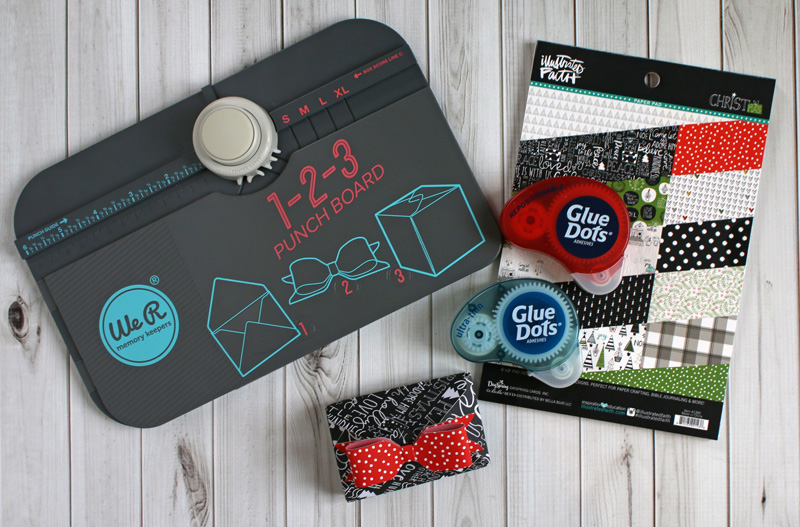
Today I wanted to share how I created a rectangle gift card box with my We R Memory Keepers 123 Punch Board. I created a Christmas gift card box, but this will work for any occasion, just switch out the paper. Do bear with me as there are a lot of photos in this post, but I promise, once you make one it's really easy.
For a 3 1/2" x 2 1/4" x 1/2" gift box all you'll need is the We R Memory Keepers 123 Punch Board, some adhesive (I love Glue Dots® Ultra Thin and Repositionable for this task), and a 5 5/8" x 5 5/8" piece of patterned paper (I used Bella Blvd Illustrated Faith Christmas).
The standard directions for making a box with the punch board will give you a square box, so to make a rectangle we need to change up the directions just a bit.
Step 1: Line up your paper to the 2" mark, punch, and score along Box Score Line A and Box Score line B.
Step 2: Without rotating your paper move it to the 2 3/4" mark, punch, and score along Box Score Line A and Box Score line B.
Step 3: Rotate your paper 90 degrees counterclockwise. Line your first score line up with the Box Score Line A line, punch, and score your paper along Box Score Line B.
Step 4: Without rotating your paper line up your second score line with the Box Score Line A line, punch, and score along Box Score Line B.
Now you're going to rotate your paper 90 degrees counterclockwise and repeat steps 1-4.
When you've completed steps 1-4 twice, you'll be all set to assemble your box. Just follow the directions on the punch board for assembly.
I like to use a Repositionable Glue Dot® to hold my gift card snugly in the box.
You have 2 options for closing up the box. If you want it to lie flat, you'll have to skip the corner slitter punch, and your top will have a bit of an envelope look to it. Just use adhesive to hold it shut.
I chose to use the corner slitter punch on my longer sides, and ended up with a gabled box top instead.
To make the box a little more festive, I used the 123 Punch Board to create a bow (this is the XS bow size).
I give out a lot of gift cards, so I love having the option of making a quick gift card box now, too. If you're looking for a few more ideas for gift card giving, check out my festive Gift Card Envelopes or for a unique twist these Gift Card Coin Envelopes. If you have any questions about the creation of this gift card box, don't hesitate to leave me a comment or email me!
I wrote this post while participating on the Glue Dots® Design Team.
For a 3 1/2" x 2 1/4" x 1/2" gift box all you'll need is the We R Memory Keepers 123 Punch Board, some adhesive (I love Glue Dots® Ultra Thin and Repositionable for this task), and a 5 5/8" x 5 5/8" piece of patterned paper (I used Bella Blvd Illustrated Faith Christmas).
The standard directions for making a box with the punch board will give you a square box, so to make a rectangle we need to change up the directions just a bit.
Step 1: Line up your paper to the 2" mark, punch, and score along Box Score Line A and Box Score line B.
Step 2: Without rotating your paper move it to the 2 3/4" mark, punch, and score along Box Score Line A and Box Score line B.
Step 3: Rotate your paper 90 degrees counterclockwise. Line your first score line up with the Box Score Line A line, punch, and score your paper along Box Score Line B.
Step 4: Without rotating your paper line up your second score line with the Box Score Line A line, punch, and score along Box Score Line B.
Now you're going to rotate your paper 90 degrees counterclockwise and repeat steps 1-4.
When you've completed steps 1-4 twice, you'll be all set to assemble your box. Just follow the directions on the punch board for assembly.
I like to use a Repositionable Glue Dot® to hold my gift card snugly in the box.
You have 2 options for closing up the box. If you want it to lie flat, you'll have to skip the corner slitter punch, and your top will have a bit of an envelope look to it. Just use adhesive to hold it shut.
I chose to use the corner slitter punch on my longer sides, and ended up with a gabled box top instead.
To make the box a little more festive, I used the 123 Punch Board to create a bow (this is the XS bow size).
I give out a lot of gift cards, so I love having the option of making a quick gift card box now, too. If you're looking for a few more ideas for gift card giving, check out my festive Gift Card Envelopes or for a unique twist these Gift Card Coin Envelopes. If you have any questions about the creation of this gift card box, don't hesitate to leave me a comment or email me!
I wrote this post while participating on the Glue Dots® Design Team.
Labels:
Bella Blvd,
Glue Dots,
Illustrated Faith,
We R Memory Keepers
Monday, December 12, 2016
Masculine Christmas Tags
I'm over on the SRM blog with some masculine Christmas tags.
Head on over to the SRM Blog to see all the details on how I created these.
Labels:
Bella Blvd,
Illustrated Faith,
silhouette,
SRM
Friday, October 7, 2016
Gamer Birthday Layout
I feel like I've been doing a lot of paper crafting lately, but not a lot of scrapping, so I've decided to carve out a little time to get some layouts done. Up first is a layout from my son's 10th Birthday party. Here's my finished Gamer Birthday Layout.
My son requested a video game themed birthday party. You can find some of the decorations I made for the party here. We make the cake every year, too. I tend to do any baking, all over frosting, and sculpting out of fondant. My husband does any detail/drawing/fancy piping work with frosting. This year he also carved the cake into the shape of a video game controller for me.
When I saw the video game controller paper in Bella Blvd's new Alex collection, I knew exactly what I was going to use to scrap our photos from the party. I really like the bright colors and fun prints in this collection. Just look at that great blue/black plaid! It's so fun.
As my boys get older, I'm finding it a bit harder to find just the right paper collection for their photos. Alex is a great collection for when your boys are out of that little boy age, and you need some boy paper that's a little more mature.
I hope you're finding some time to get some scrapping done, too and that you enjoyed this gamer birthday layout.
My son requested a video game themed birthday party. You can find some of the decorations I made for the party here. We make the cake every year, too. I tend to do any baking, all over frosting, and sculpting out of fondant. My husband does any detail/drawing/fancy piping work with frosting. This year he also carved the cake into the shape of a video game controller for me.
When I saw the video game controller paper in Bella Blvd's new Alex collection, I knew exactly what I was going to use to scrap our photos from the party. I really like the bright colors and fun prints in this collection. Just look at that great blue/black plaid! It's so fun.
As my boys get older, I'm finding it a bit harder to find just the right paper collection for their photos. Alex is a great collection for when your boys are out of that little boy age, and you need some boy paper that's a little more mature.
I hope you're finding some time to get some scrapping done, too and that you enjoyed this gamer birthday layout.
Labels:
Bella Blvd
Friday, July 29, 2016
Using the Mini Alphabet Punch on a Layout
Summer gets soooo busy! I'm been trying really hard to make a few minutes here and there to sneak off to my craft room and scrap a page. I popped into my craft room the other day and manages to make a quick layout of a photo from earlier this month. I also got to use my We R Memory Keepers Mini Alphabet punch again, and let me tell you, using the mini alphabet punch on a layout is lots of fun!
We were in Wisconsin vacationing at my parents' place. This is a photo of my parents and my boys after we got home from church. I have so many photos from vacation, but this one felt like a good place to start. I wanted a great big title, so using the WRMK Mini Alphabet Punch was perfect for this. I needed the letters to pop a little more on the page, so a inked the edges with a bit of gray ink.
For my paper, I ended up with a mix of Bella Blvd Color Chaos and Doodlebug Love Bugs. Aqua, gray, and red is always one of my favorite color combos.
I kept my embellishments clean and simple with stickers from SRM's Labels by the Dozen Valentine, Sticker Sentiments Love, and We've Got Your Border Bright.
Have you used the WRMK Mini Alphabet Punch yet? I've now made a banner with it, dressed up an envelope with it, and created a layout title. I can definitely tell this is going to be one of those tools I reach for a lot!
We were in Wisconsin vacationing at my parents' place. This is a photo of my parents and my boys after we got home from church. I have so many photos from vacation, but this one felt like a good place to start. I wanted a great big title, so using the WRMK Mini Alphabet Punch was perfect for this. I needed the letters to pop a little more on the page, so a inked the edges with a bit of gray ink.
For my paper, I ended up with a mix of Bella Blvd Color Chaos and Doodlebug Love Bugs. Aqua, gray, and red is always one of my favorite color combos.
I kept my embellishments clean and simple with stickers from SRM's Labels by the Dozen Valentine, Sticker Sentiments Love, and We've Got Your Border Bright.
Have you used the WRMK Mini Alphabet Punch yet? I've now made a banner with it, dressed up an envelope with it, and created a layout title. I can definitely tell this is going to be one of those tools I reach for a lot!
Labels:
Bella Blvd,
SRM,
We R Memory Keepers
Friday, May 27, 2016
12 Years Anniversary Layout
Every year my husband and I do something for our anniversary. Sometimes it's just dinner and a movie, sometimes it's something bigger, but every year I make sure we take a photo to mark the celebration. All of these photos get scrapped and live in an album just for our anniversary layouts. I can't help but think how fun it will be to go back and look at an album full of anniversaries when we celebrate 25 or 40 or 50 years together. Today I'm sharing our 12 Years anniversary layout.
We don't actually celebrate 12 years together until June, but we had the opportunity to go to St. Simon's Island, Georgia. We decided to turn it into a bit of an anniversary trip.
I love the bright colors and watercolored feel Bella Blvd's Illustrated Faith collection. I used a mix of papers and heart shaped enamel dots from the collection.
I used some journaling cards and tags from Elle's Studio for my journaling and to add a few extra layers of embellishments to my layout.
I so love going through life with this guy! I can't get enough of spending time with him, and I am so thankful to be able to put our years together down on paper like I did with this 12 years anniversary layout.
We don't actually celebrate 12 years together until June, but we had the opportunity to go to St. Simon's Island, Georgia. We decided to turn it into a bit of an anniversary trip.
I love the bright colors and watercolored feel Bella Blvd's Illustrated Faith collection. I used a mix of papers and heart shaped enamel dots from the collection.
I used some journaling cards and tags from Elle's Studio for my journaling and to add a few extra layers of embellishments to my layout.
I so love going through life with this guy! I can't get enough of spending time with him, and I am so thankful to be able to put our years together down on paper like I did with this 12 years anniversary layout.
Labels:
Bella Blvd,
Elle's Studio
Friday, April 1, 2016
Doors of Dublin Layout
This is a personal blog. All editorial content and projects are
intellectual property of Taylor Stamped. I do receive financial
compensation and material product from A Walk Down Memory Lane to develop my craft posts, but all ideas and opinions are my own. Some links are affiliate links.
Today I have a layout that feels nice and spring-y. I think it's the mix of bright colors that makes it feel like spring to me. Today's Doors of Dublin layout mixes some fun patterns with some minimal embellishments.
There are these really amazing, bright, Georgian doors all over Dublin. There are parts of the city where they're a bit more concentrated, but you can really see them anywhere. I snapped a photo of these while we were just out driving around the city.
Bright doors needed some fun, bright paper so I reached for my stash of My Mind's Eye Jubilee Tangerine paper. There are so many fun patterns in this collection, that I really had a hard time choosing just a few. I ended up using as many as I could by layering up quite a few papers on top of each other. Since there's a lot going on in this layout color and pattern wise, I kept the embellishments fairly simple. I clustered some enamel dots from my stash and a few heart enamel dots from Bella Blvd.
Bright doors and some bright My Mind's Eye paper make for a fun spring layout about the doors of Dublin.
Today I have a layout that feels nice and spring-y. I think it's the mix of bright colors that makes it feel like spring to me. Today's Doors of Dublin layout mixes some fun patterns with some minimal embellishments.
There are these really amazing, bright, Georgian doors all over Dublin. There are parts of the city where they're a bit more concentrated, but you can really see them anywhere. I snapped a photo of these while we were just out driving around the city.
Bright doors needed some fun, bright paper so I reached for my stash of My Mind's Eye Jubilee Tangerine paper. There are so many fun patterns in this collection, that I really had a hard time choosing just a few. I ended up using as many as I could by layering up quite a few papers on top of each other. Since there's a lot going on in this layout color and pattern wise, I kept the embellishments fairly simple. I clustered some enamel dots from my stash and a few heart enamel dots from Bella Blvd.
Bright doors and some bright My Mind's Eye paper make for a fun spring layout about the doors of Dublin.
Labels:
Bella Blvd,
My Mind's Eye
Monday, March 28, 2016
Derry at Night Layout
This is a personal blog. All editorial content and projects are
intellectual property of Taylor Stamped. I do receive financial
compensation and material product from A Walk Down Memory Lane to develop my craft posts, but all ideas and opinions are my own. Some links are affiliate links.
Sometimes there is a city that you just have to photograph during the day and at night. We arrived in Londonderry durning the day, but I knew I'd just have to go out again after it got dark to capture some of the views of this beautiful city. Today I'm sharing my Derry at Night layout.
Thanks to the location of our hotel, the City Hotel, all we had to do was walk out the front door to be able to capture places like the Peace Bridge and the Guild Hall at night. We could actually see these views right from our hotel window, but I wanted to get a little more up close and personal.
I used a bit of a strange mix of papers for this layout. I started with the night sky/stars paper. I actually had it for scrapping camping photos as it's from Bella Blvd's Camp Out collection, but I knew it could be really fun for this layout.
I love how navy and kraft look together, so I pulled a piece of kraft and gold paper from American Crafts. For the border I thought I might be able to get away with a black chevron from Pebbles Inc. It helps pull in the black from the star paper without being too dark.
I needed to bring all of these papers together with some cohesive embellishments. Simple Stories Gold Snap Pack has kraft, black, gold, and white all in the mix of journaling cards and embellishments, so I used those. Little clusters of these kraft, gold, black, and white embellishments really help pull everything together.
We really loved our quick stay in Derry. Photographing Derry at night was just the thing to end a fabulous day there. Is there a city you love even more at night than during the day time?
Sometimes there is a city that you just have to photograph during the day and at night. We arrived in Londonderry durning the day, but I knew I'd just have to go out again after it got dark to capture some of the views of this beautiful city. Today I'm sharing my Derry at Night layout.
Thanks to the location of our hotel, the City Hotel, all we had to do was walk out the front door to be able to capture places like the Peace Bridge and the Guild Hall at night. We could actually see these views right from our hotel window, but I wanted to get a little more up close and personal.
I used a bit of a strange mix of papers for this layout. I started with the night sky/stars paper. I actually had it for scrapping camping photos as it's from Bella Blvd's Camp Out collection, but I knew it could be really fun for this layout.
I love how navy and kraft look together, so I pulled a piece of kraft and gold paper from American Crafts. For the border I thought I might be able to get away with a black chevron from Pebbles Inc. It helps pull in the black from the star paper without being too dark.
I needed to bring all of these papers together with some cohesive embellishments. Simple Stories Gold Snap Pack has kraft, black, gold, and white all in the mix of journaling cards and embellishments, so I used those. Little clusters of these kraft, gold, black, and white embellishments really help pull everything together.
We really loved our quick stay in Derry. Photographing Derry at night was just the thing to end a fabulous day there. Is there a city you love even more at night than during the day time?
Labels:
American Crafts,
Bella Blvd,
pebbles inc,
Simple Stories
Thursday, February 11, 2016
Black, White, and Silver Layout
This is a personal blog. All editorial content and projects are
intellectual property of Taylor Stamped. I do receive financial
compensation and material product from American Crafts and A Walk Down Memory Lane to develop my craft posts, but all ideas and opinions are my own. Some links are affiliate links.
I love using lots of color on my layouts, but once in a while it's fun to play around with the absence of color on a layout. Today, I have a black, white, and silver layout.
I started with a Bella Blvd Clear Cut. I loved the black arrows and adventure words for my travel layout. Since the paper is clear, I backed it with a piece of simple white card stock.
To bring in some interest, I matted each of my photos with shiny silver card stock. I carried more of the silver throughout the layout with the help of some silver Therm O Web Deco Foil and some Heidi Swapp Minc Insta Cards.
Finally I added a few more touches of black, white, and silver with some We R Memory Keepers Clearly Posh Ephemera and We R Enamel Dots and Shapes.
This black, white, and sliver layout is a nice break from my normal bright colors. It has a fun, modern and sophisticated feel, and successfully tells the story I wanted to tell!
I love using lots of color on my layouts, but once in a while it's fun to play around with the absence of color on a layout. Today, I have a black, white, and silver layout.
I started with a Bella Blvd Clear Cut. I loved the black arrows and adventure words for my travel layout. Since the paper is clear, I backed it with a piece of simple white card stock.
To bring in some interest, I matted each of my photos with shiny silver card stock. I carried more of the silver throughout the layout with the help of some silver Therm O Web Deco Foil and some Heidi Swapp Minc Insta Cards.
Finally I added a few more touches of black, white, and silver with some We R Memory Keepers Clearly Posh Ephemera and We R Enamel Dots and Shapes.
This black, white, and sliver layout is a nice break from my normal bright colors. It has a fun, modern and sophisticated feel, and successfully tells the story I wanted to tell!
Labels:
Bella Blvd,
Heidi Swapp,
Therm O Web,
We R Memory Keepers
Subscribe to:
Posts (Atom)