Wednesday, June 29, 2011
It's That Time of Year
It's the time of year where we are reminded how blessed we are to live in this country. We're also reminded of the amazing men and women who give so much for others. This past weekend I was blessed to be a part of an event at my local scrap store that was sponsored by a number of companies (including We R Memory Keepers) to make cards for Operation Write Home. These cards will be sent (along with many, many others) to the men and women of our armed forces. If you're not familiar with Operation Write Home, you can check them out here. They are a very cool organization that has sent out over 1 million cards to date. If you're feeling especially blessed this 4th, you can also check out Anysoldier.com. It's another awesome organization where you can find info on sending notes of thanks and care packages to the troops.
Ok, now on to the details about the cards! I finally got around to cutting fabric with my Silhouette. Let me tell you, it was so easy! If you can cut paper with your Silhouette, and you can work an iron, you can cut fabric. I found patriotic linen napkins that were just too cool to pass up, so I used them here for the stars. I paired the stars up with My Mind's Eye's American Made paper, added a button or 2 and some ribbon, and ta-da some star-spangled cards.
Wishing you a blessed weekend and beautiful 4th of July!
Tuesday, June 28, 2011
We Cally You Trouble
The patterned paper is from Crate Paper's Toy Box line, as are the border stickers (the red triangle accents), and the brad in the bottom right corner. The alphabet stickers are from Jillibean Soup, and the journaling was done on my computer.
Thursday, June 23, 2011
Fun in the Sun
I had to share 1 last Simple Stories 100 Days of summer layout. This one is so much better in person! I added Stickles to the sun in the title strip and the word "sun". I added Glossy Glaze to the "fun in the sun" and blue swirl part of the title. It was a simple way to really make the title strip pop, and add some texture.
Tuesday, June 21, 2011
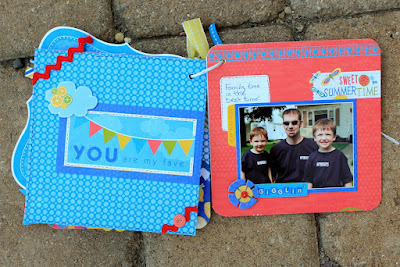
Summer Parade Mini Album
Monday, June 20, 2011
Simple Stories Layout #2
I wanted to chat a bit about Simple Stories today since I've been working with their 100 Days of Summer line quite a bit. There are a lot of scrapbook companies out there, but Simple Stories does scrapping a bit differently. Simple Stories is a system that contains pre-designed element pices (journaling tags, photo mats, quote blocks, and titles) that are printed on double-sided 12 x 12 sheets of paper. All you have to do is cut them apart to create a custom page. You can use the pices as you normally would on a layout, or you can slip them into specially sectioned page protectors (check out We R Memory Keepers 12" x 12" divided page protectors). You're pages go together really quickly!
Friday, June 17, 2011
Simple Stories
2 Years
Paper: Simple Stories 100 Days of Summer
Accessories: Simple Stories 100 Days of Summer Alpha Stickers, My Mind's Eye Stella and Rose Buttons, Tim Holtz Tissue Tape
Tools: EK Success Edger Punch Bracket, We R Memory Keepers Corner Chomper
Thursday, June 16, 2011
Helping a Hero with...
|
|
Wednesday, June 15, 2011
Gasp!
Our Simply Wonderful Summer Mini Album by Samantha Taylor
Book: Fancy Pants Artist Edition Chipboard Banners
Paper: Pink Paislee Hometown Summer (Sunnyside Lane, Heat Wave, Summer Fun, Neighborhood Pool), Jillibean Soup Staples
Stamps: My Favorite Things Polka Dot Greetings
Ink: Versamark
Accessories: Pink Paislee Hometown Summer Border Stickers, Pink Paislee Hometown Summer Rubber Charms, Pink Paislee Soiree Twine, American Craft Zing Clear Embossing Zing Powder, American Craft Aqua Zing Embossing Powder, Cosmo Cricket Tiny Type Alpahs, The Twinery Twine, Jenni Bowlin Malted Milk Paint, Jillibean Soup Dutch Mustard Soup Cardstock Stickers, Jillibean Soup Spotted Owl Soup Cardstock Stickers, Jillibean Soup Corrugated Alphas, Pebbles Inc. Candy Dots, Fancy Pants It’s Your Day Buttons, Doodlebug Boutique Buttons, Making Memories Journaling Pad, Echo Park For the Record Alpha Stickers, Jillibean Soup Bean Blossoms
Tools: Fiskar’s Uppercrest Border Punch, Fiskar’s Scalloped Sentiments Border Punch
Monday, June 13, 2011
I Love a Parade
Here's my version:
The theme for the challenge this time around is Song Lyrics. Since I had recently taken photos of my kids at a parade I chose, "I love a parade".
I didn't make too many changes to the sketch. I took the sketch and rotated it 90 degrees. Sometimes when working with a sketch I focus on 1 element to highlight. This time I took the scalloped border and focused on that. I kept the rest of the layout fairly minimal so as not to overwhelm the photos.
Sunday, June 12, 2011
Glitter Ritz Card Class
Glitter Ritz Cards
AWDML now carries Glitter Ritz Glitter. You have to see this glitter in person to truly understand how cool it is. It's low mess and satiny in texture. In this class Samantha will teach you how to apply it, color it, use it with patterned paper, stickers, and stamps while making 3 cards. The best part? You go home with your own container of Glitter Ritz Glitter (a $7.49 value)! Call AWDML at (712)476-3443 to reserve your spot!
Cost:$20
June 18 from 10:15 am - 12 pm
Thursday, June 9, 2011
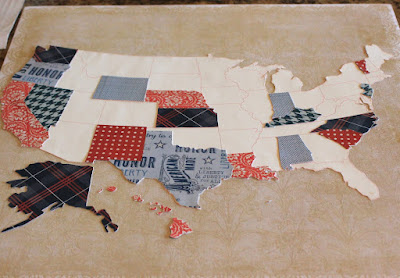
Geography Time
My map is 12" x 12". I did this because I wanted to use a 12" x 12" piece of cork behind the paper as backing. We plan on sticking pins in it to show where Dad (my husband) is traveling for work (he travels a fair amount, and I think it will be fun for the kids to track him).
I also cut the large background US (seen here in white) with my Silhouette machine. It was also used to cut the state template pieces. However, I still cut the patterned paper states by hand.
The biggest difference is that I used My Mind's Eye's American Made paper. I think it's the perfect line for this patriotic project.
Wednesday, June 8, 2011
Father's Day Card Alternative
If you're looking for a Father's Day project, I've got one featuring Glue Dots® for you today. I wanted to make an alternative to a card for Father's Day this year, so I decided to fill tubes from SRM with candy (who doesn't love the new Pretzel M & M's...seriously) and add a tag instead of a card. This is also a great project for using up scraps and bits and pieces of leftover papers and stickers. Here's the breakdown:
What you'll need:
Memory Book Glue Dots®
Scraps of paper (my largest measures 3" x 4") (I'm using Mr. Boy from Bella Blvd.)
Matching embellishments
Ribbon or Twine
Stickers or Stamps (I'm using stickers from SRM and Bella Blvd.)
Plastic Tube (the ones I used are from SRM Stickers)
Candy
I made a little decorative strip for the bottom of the tube. Cut a strip of paper about 1 1/4" tall and punch it with a decorative border punch. The length of your strip will be determined by the circumference of your tube.
Now you will put Memory Book Glue Dots® on both the inside and outside edge of your strip of paper. The Glue Dot® on the inside will secure the paper to the tube (since Glue Dots® are clear the adhesive is virtually undetectable even when the tube is empty). The Glue Dot® on the outside of the paper strip will secure the paper to itself when you wrap the strip around the tube.
To create the tag, you will need 2 pieces of 3"x4" paper per tag. As you can see in the photo, I didn't want the back sides (the dog print and the "future athlete" paper) to show, so I took 1 piece of wood grain paper and adhered it with Memory Book Glue Dots®
If you put 1 Glue Dot® in each corner, you'll get a nice firm hold.
Embellish your tags with paper and stickers.
Attach your tag with ribbon or twine around the top of the tube. I tied my ribbon in a knot instead of a bow to make it a little more manly.
Now you have a tasty alternative to a card!
*I wrote this blog post while participating on the Glue Dots® Design Team.
Monday, June 6, 2011
Another one checked off the "to craft" list
It feels like I'm saying, "I finally got to use ______ paper," or " I finally got to scrap _______ photos" a lot lately. It sure feels nice to clear some things off of my "to craft" list (yes, I actually have a physical, down on paper, "to craft" list). It feels really good! Here's another one of those. Today I finally have my photos from St. Patty's Day scrapped. Woo hoo!
P.S. This layout is done with a big thank you to Little Yellow Bicycle. I won this line (Lucky Me) from them months ago.
Thursday, June 2, 2011
4th of July Decorations and Tutorial
With Memorial Day in my rear view, I have to admit, I've already begun thinking about the 4th of July. It probably doesn't help that my local scrap store (A Walk Down Memory Lane) just got in My Mind's Eye's American Made line. I love every sheet in this line...both sides. I'm pretty sure Tommy Hilfiger is jealous of the beautiful prints. I've stashed some American Made away to make some 4th of July layouts after all the fun this year, but first I made some patriotic decorations.
What you'll need:
~Ultra Thin or Permanent Glue Dots®
~Double sided patterned paper (you can get 2 decorations per 12 x 12 sheet)
~Scoring Tool
~Strong Scissors
~Ribbon, Twine, or String
First, cut your paper to 6" x 10".
Score the paper lengthwise, every 1/2" from 1/2" to 9 1/2".
Turn your paper and score it height wise at 3".
Accordion fold the 1/2" folds and hold tightly together.
Take a length of twine, string, or ribbon and tie it as tightly as possible around the center of your paper (there should be a score mark at the middle that you can uses as a guide).
Cut the ends of your paper at opposite angles (This is the hardest part of the project. You'll need a good, strong scissors and some elbow grease to cut through the thick layers of paper).
Add Ultra Thin Glue Dots® to the flat edge of the paper.
Fan out the paper, and press the seams firmly together.
Now all you have to do is decorate!
As you can see I've used ribbon to hang one star medallion, and attached a stick to the other one for a table decoration. If you're having a 4th of July party, you could make multiple medallions attached to sticks for table decor that guests can also use as hand fans. I also think the hanging medallions would be really lovely worked into a garland or wreath.
*I wrote this blog post while participating on the Glue Dots® Design Team.
You Can Fly
Remember when swinging was sooooo much fun? I love the joy in these photos. Jillibean's Watermelon Gazpacho was just perfect for capturing the moment.
I hope you and yours are enjoying the simple pleasures of summer!