I've had the idea for this The Heavens Declare Bible Journaling in my head for about six months now. I finally took the time to sit down and get that idea on paper. I'm loving how it turned out.
The idea for this Bible journaling started with Paper House's Stargazer Faux Enamel Stickers. Photos of these stickers do not do them justice. They seriously look like an enamel design. All of Paper House's faux enamel stickers are gorgeous.
While the idea started with the stickers, they were actually the very last part of this layout. I started by using Washi tape to mask of the verse my journaling was based on. Then, I layered up my Distress Ink. I chose Distress Ink colors that matched the colors on the stickers. Make sure to start with the lightest color and layer on working up to the darkest color.
I added to the galaxy feel by adding dots from white and gold paint pens as well as black and silver Wink of Stella glitter pens. Then I added the Stargazer Faux Enamel Stickers. Finally, I created a page tab from Stargazer patterned paper and added another sticker to the tab.
Want to pick up these Stargazer stickers for yourself? You can always enter my affiliate code PH19SAMANTHA at checkout to get 20% off your entire order at Paper House.
I wrote this post while participating on the Paper House Design Team.
Showing posts with label Tim Holtz. Show all posts
Thursday, July 11, 2019
Friday, October 19, 2018
Autumn Card with Glue Dots and Pretty Pink Posh
Hello! Welcome to your next stop on this very fun collaboration with Glue Dots and Pretty Pink Posh! Today I have an autumn card with Glue Dots and Pretty Pink Posh to share.
Glue Dots® products used: Pop Up Glue Dots® and Permanent Glue Tape®.
Pretty Pink Posh products used: Autumn Blooms Stamp Set, Autumn Blooms Dies, and Happy Owls.
Autumn Blooms is a versatile set that can be used for lots of seasons. To keep that autumn feel, I went with some greens, teal blues, deep purples, and rich oranges for my color palette.
Glue Dots® Premium Glue Tape is my go to adhesive for putting cards together. I used Pop Up Glue Dots® to add some dimension to my "congrats" panel.
Check out the rest of today's projects at the following links:
And if you missed the stops on yesterday's hop, check them out here:
Labels:
Glue Dots,
Pretty Pink Posh,
Tim Holtz
Wednesday, August 22, 2018
Prayers Sympathy Cards
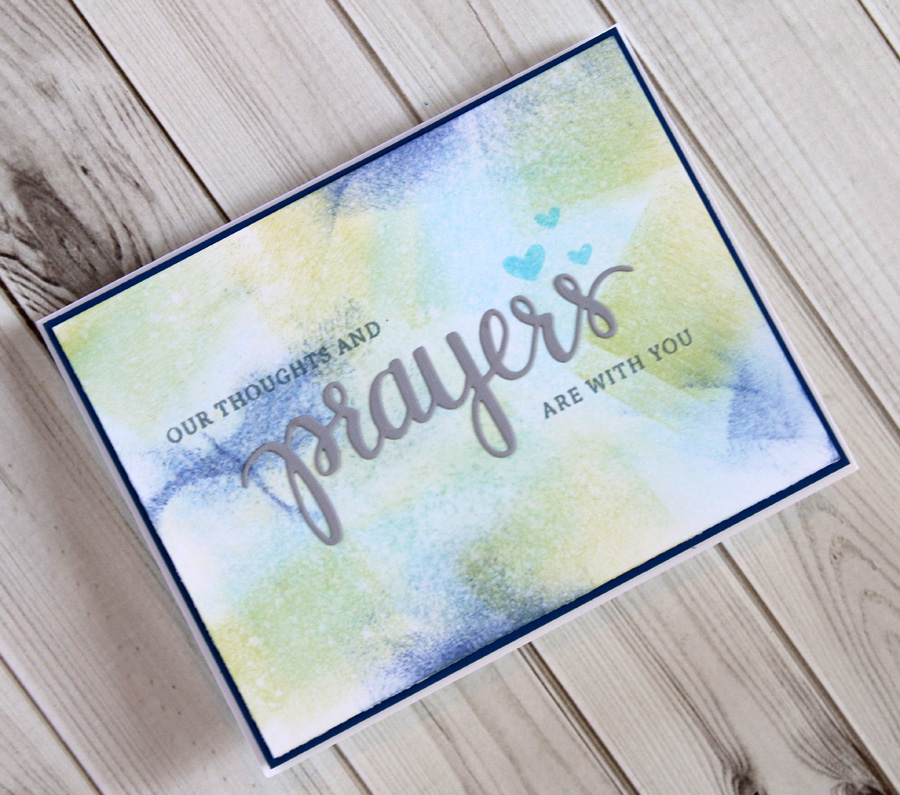
I have, unfortunately needed far too many sympathy cards lately. While never the easiest to make, I thought I'd share my prayers sympathy cards today.
I used the Hero Arts Prayers stamp and matching die set as my starting point. I've had the set for a very long time, but this is the first time I've used it.
I then used a similar color palette of blues, greens, and gray or black throughout the set of cards.
I used different mediums like stamps, stencils, and ink blending to create different backgrounds for each of the cards.
My goal was to make the backgrounds soft to keep the focus on the sentiment.
While I don't love having a reason to use cards like these, it is so nice to have some on hand to send when they are needed.
I used the Hero Arts Prayers stamp and matching die set as my starting point. I've had the set for a very long time, but this is the first time I've used it.
I then used a similar color palette of blues, greens, and gray or black throughout the set of cards.
I used different mediums like stamps, stencils, and ink blending to create different backgrounds for each of the cards.
My goal was to make the backgrounds soft to keep the focus on the sentiment.
While I don't love having a reason to use cards like these, it is so nice to have some on hand to send when they are needed.
Thursday, December 14, 2017
Winter Coffee Thank You Card
The Coffee Lovers' Blog is having a winter themed blog hop. I had so much fun playing along with the fall hop that I couldn't pass up the chance to create something for the winter hop I came up with a clean and simple winter coffee thank you card.
For this card I used the coffee cup from SRM's Coffee Plans stamp set (which also happens to be one of the prizes you can win if you play along with the hop) and the snowflake from SRM's Seasonal Plans stamp set. The greeting is an SRM sticker from Thank You Sentiments.
I stamped my background with 3 different shades of blue Distress Ink. After stamping and adding my sentiment, I felt like the card still needed something, so I added a little glitter (with some Stickles) to the center of each snowflake.
Want some more winter coffee card inspiration? Head on over to the hop for hundreds of amazing card and project ideas!
I wrote this post while participating on the SRM Design Team.
For this card I used the coffee cup from SRM's Coffee Plans stamp set (which also happens to be one of the prizes you can win if you play along with the hop) and the snowflake from SRM's Seasonal Plans stamp set. The greeting is an SRM sticker from Thank You Sentiments.
I stamped my background with 3 different shades of blue Distress Ink. After stamping and adding my sentiment, I felt like the card still needed something, so I added a little glitter (with some Stickles) to the center of each snowflake.
Want some more winter coffee card inspiration? Head on over to the hop for hundreds of amazing card and project ideas!
I wrote this post while participating on the SRM Design Team.
Wednesday, June 28, 2017
Thanks So Much Card
I recently needed a thank you card. I decided to use a stamp and die set that I've had forever, but just haven't had the chance to use yet.
I used the Hero Arts Thanks Die and Clear Acrylic Stamp Set. The "thanks" die, "so much, you are awesome" stamps, and star stamps are all part of the set. I used a simple oval die to cut a hole in the white card stock to create a bold backdrop for the thanks die cut.
I used Tim Holtz Distress Ink in Cracked Pistachio, Blueprint Sketch, and Squeezed Lemonade to stamp my sentiments and stars.
This thanks so much card definitely falls into the clean and simple category. I'm so glad I finally got to use this great stamp and die set.
I used the Hero Arts Thanks Die and Clear Acrylic Stamp Set. The "thanks" die, "so much, you are awesome" stamps, and star stamps are all part of the set. I used a simple oval die to cut a hole in the white card stock to create a bold backdrop for the thanks die cut.
I used Tim Holtz Distress Ink in Cracked Pistachio, Blueprint Sketch, and Squeezed Lemonade to stamp my sentiments and stars.
This thanks so much card definitely falls into the clean and simple category. I'm so glad I finally got to use this great stamp and die set.
Labels:
Hero Arts,
Ranger Ink,
Tim Holtz
Friday, April 14, 2017
Isaiah 53 Bible Journaling
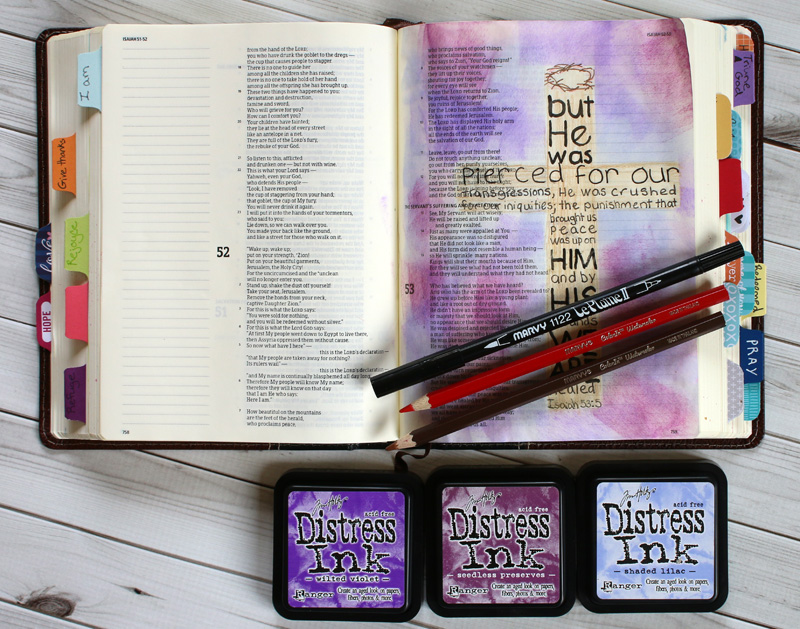
I have always loved the message of Good Friday. I love the time it gives for reflection and the message of Christ crucified that I may live. I love that our sorrow is short lived and we look forward to an Easter of rejoicing. Today I wanted to do a bit of Isaiah 53 Bible journaling.
I wrote Isaiah 53:5 in the shape of a cross. I then went over my writing with an eraser to distress the words a bit. I shaded over the words with a brown pencil to give the cross a more solid feel.
While purple isn't usually my favorite color, it is the color of lent. It was definitely the right feel for this page. I used 3 different colors of purple Distress ink and sponged it on the background. I just used a bit of scratch paper to mask off the cross.
I hope you have time to reflect this Good Friday. Have a blessed Easter!
I wrote Isaiah 53:5 in the shape of a cross. I then went over my writing with an eraser to distress the words a bit. I shaded over the words with a brown pencil to give the cross a more solid feel.
While purple isn't usually my favorite color, it is the color of lent. It was definitely the right feel for this page. I used 3 different colors of purple Distress ink and sponged it on the background. I just used a bit of scratch paper to mask off the cross.
I hope you have time to reflect this Good Friday. Have a blessed Easter!
Labels:
Bible Journaling,
Ranger Ink,
SRM,
Tim Holtz
Friday, January 27, 2017
I Am Bible Journaling
Today I wanted to share my I Am Bible journaling page. It's not the prettiest page I've ever made, but I wanted to share how I combined many of my Bible journaling stamp sets to create it. Hopefully it will have you looking at your sets in new ways.
I started by inking the edge of my bible with Fossilized Amber and Squeezed Lemonade Distress Ink. Then, I stamped my border and my words.
I used stamps from 4 different SRM Bible journaling stamp sets (I Am, Big Praise, Sing & Rejoice, and The Lord is Kind & Merciful) to create the look I wanted for my journaling. I stamped everything in Pumice Stone Distress Ink. Then I used a blue pen to highlight the words. Finally, I added a little matching washi tape in center.
By mixing and matching my stamp sets I can get so much use out of them and use them in so many more places in my Bible journaling.
I created this post while participating on the SRM design team.
I started by inking the edge of my bible with Fossilized Amber and Squeezed Lemonade Distress Ink. Then, I stamped my border and my words.
I used stamps from 4 different SRM Bible journaling stamp sets (I Am, Big Praise, Sing & Rejoice, and The Lord is Kind & Merciful) to create the look I wanted for my journaling. I stamped everything in Pumice Stone Distress Ink. Then I used a blue pen to highlight the words. Finally, I added a little matching washi tape in center.
By mixing and matching my stamp sets I can get so much use out of them and use them in so many more places in my Bible journaling.
I created this post while participating on the SRM design team.
Labels:
Bible Journaling,
SRM,
Tim Holtz
Wednesday, January 18, 2017
I Am Redeemed
It's been a while since I've shared some Bible Journaling here. SRM just announced their latest Bible Jouranling stamps, and they are so fantastic. I got my sets and couldn't wait to get journaling. Today I have an I Am Redeemed Bible journaling to share.
I used SRM's new I Am stamp set for this page. I am is available in this set in 2 different fonts. It makes for so many possibilities. When I was reading this section of scripture it made me think of Luther's explanation to the 2nd article of the Apostle's Creed, so after I stamped, "I am redeemed" I wrote the explanation for my response to the verse.
I used a Reminisce white gel pen (also newly available from SRM) to highlight my stamped words and arrow. I uses 3 different shades of Distress Ink (Shaded Lilac, Squeezed Lemonade, and Broken China) to add color to the background of my page.
I love all the possiblities for the new stamp sets from SRM! You will be seeing them a lot from me in the near future. Have a blessed day! I am redeemed!
I used SRM's new I Am stamp set for this page. I am is available in this set in 2 different fonts. It makes for so many possibilities. When I was reading this section of scripture it made me think of Luther's explanation to the 2nd article of the Apostle's Creed, so after I stamped, "I am redeemed" I wrote the explanation for my response to the verse.
I used a Reminisce white gel pen (also newly available from SRM) to highlight my stamped words and arrow. I uses 3 different shades of Distress Ink (Shaded Lilac, Squeezed Lemonade, and Broken China) to add color to the background of my page.
I love all the possiblities for the new stamp sets from SRM! You will be seeing them a lot from me in the near future. Have a blessed day! I am redeemed!
Labels:
Bible Journaling,
Ranger Ink,
SRM,
Tim Holtz
Wednesday, October 5, 2016
Emboss Resist Bible Journaling Background
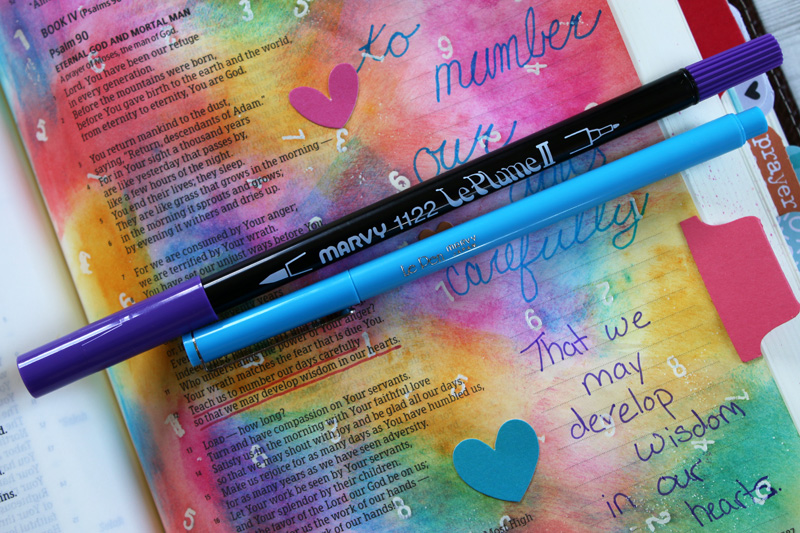
I've been thinking about trying and emboss resist Bible journaling background for a while. Emboss resist has always been one of my favorite techniques, but I wasn't sure if it would work out okay. I recently had a Bible study on Psalm 90:12 (Teach us to number our days), and it seemed like just the right time to try out heat embossing in my Bible.
I wanted to create a number background to go with my verse. I don't have a big number background stamp, so I created my own from the numbers in the SRM Today, Tomorrow, To Do stamp set. I stamped the numbers with Versamark ink and then embossed with clear embossing powder. It was a little tough to get into the center of the Bible, but otherwise It wasn't that much harder than heat embossing on a card. To get the extra embossing powder off of the page (before heat embossing) I just held the page straight up and encouraged the embossing powder to fall into the center crack of my Bible. From there, I just funneled the powder back into the embossing powder container.
After I heat embossed my numbers, I finished my background by sponging on some Distress Ink.
I try to push myself a bit when it come to picking color combos for Bible journaling. This one's a little different for me, but I absolutely love the way these 4 colors blend together. In case you can't see them well, they are: Picked Raspberry, Abandoned Coral, Spiced Marmalade, and Mermaid Lagoon.
I finished up my page by using some Marvy pens to add the verse to the margin. I also added a few heart stickers.
I'm going to call this emboss resist Bible journaling background a success. Now that I know I can do it (and that it's pretty easy!) I will definitely be using it more in my Bible journaling. Have you done any stamping or heat embossing in your Bible?
I created this post while working on the SRM Design Team.
I wanted to create a number background to go with my verse. I don't have a big number background stamp, so I created my own from the numbers in the SRM Today, Tomorrow, To Do stamp set. I stamped the numbers with Versamark ink and then embossed with clear embossing powder. It was a little tough to get into the center of the Bible, but otherwise It wasn't that much harder than heat embossing on a card. To get the extra embossing powder off of the page (before heat embossing) I just held the page straight up and encouraged the embossing powder to fall into the center crack of my Bible. From there, I just funneled the powder back into the embossing powder container.
After I heat embossed my numbers, I finished my background by sponging on some Distress Ink.
I try to push myself a bit when it come to picking color combos for Bible journaling. This one's a little different for me, but I absolutely love the way these 4 colors blend together. In case you can't see them well, they are: Picked Raspberry, Abandoned Coral, Spiced Marmalade, and Mermaid Lagoon.
I finished up my page by using some Marvy pens to add the verse to the margin. I also added a few heart stickers.
I'm going to call this emboss resist Bible journaling background a success. Now that I know I can do it (and that it's pretty easy!) I will definitely be using it more in my Bible journaling. Have you done any stamping or heat embossing in your Bible?
I created this post while working on the SRM Design Team.
Labels:
Bible Journaling,
Marvy,
Ranger Ink,
SRM,
Tim Holtz
Monday, April 18, 2016
Yupo Alcohol Ink Card
This is a personal blog. All editorial content and projects are
intellectual property of Taylor Stamped. I do receive financial
compensation and material product from A Walk Down Memory Lane to develop my craft posts, but all ideas and opinions are my own. Some links are affiliate links.
After seeing the card Lisa over at A Walk Down Memory Lane made with Yupo Alcohol Ink paper, I knew I had to try the stuff out...right away! Here's my first attempt at a Yupo Alcohol ink card.
This paper is so cool! Yupo translucent alcohol ink paper is actually a plastic paper. Because it's not a traditional paper it reacts differently with alcohol ink. Creating fun backgrounds with Yupo paper and alcohol ink is so simple.
There are a few different ways you can use these 2 things together. For this background I simply dripped the alcohol ink right from the bottle onto the paper. Give it a minute or so to spread out and travel, then choose another color and drip some more. Keep dripping until your paper has as much coverage and color as you want.
For a little extra texture, I put some alcohol ink blending solution on a paint brush and flicked it at the paper when I was all done. This added a few "water spots" to the paper.
I used my We R Memory Keepers Evolution Advanced and the dies that come with the Evolution to create a little spot on the card for my greeting.
Yupo paper and alcohol ink makes a really simple and stunning background for a Mother's Day card, or any card! Have you tried out this cool paper yet?
After seeing the card Lisa over at A Walk Down Memory Lane made with Yupo Alcohol Ink paper, I knew I had to try the stuff out...right away! Here's my first attempt at a Yupo Alcohol ink card.
This paper is so cool! Yupo translucent alcohol ink paper is actually a plastic paper. Because it's not a traditional paper it reacts differently with alcohol ink. Creating fun backgrounds with Yupo paper and alcohol ink is so simple.
There are a few different ways you can use these 2 things together. For this background I simply dripped the alcohol ink right from the bottle onto the paper. Give it a minute or so to spread out and travel, then choose another color and drip some more. Keep dripping until your paper has as much coverage and color as you want.
For a little extra texture, I put some alcohol ink blending solution on a paint brush and flicked it at the paper when I was all done. This added a few "water spots" to the paper.
I used my We R Memory Keepers Evolution Advanced and the dies that come with the Evolution to create a little spot on the card for my greeting.
Yupo paper and alcohol ink makes a really simple and stunning background for a Mother's Day card, or any card! Have you tried out this cool paper yet?
Labels:
Ranger Ink,
Stamp School,
Tim Holtz,
We R Memory Keepers,
Yupo
Thursday, January 28, 2016
Getting Started Bible Journaling
This is a personal blog. All editorial content and projects are
intellectual property of Taylor Stamped. I do receive financial
compensation and material product from A Walk Down Memory Lane to develop my craft posts, but all ideas and opinions are my own. Some links are affiliate links.
As you probably know, Bible journaling is really popular. The moment I saw it, I fell in love with the idea of it...but here's the thing, I'm no artist. I'm a paper crafter, but I don't art journal, I can't draw, and I don't even have very good handwriting. I decided, though, that it doesn't matter. I want to journal in my Bible. There are some amazing Bible journaling artist out there, and my pages aren't going to look like theirs (not now, and maybe not ever), but that's okay. Today's post is just a bit of encouragement and a few things I've found helpful for getting started Bible journaling.
First of all, if you're already a paper crafter, I'd encourage you to use what you have in your stash. Have lots of inks? Use those. Love Gelatos? Use those. Like to stamp? Then by all means, stamp in your Bible! Then start building on your stash as you find your groove and learn what you like to use. A few things I do suggest having are:
1. A journaling Bible or if you're want to start with something a little less permanent, a pretty journal, or a Bible Study Book (I love the ones from She Reads Truth, and they're great for journaling in).
2. Some good pens. I love the Illustrated Faith Pen (that I bought specifically for Bible Journaling), and I use a handful of colored American Crafts Precision Pens (that I already own for layout journaling).
3. Something to place behind the page you're working on to keep the ink/paint/whatever from bleeding into the rest of your Bible. I started by just using a thin piece of cardboard, but as soon as I could get my hands on an Illustrated Faith Bible Mat, I got that (you can see it peeking out from behind my pages in some of the photos below). It really helps to protect your Bible.
That's all I bought to begin. Everything else I have been using for the past 6 months or so has come from my craft stash. Now, I'll show you how I created the page above.
Since I'm not great with drawing, I love to add color and drama to my pages with inks and watercoloring. I thought I'd combine the two by doing some watercoloring with my Distress Inks. I just pressed my inks in Cracked Pistachio, Squeezed Lemonade, and Picked Raspberry directly onto my Sticky Thumb Splat Mat. Then I used a Water Brush to pick up the inks and paint then directly onto my Bible page.
Next, I used a Penny Black stencil to add some dots to my journaling space. I placed some washi tape on the stencil to block off the area of the stencil that I wanted to use. I sponged some Picked Raspberry ink directly onto the paper through the stencil.
I finished up by adding my journaling, some washi tape, and a few stickers.
My finished page isn't perfect, but it's my thoughts on this part of Genesis written down in a way that makes my creative heart happy.
Have you tried out Bible journailing? What are some of your favorite techniques to use?
As you probably know, Bible journaling is really popular. The moment I saw it, I fell in love with the idea of it...but here's the thing, I'm no artist. I'm a paper crafter, but I don't art journal, I can't draw, and I don't even have very good handwriting. I decided, though, that it doesn't matter. I want to journal in my Bible. There are some amazing Bible journaling artist out there, and my pages aren't going to look like theirs (not now, and maybe not ever), but that's okay. Today's post is just a bit of encouragement and a few things I've found helpful for getting started Bible journaling.
First of all, if you're already a paper crafter, I'd encourage you to use what you have in your stash. Have lots of inks? Use those. Love Gelatos? Use those. Like to stamp? Then by all means, stamp in your Bible! Then start building on your stash as you find your groove and learn what you like to use. A few things I do suggest having are:
1. A journaling Bible or if you're want to start with something a little less permanent, a pretty journal, or a Bible Study Book (I love the ones from She Reads Truth, and they're great for journaling in).
2. Some good pens. I love the Illustrated Faith Pen (that I bought specifically for Bible Journaling), and I use a handful of colored American Crafts Precision Pens (that I already own for layout journaling).
3. Something to place behind the page you're working on to keep the ink/paint/whatever from bleeding into the rest of your Bible. I started by just using a thin piece of cardboard, but as soon as I could get my hands on an Illustrated Faith Bible Mat, I got that (you can see it peeking out from behind my pages in some of the photos below). It really helps to protect your Bible.
That's all I bought to begin. Everything else I have been using for the past 6 months or so has come from my craft stash. Now, I'll show you how I created the page above.
Since I'm not great with drawing, I love to add color and drama to my pages with inks and watercoloring. I thought I'd combine the two by doing some watercoloring with my Distress Inks. I just pressed my inks in Cracked Pistachio, Squeezed Lemonade, and Picked Raspberry directly onto my Sticky Thumb Splat Mat. Then I used a Water Brush to pick up the inks and paint then directly onto my Bible page.
Next, I used a Penny Black stencil to add some dots to my journaling space. I placed some washi tape on the stencil to block off the area of the stencil that I wanted to use. I sponged some Picked Raspberry ink directly onto the paper through the stencil.
I finished up by adding my journaling, some washi tape, and a few stickers.
My finished page isn't perfect, but it's my thoughts on this part of Genesis written down in a way that makes my creative heart happy.
Have you tried out Bible journailing? What are some of your favorite techniques to use?
Labels:
Bella Blvd,
Bible Journaling,
Illustrated Faith,
Ranger Ink,
Tim Holtz
Monday, June 29, 2015
Selfie Mini Album
I wanted to make a quick mini album of all the photos that my husband and I are in together from our trip to Ireland. After all, the whole reason for the trip was to celebrate 10 years of being together. Today I have that selfie mini album.
I thought it would be fun to use the Tim Holtz Idea-ology Flip Frame to bind/display my album. What makes this frame so fun, is that I can put a page on display for a little while, and then after a few days flip to the next page to enjoy that one for a little while.
I kept the pages simple by using larger photos and embellishing over the photos. I also chose one 6x6 paper pad, and used that for the whole album. I grabbed DoCrafts True Blue paper pad since the colors were fairly neutral.
For embellishments, I used a lot of Heidi Swapp's Minc Stickers covered in Therm O Web Deco Foil and Simple Stories DIY Insta Stickers.
Per my usual problem with mini albums, this album is not so mini. I think there are something like 20 pages to it, but the frame is definitely large enough to hold them all.
It might be a little while until I get all of my photos from our Ireland trip scrapped, but at least I have this to enjoy for now.
Thanks for stopping by!
I thought it would be fun to use the Tim Holtz Idea-ology Flip Frame to bind/display my album. What makes this frame so fun, is that I can put a page on display for a little while, and then after a few days flip to the next page to enjoy that one for a little while.
I kept the pages simple by using larger photos and embellishing over the photos. I also chose one 6x6 paper pad, and used that for the whole album. I grabbed DoCrafts True Blue paper pad since the colors were fairly neutral.
For embellishments, I used a lot of Heidi Swapp's Minc Stickers covered in Therm O Web Deco Foil and Simple Stories DIY Insta Stickers.
Per my usual problem with mini albums, this album is not so mini. I think there are something like 20 pages to it, but the frame is definitely large enough to hold them all.
It might be a little while until I get all of my photos from our Ireland trip scrapped, but at least I have this to enjoy for now.
Thanks for stopping by!
Labels:
DoCrafts,
Heidi Swapp,
Simple Stories,
Therm O Web,
Tim Holtz
Subscribe to:
Posts (Atom)