Showing posts with label pebbles inc. Show all posts

Wednesday, April 27, 2022

3 Fast Travel Layouts

I have 3 fast travel layouts to share. These are 3 of the last 4 layouts in my Germany album. 


This is the plaza of the area we stayed at in Berlin. Postamer Platz is pretty cool, as it used to be a no man's land with the Berlin Wall running through it. Now it's a vibrant, busy area. There is a marker that runs through the Platz so you can see where the wall was.


We had a last beer and bite to eat at an American themed restaurant right next to our hotel. My husband was able to get a currywurst there, so I'm not sure it was too Americanized.


One last stop, the gym at the hotel. It was one of the nicest gyms (not surprising as it was a really nice hotel). 

Next week I'll have my last layout from this trip.

Monday, February 4, 2019

Valentine Treat Bags

Today I have some simple Valentine Treat Bags using supplies from the Scrapbooking Store's February kit.


For these I used some printed bags I had on hand and supplies found in the upgrade portion of the February kit.


These bags are not only a cute way to give some Valentines treats away, but also a great way to use up extra ephemera you may have from the kit.


Use washi tape from the upgrade to seal your treat bags shut. It will make sure your goodies stay inside, but isn't too hard to get open again. Plus, with so many cute print an color options it adds some extra cuteness to your bag.


Do you have any fun plans for Valentine's Day?

I wrote this post while participating on the Scrapbook Store Design Team.


Wednesday, June 13, 2018

Fourth of July Utensil and Treat Cones


No Fourth of July is complete without a backyard BBQ. These cute 4th of July utensil and treat cones are perfect for holding utensils or treats like popcorn and trail mix. They’re also simple, fast, and inexpensive to make! One sheet of 12”x12” paper will make 4 cones. 


Supplies:
·         Glue Dots® Premium Glue Tape
·         12”x1” sheet of double sided patterned paper. 


Directions:
1.       Cut a 6”x6” square of patterned paper.
2.       Turn the paper so it’s oriented as a diamond instead of a square.


3.       Use Glue Dots® Premium Glue Tape to put adhesive on the front of the bottom, right hand edge of the patterned paper. 


4.       Use Glue Dots® Premium Glue Tape to put adhesive on the back side of the bottom, left hand edge of the patterned paper. 


5.       Roll the paper into a cone and press along the edges to seal the adhesive.


Premium Glue Tape is strong enough to stand up to the bending and pulling of this craft. The dispenser helps it apply quickly and evenly. Whether you have 4 people or 40 at your BBQ, they’ll all love this fun decorative touch. 

I wrote this post while participating on the Glue Dots® Design Team. 

Thursday, September 7, 2017

Fall Fun Layout

It's September, which means school has started and fall is right around the corner. I'm getting ready for autumn with this fall fun layout.


I used a mixture of products on my layout, but the majority of the papers and embellishments are from Paper House's Autumn Woods collection. The paper was released last year, but they just released a new line of planner embellishments that are amazing! I couldn't resist using a bunch of them all at once on this layout.


There's a mix of cardstock stickers, epoxy stickers, puffy stickers, and even rice paper borders on this layout. The mix of textures with the rich autumn colors is so fun!


My favorite embellishments from the new line are the stick on pockets. There are so many ways to use them. I used one on this layout to hold and frame my journaling.


Are you excited for some fall fun, or are you hoping for quite a few more months of summer weather?

I wrote this post while participating on the Paper House Design Team.

Thursday, July 6, 2017

Winter Layouts

Well, I do know it's summer (it was even 90 degrees today!), but I have a couple of winter layouts to share.


I've been busy trying to get through a bunch of photos and use some of my favorite paper that I've stocked up on.


I think I'm now officially out of Pebbles Inc Winter Wonderland paper, and I'm still in love with the clean lines and bright, modern feel of this collection.


Since I'm using up the last of my papers in this collection, I used a lot of small layers. These were pieces left over from other layouts. Even the "snow" cut outs above were extras from these layouts I shared back in May.


These winter layouts are a clean and simple, but I'm pretty happy that I was able to eek out a few more layouts from this fabulous winter collection.

Wednesday, May 24, 2017

Silhouette Cameo Winter Layouts

I know spring is in full swing, but I got on a roll creating some snowy winter layouts. I got through almost all of my snowy winter photos in one afternoon, because the winter creativity was just flowing. Today I'm sharing 2 Silhouette Cameo Winter Layouts.


I used my Silhouette Cameo to create the titles for both of these layouts. I cut the title from my main piece of patterned paper, and then backed the cutouts with a contrasting patterned paper. 


Both layouts also use Pebbles Inc Winter Wonderland collection. I've got to say this is one of my all time favorite winter collections. It's fun and bright without being overly cutesy. I stocked up on it a bit, because it's just so fun.


The big bold titles on these layouts really help make them pop. I love how versatile my Silhouette Cameo is!


Do you stick to scrapping in the current season, or do you scrap whatever you feel like?

Wednesday, March 15, 2017

Game Time Chip Wrap Free Printable

I received these Salt and Vinegar Veggie Chips free from Sensible Portions, but any opinions of the chips are my own.

It's that time in March where we will have the TV tuned to college basketball games, and there are multiple brackets filled out, and our conversations will center around more basketball. We have a blast watching March Madness, and I love adding a few little surprises to our game watching.


My 8 year old, who also happens to be the biggest sports fan in our family, is a huge fan of Sensible Portions' Garden Veggie Straws, so when they offered me the opportunity to try the Sea Salt & Vinegar Veggie Chips I jumped at the chance. We weren't disappointed! These are super tasty, vinegar-y not overpowering, and (according to my 10 year old) not vegetable-y (which is amazing since they are made with potatoes, sweet potatoes, carrots, pumpkin, and beets). These are available right now at select Kroger locations. Once you pick some up, head a little further down this post to grab your free Game Time Wrap Printable so you can make your own Game Time chips, too!


Getting these ready for basketball watching was super simple. I covered the chip can in a little patterned paper and created a "Game Time" printable to wrap around the can.

Just cut it out and attach it to your Veggie Chips container.


I used Glue Dots® Glue Lines to adhere everything to the Veggie Chip container. Since there's no drying tie with Glue Dots®, this whole project can be completed in under 10 minutes - that's shorter than half time at a basketball game! Will you be spending lots of time talking basketball during March, too?

I wrote this post while participating on the Glue Dots® Design Team.

Tuesday, November 22, 2016

Masculine Birthday Card

My grandpa's birthday is coming up next week, so I needed a masculine birthday card. Here's what I came up with.


I started with a bit of an oldie but a goodie for my paper choice: Pebbles Inc Birthday Wishes. I don't make a lot of cards, so I tend to go through my 12 x 12 papers a lot faster than I do my 6 x 6 paper pads, so I still have some of this fun paper in the smaller prints hanging around my scrap room.


It's super busy around my house right now, so I decided to reach for die cuts and stickers to decorate my card. The fun "it's your Day!" sticker from SRM's Fancy Birthday Sentiments was perfect for the center of one of the balloons. When I finished layering up the card, it felt a little plain, so I added some sticker stitches as well. I used both black and white sticker stitches to pull in the black and white from the patterned paper.


This masculine birthday card is already in the mail and on its way to my grandpa. I hope it brings him an extra smile on his birthday! Do you like to use stickers to save some time when making cards?

Thursday, October 20, 2016

Happy Autumn Layout

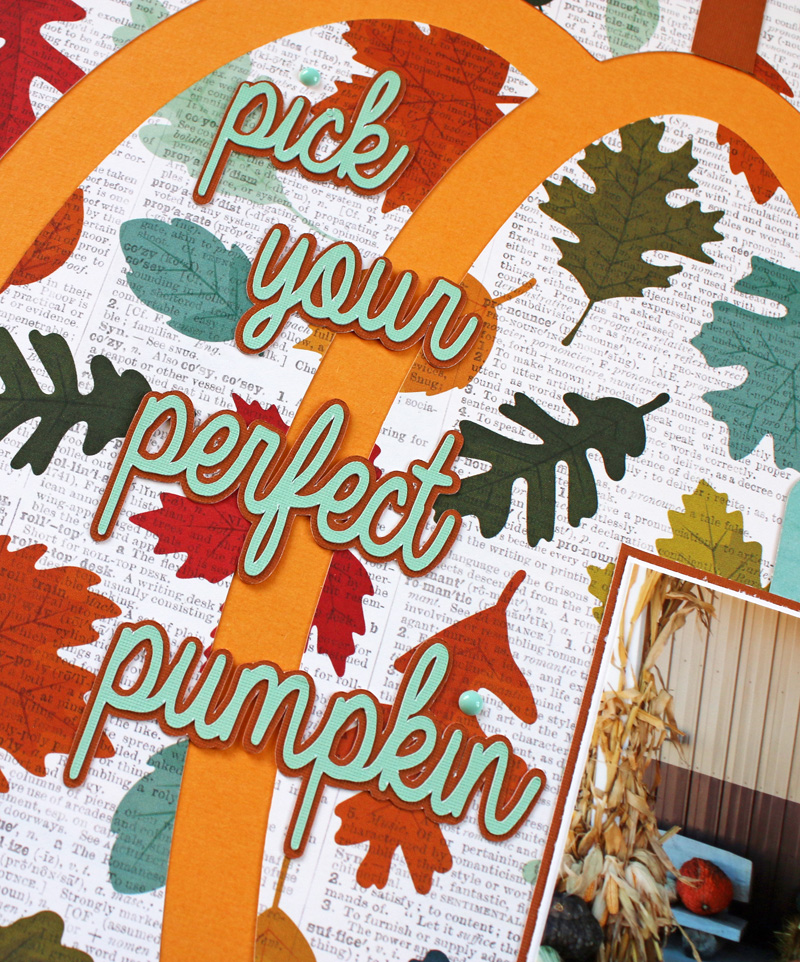
I don't know about you, but we've been enjoying some amazing fall weather, which allows for a lot of autumn fun. Today I have a Happy Autumn layout showcasing my son's pumpkin pick this year.


For this fall layout, I chose Pebbles Woodland Forrest Collection. You can never go wrong with a collection by Pebbles Inc. Their collections always have a bit of a whimsical feel without being overly cutesy. My favorite print is that plaid...but I always love a good plaid.


The pumpkin silhouette was cut with my Silhouette cameo. The "love" is a sticker from Pebbles Warm & Cozy collection. In person, it's a lovely matte metallic gold.


Going to pick out pumpkins is one of my favorite fall activities, so I hope it'll be a long time before the get too old for it! 


I hope you're having a fantastic autumn! 

Monday, October 10, 2016

Pumpkin Patch Layout

Fall is here, and that means I get to break out the fall papers for scrapping! We have a favorite pumpkin patch, so today I have a layout of my son getting his pumpkin for this year.


There are always so many great fall themed paper collections to choose from every year. I think it's one of my favorite seasons for paper! For this layout I decided to grab Pebbles Warm and Cozy collection to start.


I cut a pumpkin shape from my patterned paper with the Silhouette Cameo and layered it over a matching piece of orange American Crafts card stock. I used more matching card stock to mat my photo. For embellishments I used a little but of everything from my stash. There are some stickers from SRM's Live Life Calendar Year and Calendar Companion, Phrase Stickers from Pebbles Woodland Forest collection, and even a sticker from Imaginisce's Give Thanks. I cut the title with my Silhouette Cameo. The Journaling card came from We R Memory Keeper's Indian Summer collection.


I think this pumpkin patch layout does a pretty good job of capturing the fun of our favorite pumpkin place. What's your favorite fall collection this year?

I wrote this post while participating on the SRM Design Team.

Monday, August 1, 2016

Basketball Box Card

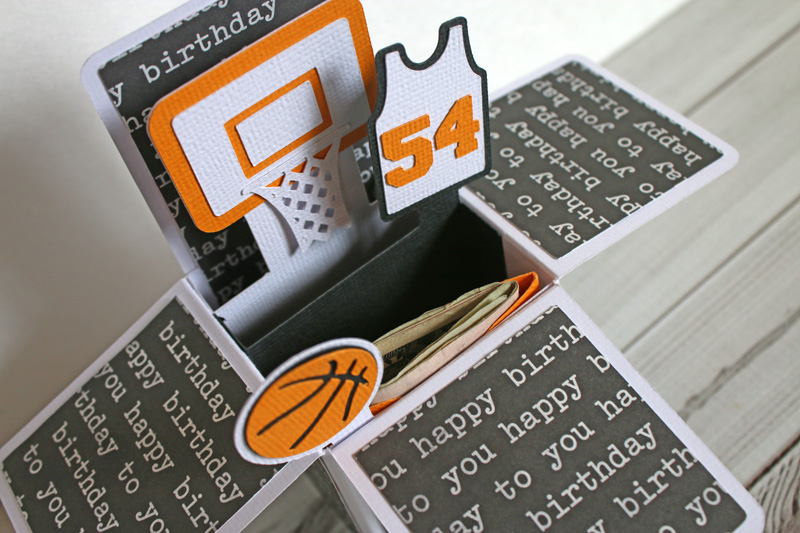
I love making 3-D box cards with my Silhouette. They're pretty easy to make, are super customizable, and are just darn cute. One of my nephews just turned 17 over the weekend, so I whipped up a basketball box card for him.


Not only does he love basketball, but he's pretty good player, too! Our school colors are orange and black, so that made color choice easy for me. I wanted to make sure it felt like a birthday card, too so I decorated the box with some coordinating black and white birthday paper from Pebbles Inc Birthday Wishes.


I needed somewhere to stash a little birthday money, so I created a small pocket with the We R Memory Keepers 123 Punch Board and stuck it inside the box, too.


One more note about these box cards, they fold down flat, so you can mail them! If you have a Silhouette, check out the box cards in the online store. They really are fun and easy to make. If you have made one I'd love to hear what theme you made!

Tuesday, June 14, 2016

Mickey Father's Day Card

We're kind of Disney-a-holics in our family. I thought it would be fun to make a Mickey Father's Day Card for my dad this year. I used my Silhouette Cameo to create my Mickey Mouse inspired card.


I was love all the possibilities for the the classic mickey shape, and thought it would be fun to have mickey wearing a tie. Creating a classic Mickey inspired head is super simple in the Cameo software. You just have to create 3 circles, overlap them, and weld them together.


I used a plain tie cutting file from the Silhouette store to add a tie to my Mickey, and then decided that Mickey would (of course) have a mickey head on his tie.


Waltograph from dafont.com is my favorite font for cutting Disney looking letters. I cut Happy Father's Day in Waltograph on American Crafts white card stock. I added some pops of patterned paper from Pebbles Inc Birthday Wishes. I stretched outside the classic black, red, and yellow Mickey colors and went with a blue, black, and orange color theme for the card.


Do you have Disney-a-holics in your family too? I'm not sure why I haven't tried this sooner. After how cute this Mickey Father's Day card turned out, I know there are a few more Mickey inspired cards in my future!

Friday, June 10, 2016

Daily Activity Pinwheels

I run a pretty loose ship during the summer, but I do require my kids to to a little math and reading, and help out a little more with cleaning during the summer. I wanted a way for my kids to be accountable for some daily tasks without me having to always be asking them. Of course, I also wanted it not to be an eyesore, so I came up with these Daily Activity Pinwheels.


These are the supplies I used for this project.


I have the We R Memory Keepers Pinwheel Punch Board and LOVE it. You can make this project without it, but the punch board makes creating pinwheels super fast and extra easy. 


I used my Pinwheel Punch Board to make 2 different sizes of pinwheels. I made a 3" pinwheel and 4" pinwheel for each individual pinwheel.


 To be able to have a double pinwheel, all you need to do is cut one pinwheel on the A side of the guide (Here this 3" pinwheel is lined up with the white lines of the guide).


Then, cut your second pinwheel on the B side of the guide (this 4" pinwheel is lined up with the red lines of the guide).


When everything was punched and cut, I assembled my pinwheels with the Pinwheel Attachments. They fit right on the paper straws, and the attachments allow the pinwheels to spin like real pinwheels. Something my kids definitely find fun!

I also attached little paper tags to each pinwheel. I have 2 boys, and each one has 4 daily tasks  (thus, 4 pinwheels each for a total of 8 pinwheels). The 4 daily tasks are: Reading, Math, Cleaning, and Free Choice. My kids read every day, so that one's a fun one for them. The math pinwheel counts if they do a math work sheet, flash cards, or play some math games on the computer. For cleaning, they have to come get a task from me (dust, clean your room, etc.). Free choice is pretty much what it sounds like. They can do just about anything that doesn't involve a screen (bake cookies with me, play with the neighbor, play LEGOS, work on a craft project)...they just have to tell me what it is they're doing for their free choice that day.


We're in the middle of painting our walls, so I wanted something that I could set out instead of hang on a wall, so placing the pinwheels in painted mason jars fit the bill. We put them in the center of our kitchen table, and they have the added bonus of being a great conversation piece at supper time. My husband gets to hear all about what the did for free choice that day, or they tell dad all about how they organized something during cleaning time.


So each morning our pinwheel jars start out looking like this. Each kid has his own tasks in his own jar (grey pinwheels for one kid and aqua pinwheels for the other).


Then as they complete their task, they move the pinwheel with that tag on it from their jar into the big blue jar. By supper time the blue jar is filled and the white jar is empty. It has the added joy of being a fun summer decor item, too!