Tuesday, April 29, 2014

Sunset on the Island Layout

Last month I got to take a vacation with my sister to visit my grandparents in one of my very favorite places in the US: St. Simon's Island, Georgia.  I got to relax a lot, make some lovely memories, and of course I spent a little time photographing the beauty of the island.  Today I have a 2 page layout of photos I took during a sunset walk.  This is Sunset on the Island:


Echo Park's Summer Adventure came into A Walk Down Memory Lane about the same time I got back from my trip. The nautical themes and rich colors seemed like a nice fit for my photos.


This photo of the bridge at sunset was too lovely not to enlarge.  It's not very often that I scrap really big photos, but since it takes up so much space, I decided to keep the rest of the page fairly simple.  I layered the picture of resident pelican in front, and if you take a close look at that photo, you can see the same bridge at sunset behind him.  


I echoed the colors of the paper collection with my alphas for the title, and added half a sun sticker to make it look like it was setting.  


 The other half of the layout is more of the photos I took of some of our favorite places at sunset. 


 It was definitely a struggle to keep these pages from feeling too overworked between the patterned paper and large photo on the left side of the layout, but in the end, I think I struck a pretty decent balance.

Thanks for stopping by!

Sunday, April 27, 2014

Birthday Gelato Gesso Resist Card

I thought it might be fun to share a little mixed media card tonight.  I don't work with mixed media a lot, but it's so much fun to get my hands messy and play around that I really should do it more!  This is a birthday Gelato gesso resist card that I created.


I started by placing the Studio Calico Inter Circles mask on a piece of card stock. I applied a generous amount of gesso to the card stock using the stencil.  When the gesso dried I added color with my Gelatos.  There's nothing more fun than coloring with those chapsticky crayons!  I used a baby wipe to blend the Gelatos a bit and remove the gelatos from the gesso, creating a resist where it was stenciled on.  Finally I finished it off with one big Tim Holtz Blueprints birthday stamp. If you try to stamp over a gesso resist, make sure to use a permanent, waterproof ink, or your ink will smear and rub off of the gesso treated area.  I used Ranger's Archival ink in brown for my card. 


That's it for me and my card today.  I'm off to wash my hands now! Thanks for stopping by.

Thursday, April 24, 2014

Globetrotters Layout

Two weeks ago we took our kids to a Harlem Globetrotters game. We got the tickets way back in October on the very day they went on sale.  I went to a game when I was little and I knew we just had to take our kids and make some great memories, too!


Another bonus? I didn't have to wait until the 4th of July to use Pebble's awesome patriotic collection Americana.  Not only are the patterns in Americana amazing, there are 3 colors of chunky glitter Thickers.  I don't know why, but I can't get enough of the chunky glitter Thickers. 


I played around with mixing color and black and white photos on the same layout.  Not something I normally do, but here it just seemed to work. 


Also, since we got our tickets back in October, they were printed in pink. While I'm all for breast cancer awareness, pink tickets did not match my layout.  I took a little bit of blue ink and sponged it over the whole ticket. While it didn't get rid of the pink, it did tone it down a bit, and made it stick out a bit less.


Oh, and in case you were wondering, it was just as fun as I remembered. We all had a blast, and my kids are still talking about it 2 weeks later. 

Thanks for stopping by!


Friday, April 18, 2014

Funny Photo Card Using Top Dog Dies

Today I'm guest designing over at Top Dog Dies.  I got to play around with their Photo Mats Die and their Photo Props Die. I have a layout over there, so I decided to make a funny photo card using Top Dog Dies for my blog here today.


I had some photos of my boys together that I took this past fall (I try to make them sit for one good set of photos every year). I decided photos from that session would be perfect for a photo greeting card. 


I started by cutting a photo mat with the Photo Mats Die.  There are 3 different sizes of photo mats on this one die. I used the medium size.  This is also a steel rule die, which means you can cut multiple mats at once (I cut 6 at a time for my layout on their blog, and it cut through 6 layers of paper at once like a knife through butter).
 

I used the  Top Do Photo Props Die with Pebble's Garden Party 6 x 6 paper pad to make the glasses and bow tie, and layered them up on  my photo using Micro Glue Dots®. They just happen to be small enough to work on those ultra thin glasses.  The Photo Prop Die is a wafer thin die, which again cut beautifully, even on the really thin elements (like the glasses).  I used a magnetic platform with my Big Shot and the wafer thin dies, which isn't a necessity but really makes cutting easy by holding the die in place on the paper. 

 I decided to add an extra little photo to the inside.  I cut a photo mat from patterned paper this time, stuck the photo behind, and added a little white card stock rectangle to the bottom of the mat so my boys can sign their name to the card right on the photo mat.


 I also made a layout using the Photo Mats Die, Photo Props Die, and some of my own silly photos.  It's up on the Top Dog Dies Blog today, so head on over there to check it out (and to get a step by step on how I made it).

Supplies:
Top Dog Photo Mats Die
Top Dog Photo Props Die
Pebbles Garden Party Cardmaking Pad
Pebbles Garden Party 6 x 6 Pad
Pebbled Basics Accent & Phrase Stickers
Pebbles Special Delivery Watermark Rubons
Micro Glue Dots®

Thursday, April 17, 2014

Easter Story Jelly Beans

A few years ago we planted magic jelly beans for Easter.  My boys were asking if we could do it again, but this year I decided to put a bit more focus on the reason for Easter, then just a fun activity. This year we're changing how we do it a bit and calling them Easter Story Jelly Beans.


They're still pretty magical, but instead of a special treat (in our case some crazy fun suckers) springing up over night, this year we will be planting a few jelly beans on Good Friday.  It will be a good time to talk (again) about what Good Friday means, and how Jesus died and was buried (I always find that my boys retain things more if their hands are busy while their ears are listening). We will then have to wait all the way until Easter morning to see what grows from them. Another great time to talk about how Jesus' followers must have felt waiting for the very first Easter morning. 


There's a fun little religious poem/prayer saying what each of the colors of the jellybeans stand for.  I decided to print it out on tags.  I laminated them with my Xyron Creative Station, because my boys are really into bookmarks right now, and I thought they would make fun bookmarks after they open their jellybean bags. 
Speaking of the bags. They are Pebbles Inc.'s Special Delivery Printed bags.  I cut a little peek-a-boo window and embellished them with paper from Pebbles Inc.'s Garden Party.

Tuesday, April 15, 2014

Making Ice Cream

Today I have a  layout I made of my oldest making ice cream.  He had a project to do for school. The assignment was to learn something new, and then give a small presentation about it.  He decided to learn how to make ice cream (bonus was getting to take the ice cream into school for a snack during his presentation).


I've really been wanting an excuse to use Carta Bella's Homemade with Love collection, and this was a pretty good reason. The colors in the collection just happened to go well with the colors of my (very dark) photos and even helped brighten them up a bit. 


The sticker sheet that went with the collection wasn't quite right for my ice cream layout, so I trimmed some of the icons from the patterned paper and popped them up with some Pop Up Glue Dots®.  A pretty simple way to scrapbook some school fun.
Thanks for stopping by!

Thursday, April 10, 2014

Summer Mango Butter Soap

I have another soap recipe to share with you today.  It's a Summer Mango Butter Soap made with goat's milk.  I wanted a soap that was a bit heavier on mango butter than any recipe I could find on the internet, so I came up with my own.  Mango butter is richly moisturizing, is great for treating cuts and skin rashes, and isn't as greasy feeling as shea butter. Oh, and it smells amazing! I used in in a lotion bar as well (I'll have to share that recipe another time!), and it's just as good a soap as it is in a lotion bar.


I've been using this soap for a few weeks now, and it is luxurious, moisturizing, and silky smooth.  The color in the photo is natural and comes from the mango and the goats milk.  I call this soap summer soap for a few reasons.  There's just something about mango butter that feels like it should be in a summer soap.  This soap is also made from my friend's goat's milk (thanks Julie!), and using milk instead of water adds extra moisture (by way of fat) to the lotion.  Finally, I added some castor oil to make it lather nicely. Please note, I do not use palm oil in any of my soap making. I've found that soybean oil and olive oil make very nice alternatives. Now on to the recipe (as with all my soap recipes, I'm just sharing the recipe.  There are lots of great tutorials out there on making cold process soap, so it's just the recipe here).

Summer Mango Butter Soap
8 oz Mango Butter 
16 oz Olive Oil
10 oz Coconut Oil
8 oz Soybean Oil
2 oz Castor Oil
6 oz Lye
14 oz Goat Milk
Optional 2 oz essential oils at trace (lavender and orange go very nicely with this soap)

Because of some of the oils used in this soap, I do like to let it cure for closer to 6 - 8 weeks. However, using it after 4 weeks won't hurt anything, it just won't be as hard a bar of soap as if you allow it longer curing time.  If you make it now, it will be ready just in time for the summer!

Thanks for stopping by!

Monday, April 7, 2014

How to Make a Back to Back Mini Album

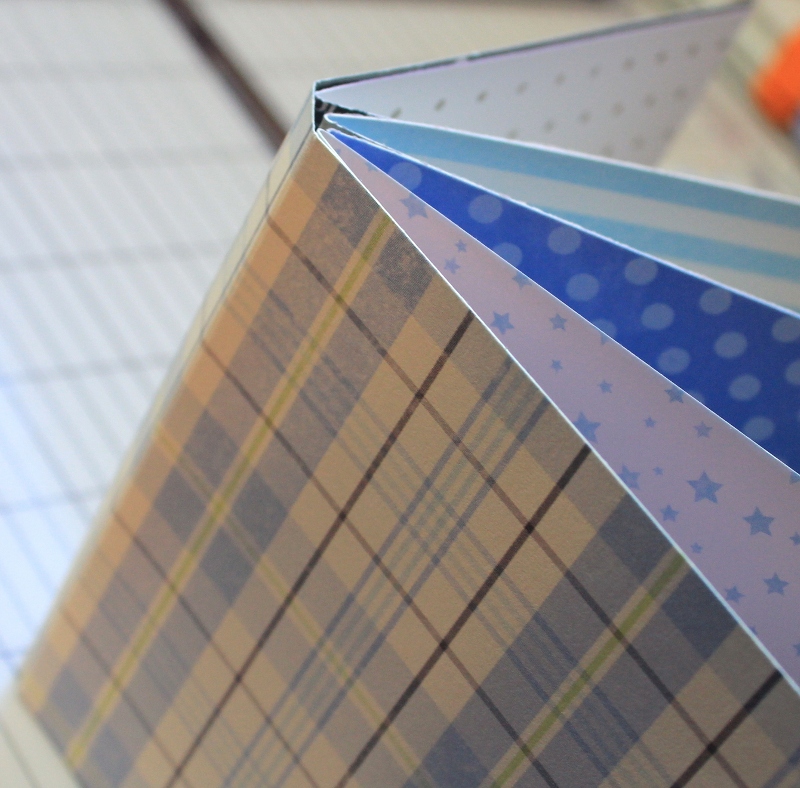
I have a mini album over on the Pebbles blog today that I used the Back to Back binding style to make.  I thought I'd show here, how to make a back to back mini album with a little photo tutorial. 


My finished album measures 4" x 4", however you can change your measurements to make this quite a bit larger or smaller. 


I started by cutting and scoring my inside pages.  I needed 4 pages plus the cover, so I cut 4 - 4" x 8" pieces of patterned paper for the inside pages.  These are scored at 4" and folded in half. 


I gathered these pages together, and measured how thick they were to decide how big I wanted my spine to be.  They were about 1/4" thick.  I like to have a little bit of embellishment room, so I decided to add 1/8" to that, so I will make my spine 3/8" thick. 


To make my cover, I cut a piece of patterned paper to 4" x 8 3/8" (that's 4" for the front cover, 4" for the back cover and 3/8" for the spine).  Then I scored it at 4", turned my paper 180 degrees and scored it again at 4". 


Your cover should look like the picture above now. 


Now it's time to assemble your book, and here's where the back to back gets its name.  I start with the inside pages first.  Place adhesive on the back side of your first and second pages (the side that you don't want to see).  Place the backs of the pages together and firmly adhere, matching up along all edges.  Repeat this until all of your pages are adhered together.


To adhere the cover to your pages, put adhesive the back side of the very front page and the inside of the front cover of your album (in the photo above, that's the gray paper and the alphabet paper).  Line up the pages and press firmly together.  Repeat the same steps for the back cover.


When you're finished the spine of your album will look like the photo above. 


You can leave the album as is (album of the left), or round the corners of all the pages (album on the right).


When you're done decorate the cover and pages.  To see how I decorated the insides of the rest of the pages of my Milestone Mini Albums, head on over to the Pebbles Blog.

Thanks for stopping by! 

Sunday, April 6, 2014

Hello Again Zoo Layout

Today I've made a layout using Carta Bella's Hello Again collection.  I'm still slowly working through our photos from our trip to the Omaha Zoo last summer, and I just finished another one, Here's my Hello Again Zoo Layout:


I talked about cheating hand written titles by cutting them out with a die cutting machine here.  I used my Silhouette to cut the Omaha title.


Then to give it an even more hand drawn feel, I sketched a line underneath it with my Zig Wink of Stella black brush tip marker.  If you haven't tried these markers before, I highly recommend them.  It doesn't show up well in my photograph, but the have some shimmer/sparkle to them.  They come in black, white, silver, and gold.  You can also get them with a more traditional marker tip (and in more colors), but there's just something about the brush tip that I really like.


 I layered up some of the papers and embellishments in a few spots on the layout. 


Pretty simple, but I've got another layout finished and into the books (well, sitting in a pile waiting to be put in a scrapbook at least).

Thanks for stopping by!

Tuesday, April 1, 2014

Camping Layout Uisng Wildflower

Today I have a camping layout using Wildflower from Carta Bella. We celebrated the end of last summer with a quick little camping trip.


 As you can see, Wildflower was perfect for scrapping a few pics from our adventure.  It has a lovely nature, woodsy collection that is a bit different than any other camping collection out there.


I have to tell you though, scrapping can be dangerous.  I've been scrapping these photos from our camping trip and remembering the fun...and I said yes to something I told my husband and boys would never, ever, ever happen...I consented to buying a camper:


After this summer, I have a hunch you'll be seeing a few more camping layouts from me...and truthfully, I can't wait!


Thanks for stopping by!