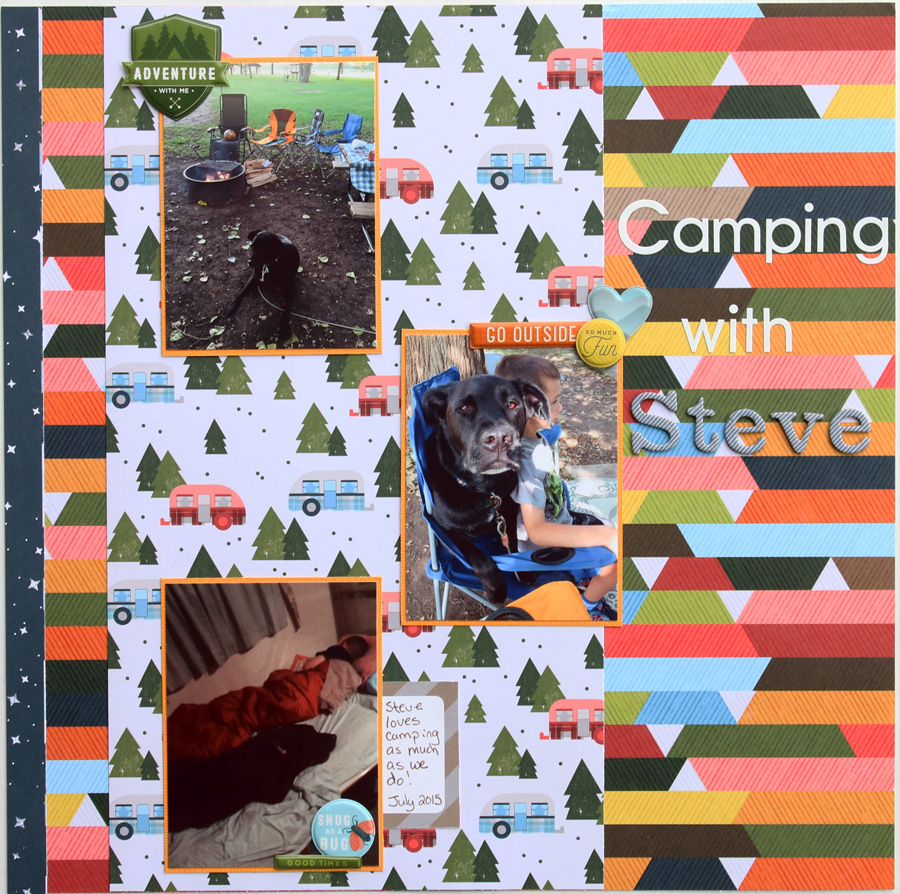
The weather's warming up which is making me really antsy to get our there and camp. Since we're not quite ready to take the camper out yet, I thought I'd do something else I love and scrap some camping photos instead. Today I have a camping layout that's all about camping with our dog, Steve.
I may have stock piled a bit of Pink Paislee's Outfitters collection. This collection is so bright and fun. It's full of great prints...I mean, how can you not love that camper?!?
The puffy stickers are some of my favorite! I had a hard time not using the entire sticker sheet on one layout. There's just something about the look of puffy stickers that makes me happy.
My title was pretty simple, so to keep it from looking plain I mixed up the alphas that I used. Changing the material (stickers to chipboard) and the color added a bit of interest. You could get a similar look by cutting your title with the Silhouette (which I do often), but I still love using alphabet stickers, too.
This camping layout is just going to have to tide me over until the camping season starts up again!
Showing posts with label pink paislee. Show all posts
Thursday, April 13, 2017
Wednesday, June 29, 2016
Mixing Collections
Today I'm mixing collections a bit to create the 2 page layout I wanted. I often mix in embellishments from a different paper collection, but it's not terribly often that I use two different paper collections for one layout.
To compliment my photos of our visit to Newgrange, I wanted a mix of blues and greys. To accomplish that, I pulled papers from both American Crafts True Stories and Pink Paislee Atlas. To make everything flow nicely, I made sure to use embellishments from both collections as well.
We had a bit of a drive to Newgrange from Northern Ireland, so we got up early to be part of one of the first tours of the day. The fun little coffee cup "its a new day" die cut from True Stories was just too cute to pass up, and fits as a nice little reminder of our early start.
Do you like mixing collections, or do you usually stick to paper all from the same collection when you scrap?
To compliment my photos of our visit to Newgrange, I wanted a mix of blues and greys. To accomplish that, I pulled papers from both American Crafts True Stories and Pink Paislee Atlas. To make everything flow nicely, I made sure to use embellishments from both collections as well.
We had a bit of a drive to Newgrange from Northern Ireland, so we got up early to be part of one of the first tours of the day. The fun little coffee cup "its a new day" die cut from True Stories was just too cute to pass up, and fits as a nice little reminder of our early start.
Do you like mixing collections, or do you usually stick to paper all from the same collection when you scrap?
Labels:
American Crafts,
pink paislee
Friday, January 22, 2016
Scrapping a Large Piece of Memorabilia
This is a personal blog. All editorial content and projects are
intellectual property of Taylor Stamped. I do receive financial
compensation and material product from American Crafts and A Walk Down Memory Lane to develop my craft posts, but all ideas and opinions are my own. Some links are affiliate links.
I've found that when we travel (whether it's a short weekend trip or something longer), I not only end up with lots of photos to scrap but lots of memorabilia like maps and tickets, too. Today, I'm sharing a layout that shows how I dealt with scrapping a large piece of memorabilia - a city map.
I decided to treat the map like I would a large photo. I let it take center stage on the left hand side of my 2 page layout. Since the map is such a big embellishment, I kept the rest of my embellishments on the page pretty simple.
Because the map is black and white, I decided to go with some of the more colorful papers from Pink Paislee Atlas. Adding some pops of red, blue, and green helps brighten up the dullness of the map.
The right hand side of my page is also full of bright colors. Since the photos on this page are in color instead of black and white, I matted the photos with a bit of green paper to make them stand out and draw your eye.
Since I had a little more space on the right hand side of the layout, I added a few more embellishments and a bit more layering.
Scrapping a large piece of memorabilia definitely worked better for me when I treated the map like a large photo. Do you like to keep maps, tickets, and bits of non photo memories too?
I've found that when we travel (whether it's a short weekend trip or something longer), I not only end up with lots of photos to scrap but lots of memorabilia like maps and tickets, too. Today, I'm sharing a layout that shows how I dealt with scrapping a large piece of memorabilia - a city map.
I decided to treat the map like I would a large photo. I let it take center stage on the left hand side of my 2 page layout. Since the map is such a big embellishment, I kept the rest of my embellishments on the page pretty simple.
Because the map is black and white, I decided to go with some of the more colorful papers from Pink Paislee Atlas. Adding some pops of red, blue, and green helps brighten up the dullness of the map.
The right hand side of my page is also full of bright colors. Since the photos on this page are in color instead of black and white, I matted the photos with a bit of green paper to make them stand out and draw your eye.
Since I had a little more space on the right hand side of the layout, I added a few more embellishments and a bit more layering.
Scrapping a large piece of memorabilia definitely worked better for me when I treated the map like a large photo. Do you like to keep maps, tickets, and bits of non photo memories too?
Labels:
pink paislee
Friday, January 15, 2016
Travel Pocket Layout
This is a personal blog. All editorial content and projects are
intellectual property of Taylor Stamped. I do receive financial
compensation and material product from American Crafts and A Walk Down Memory Lane to develop my craft posts, but all ideas and opinions are my own. Some links are affiliate links.
I don't do a lot of pocket style scrapping, it often just doesn't come naturally to me. I have found, though that there are times pocket pages really help break up the look of an album, especially when you have lots and lots of photos of the same thing. For example, I'm still plugging along scrapping photos from our trip to Ireland. For some of these photos, I have a about 1 spot worth of journaling to 10 or 20 photos. Breaking up the photos upon photos with a travel pocket layout really helps give your eye something different to look at and helps get those piles and piles of photos into an album.
I like to mix my pocket pages in with "regular" pages in my album. You can really see the difference between the 2 style of pages here, even though the layout of the pages is similar. The page on the left is a standard page, whereas the page on the right is a pocket page.
To keep the pages feeling a bit congruent, I used the same paper collection (Pink Paislee Atlas) on both pages, the same font for creating words, and pops of the same silver and teal foil on both pages.
I created my foiled titles by cutting custom words out with my Silhouette Cameo from Heidi Swapp Minc Toner Sheets. Then I covered the words with either silver or teal foil.
Then I added more pops of foil with Minc stickers, journaling cards, and patterned paper.
So, how about you? Do you love using pocket pages, or are they a bit outside of your comfort zone, too? I'd love to hear about how you break up pages and pages of travel photos!
I don't do a lot of pocket style scrapping, it often just doesn't come naturally to me. I have found, though that there are times pocket pages really help break up the look of an album, especially when you have lots and lots of photos of the same thing. For example, I'm still plugging along scrapping photos from our trip to Ireland. For some of these photos, I have a about 1 spot worth of journaling to 10 or 20 photos. Breaking up the photos upon photos with a travel pocket layout really helps give your eye something different to look at and helps get those piles and piles of photos into an album.
I like to mix my pocket pages in with "regular" pages in my album. You can really see the difference between the 2 style of pages here, even though the layout of the pages is similar. The page on the left is a standard page, whereas the page on the right is a pocket page.
To keep the pages feeling a bit congruent, I used the same paper collection (Pink Paislee Atlas) on both pages, the same font for creating words, and pops of the same silver and teal foil on both pages.
I created my foiled titles by cutting custom words out with my Silhouette Cameo from Heidi Swapp Minc Toner Sheets. Then I covered the words with either silver or teal foil.
Then I added more pops of foil with Minc stickers, journaling cards, and patterned paper.
For me, using pocket pages for this travel pocket layout was a bit outside of my comfort zone, but in the end it really pays off. Using a pocket page really breaks up the look in my album, and gives your eye something new and different to look at.
Labels:
Heidi Swapp,
pink paislee,
Therm O Web
Thursday, January 7, 2016
Snow Day Layout
This is a personal blog. All editorial content and projects are
intellectual property of Taylor Stamped. I do receive financial
compensation and material product from American Crafts and A Walk Down Memory Lane to develop my craft posts, but all ideas and opinions are my own. Some links are affiliate links.
We have had quite a bit of snow here in NW Iowa. After almost no snow last year, it's been a welcome sight. I don't think I scrapped with a single piece of winter paper last year. But this year's already a different story. We've had 3 Snow Days already this year...so with that in mind I bought a bunch of winter paper and here's my first Snow Day layout.
For this layout I chose Pebbles Inc Winter Wonderland Collection. This is a bright and joyful winter/snow collection that is super fun and easy to use. There's a bit of pink and purple in this collection as well as some snow princesses, but as you can see you can totally make a layout from just the frosty blues and silvers if you want.
I added in a few snowflake sequins from Pink Paislee's Yuletide collection and a bit of American Crafts Silver Glitter Tape to add some sparkle (because every snow layout needs at least a little sparkle).
This photo was taken on the first snow day of the school year (right before I put on my snow clothes and headed out to play, too). There's just something special about playing in the snow on a day off from school!
How's the winter weather in your neck of the woods this year? Will you be needing a lot of winter paper like me?
We have had quite a bit of snow here in NW Iowa. After almost no snow last year, it's been a welcome sight. I don't think I scrapped with a single piece of winter paper last year. But this year's already a different story. We've had 3 Snow Days already this year...so with that in mind I bought a bunch of winter paper and here's my first Snow Day layout.
For this layout I chose Pebbles Inc Winter Wonderland Collection. This is a bright and joyful winter/snow collection that is super fun and easy to use. There's a bit of pink and purple in this collection as well as some snow princesses, but as you can see you can totally make a layout from just the frosty blues and silvers if you want.
I added in a few snowflake sequins from Pink Paislee's Yuletide collection and a bit of American Crafts Silver Glitter Tape to add some sparkle (because every snow layout needs at least a little sparkle).
This photo was taken on the first snow day of the school year (right before I put on my snow clothes and headed out to play, too). There's just something special about playing in the snow on a day off from school!
How's the winter weather in your neck of the woods this year? Will you be needing a lot of winter paper like me?
Labels:
pebbles inc,
pink paislee
Sunday, November 22, 2015
Using Photo Frames for Journaling
This is a personal blog. All editorial content and projects are
intellectual property of Taylor Stamped. I do receive financial
compensation and material product from American Crafts to develop my craft posts, but all ideas and opinions are my own. Some links are affiliate links.
Lately I have lots of journaling to do on my layouts. It's always a bit of a challenge to find just the right journaling tag or space to put your journaling. Lately, I've had a lot of fun using photo frames for journaling
For today's layout I started with paper from Pink Paislee's Atlas collection. I'm really in love with the rich tones in atlas. There's lots of great greens and blues in Atlas that are all brought together with a bit of gray.
When we were in Ireland, my husband fell in love with bangers and mash, but this is the first place he ordered it. Usually I'm the one snapping photos, but my husband loved his meal so much that he took a picture of it! Definitely something that needed to be scrapped, and a story that needed to be told. I didn't think the shape of a journaling tag looked right in this space, so I grabbed a photo frame from the Atlas Instagram Card Pack. To turn it into a journaling card, I just took a bit of matching cream card stock and attached it to the back of the photo frame. Now I've got a great big blank space to journal!
I used another card from the Atlas Instagram Card Pack as an embellishment on the page. It was a nice way to tie all of the elements on the page together.
I'm always looking for new ways to add journaling to my page. It seems like I can never have enough journaling cards or tags. Using photo frames for journaling is a really fun and simple way to add more journaling cards to my stash. How do you get creative with your jounaling?
Lately I have lots of journaling to do on my layouts. It's always a bit of a challenge to find just the right journaling tag or space to put your journaling. Lately, I've had a lot of fun using photo frames for journaling
For today's layout I started with paper from Pink Paislee's Atlas collection. I'm really in love with the rich tones in atlas. There's lots of great greens and blues in Atlas that are all brought together with a bit of gray.
When we were in Ireland, my husband fell in love with bangers and mash, but this is the first place he ordered it. Usually I'm the one snapping photos, but my husband loved his meal so much that he took a picture of it! Definitely something that needed to be scrapped, and a story that needed to be told. I didn't think the shape of a journaling tag looked right in this space, so I grabbed a photo frame from the Atlas Instagram Card Pack. To turn it into a journaling card, I just took a bit of matching cream card stock and attached it to the back of the photo frame. Now I've got a great big blank space to journal!
I used another card from the Atlas Instagram Card Pack as an embellishment on the page. It was a nice way to tie all of the elements on the page together.
I'm always looking for new ways to add journaling to my page. It seems like I can never have enough journaling cards or tags. Using photo frames for journaling is a really fun and simple way to add more journaling cards to my stash. How do you get creative with your jounaling?
Labels:
pink paislee
Friday, October 23, 2015
Grocery Shopping
This is a personal blog. All editorial content and projects are
intellectual property of Taylor Stamped. I do receive financial
compensation and material product from American Crafts to develop my craft posts, but all ideas and opinions are my own. Some links are affiliate links.
I have a confession to make: When my husband and I travel, we love to go grocery shopping. Seriously, the farther away you are from home, the better the grocery stores get. We love browsing all the food we don't have at home. When we were in Ireland, we found a grocery store in every town we spent the night in. Usually we picked up our breakfast for the morning, a few snacks for the hotel room, and some candy to bring back for the kids.
I ordered Pink Paislee's Atlas collection specifically to use for scrapping Ireland. It's a fantastic travel line. The colors are rich and bright. Pops of white and gray are accented with teal, yellows, and greens. I really love the Atlas Instagram Cards. They're a mix of photo frames (that I like to use for journaling) and acetate embellishment cards.
You can see there are bits of memorabilia mixed into this layout. There's a receipt from one of our store trips in Belfast, and the only candy wrapper I remembered to save. My kids were totally weirded out by the fact that European Smarties are candy coated chocolate...nothing like the smarties here. If you want to try out the Nestle Smarties, you can find them here. Our favorite candies were more of a fruit snack called Randoms. The best part was that, about a month after we got back from vacation, they started selling Randoms by us in the US. Do yourself a favor and try them out some time, they're delicious!
Do you like to visit different grocery stores? I'd love to hear about your favorite find (or strangest find!).
Thanks for stopping by!
I have a confession to make: When my husband and I travel, we love to go grocery shopping. Seriously, the farther away you are from home, the better the grocery stores get. We love browsing all the food we don't have at home. When we were in Ireland, we found a grocery store in every town we spent the night in. Usually we picked up our breakfast for the morning, a few snacks for the hotel room, and some candy to bring back for the kids.
I ordered Pink Paislee's Atlas collection specifically to use for scrapping Ireland. It's a fantastic travel line. The colors are rich and bright. Pops of white and gray are accented with teal, yellows, and greens. I really love the Atlas Instagram Cards. They're a mix of photo frames (that I like to use for journaling) and acetate embellishment cards.
You can see there are bits of memorabilia mixed into this layout. There's a receipt from one of our store trips in Belfast, and the only candy wrapper I remembered to save. My kids were totally weirded out by the fact that European Smarties are candy coated chocolate...nothing like the smarties here. If you want to try out the Nestle Smarties, you can find them here. Our favorite candies were more of a fruit snack called Randoms. The best part was that, about a month after we got back from vacation, they started selling Randoms by us in the US. Do yourself a favor and try them out some time, they're delicious!
Do you like to visit different grocery stores? I'd love to hear about your favorite find (or strangest find!).
Thanks for stopping by!
Labels:
pink paislee
Sunday, December 28, 2014
Photo Flips Mini Album
I love using Simple Stories Photo Flips on my layouts, but did you also know you can use them to put together a super fun mini album? Today I'm sharing my photo flips mini album.
I chose the Simple Stories 4 x 6 photo flips, so the size of my completed album is just slightly larger than 4 x 6 when closed.
To put the album together, you literally just stack the pages on top of each other, using the adhesive provided to attach them back to back.
From there, all you have to do is slip in some photos, paper, and embellishments.
I mixed and matched a lot of pieces of left over papers and embellishments. There is a little bit of Pink Paislee Solstice and Hey Kid, Fancy Pants Nautical, and Echo Park Capture Life.
You can print out smaller photos or just add one big 4 x 6 photo and add some embellishments directly on the photo.
The best part is that this album is completely customizable. You can add as many or as few photos as you want, since you add the pages.
Thanks for stopping by!
I chose the Simple Stories 4 x 6 photo flips, so the size of my completed album is just slightly larger than 4 x 6 when closed.
To put the album together, you literally just stack the pages on top of each other, using the adhesive provided to attach them back to back.
From there, all you have to do is slip in some photos, paper, and embellishments.
I mixed and matched a lot of pieces of left over papers and embellishments. There is a little bit of Pink Paislee Solstice and Hey Kid, Fancy Pants Nautical, and Echo Park Capture Life.
You can print out smaller photos or just add one big 4 x 6 photo and add some embellishments directly on the photo.
The best part is that this album is completely customizable. You can add as many or as few photos as you want, since you add the pages.
Thanks for stopping by!
Labels:
Echo Park,
Fancy Pants,
Mini Album,
pink paislee,
Simple Stories
Saturday, November 29, 2014
You At 8
I've gotten a bit behind on posting my layouts. Last month I took my kiddos' annual photos. I loved how their individual photos turned out. So many fun ones to chose from that seemed to capture their personalities just right. Today I'm sharing a layout called "You at 8" about my oldest.
First of all, I'm not sure when he grew up this much. Seriously, he's always been a bit of an old soul, but now he doesn't even look like a little kid anymore.
I used lots of different paper collections on this layout. I started with Heidi Swapp's September Skies for the base of the layout. I don't know why, but I just think that light bulb paper is so stinkin' cute!
I love a good paper printed with words, so I also added paper from Pink Paislee's Bella Rouge Collection (it's currently in the AWDML Brick & Mortar store, and should be showing up in the on-line store any day). The white and blue heart paper is from Studio Calico's Lemon Lush. I've wanted to use that heart paper forever and finally had the right layout to use it on.
My embellishments for this layout consisted of a Project Life journaling card, Thickers chipboard alphas, Pebbles washi tape, enamel dots, and some Studio Calico chip shapes. So, as you can see this layout is a little bit of this, and a little bit of that, all put together to scrap my oldest at 8.
Thanks for stopping by.
First of all, I'm not sure when he grew up this much. Seriously, he's always been a bit of an old soul, but now he doesn't even look like a little kid anymore.
I used lots of different paper collections on this layout. I started with Heidi Swapp's September Skies for the base of the layout. I don't know why, but I just think that light bulb paper is so stinkin' cute!
I love a good paper printed with words, so I also added paper from Pink Paislee's Bella Rouge Collection (it's currently in the AWDML Brick & Mortar store, and should be showing up in the on-line store any day). The white and blue heart paper is from Studio Calico's Lemon Lush. I've wanted to use that heart paper forever and finally had the right layout to use it on.
My embellishments for this layout consisted of a Project Life journaling card, Thickers chipboard alphas, Pebbles washi tape, enamel dots, and some Studio Calico chip shapes. So, as you can see this layout is a little bit of this, and a little bit of that, all put together to scrap my oldest at 8.
Thanks for stopping by.
Labels:
Heidi Swapp,
pink paislee,
Studio Calico
Tuesday, September 30, 2014
Benny Digital Cut File Layout
I'm blogging over at 17 Turtles today using some of Juliana's amazing digital cut files. I have a cute little puppy treat container over there. I wanted to show how versatile her files are by sharing a more traditional project using the exact same cut files. So here is my Benny digital cut file layout.
This summer we got our kids a guinea pig. To say they love him would be an understatement. They take good care of him, and he gets plenty of attention. Scrapping a guinea pig themed page, though, posed a bit of a problem, since you can't findmany any guinea pig themed papers or embellishments.
That's the great thing about working with digital cut files: you can customize them to make them what you need. Dog paw prints and guinea pig paw prints are similar. I knew I could narrow and lengthen the paw print files from the Puppy Love Digital Cut File and the Paw Prints & Hearts Background Cut File to make them look more like Benny's paw prints.
You can also get rid of the "puppy" from a tag that says "puppy love", and use just the love part.
Juliana has lots of really great files in her 17 Turtles Etsy store (not just puppy themed ones), so don't forget to check out her store. If you haven't already, also head over to 17 Turtles blog to check out the puppy treat container I made using the exact same cut files.
Thanks for stopping by!
This summer we got our kids a guinea pig. To say they love him would be an understatement. They take good care of him, and he gets plenty of attention. Scrapping a guinea pig themed page, though, posed a bit of a problem, since you can't find
That's the great thing about working with digital cut files: you can customize them to make them what you need. Dog paw prints and guinea pig paw prints are similar. I knew I could narrow and lengthen the paw print files from the Puppy Love Digital Cut File and the Paw Prints & Hearts Background Cut File to make them look more like Benny's paw prints.
You can also get rid of the "puppy" from a tag that says "puppy love", and use just the love part.
Juliana has lots of really great files in her 17 Turtles Etsy store (not just puppy themed ones), so don't forget to check out her store. If you haven't already, also head over to 17 Turtles blog to check out the puppy treat container I made using the exact same cut files.
Thanks for stopping by!
Labels:
17 Turtles,
pink paislee,
silhouette
Thursday, August 28, 2014
Flip Layout
I'm sharing a couple of layouts today. One here and one on A Walk Down Memory Lane's Blog. They both use Simple Stories Photo Flips to add extra photos to the layout without taking up extra space on the layout.
You start by creating the layout just like you normally would. I'm loving Pink Paislee's Solstice right now, and chose that for my layout.
Then, you put your layout into the page protector and attach the Simple Story Photo Flip on top. They come in 4 x 6 or 3 x 5. They have an adhesive strip on the edge that you just need to peel the backing off of and stick down to the protector.
You can add one Photo Flip, or multiple ones to a layout.
You can also use them to add journaling to your layout.
If you 'd like to see a another layout using Photo Flips, click here to check out my other layout on AWDML's Blog.
You start by creating the layout just like you normally would. I'm loving Pink Paislee's Solstice right now, and chose that for my layout.
Then, you put your layout into the page protector and attach the Simple Story Photo Flip on top. They come in 4 x 6 or 3 x 5. They have an adhesive strip on the edge that you just need to peel the backing off of and stick down to the protector.
You can add one Photo Flip, or multiple ones to a layout.
You can also use them to add journaling to your layout.
If you 'd like to see a another layout using Photo Flips, click here to check out my other layout on AWDML's Blog.
Labels:
pink paislee,
Simple Stories
Monday, December 23, 2013
I Love You Layout
I've been wanting to scrap with Pink Paislee's Hey Kid for a while. I finally got around to it (and I finally had just the right photo). Here's my I Love You Layout.
Thanks for stopping by!
These two have such big personalities, and I love how this picture seems to capture them perfectly.
Thanks for stopping by!
Labels:
pink paislee
Subscribe to:
Posts (Atom)