Monday, November 30, 2015

Coin Envelope Gift Card Holder Tutorial

This is a personal blog. All editorial content and projects are intellectual property of Taylor Stamped. I do receive financial compensation and material product from American Crafts and  A Walk Down Memory Lane to develop my craft posts, but all ideas and opinions are my own. Some links are affiliate links.

I give a lot of gift cards for gifts, especially during the Christmas season. But just because I'm giving a gift card, it doesn't mean I can't have some fun wrapping it. I try hard to make different types of holders all the time. I'm sharing a new style for me. Today I have a coin envelope gift card holder tutorial. Both sides of this holder style are super cute. Here's the front:


 and here's the back:


 To make this I used my We R Memory Keepers 1-2-3 Punch Board and paper from Silver and Gold by We R Memory Keepers. 


I decided to make the envelope 3 x 4 1/2.


Just follow the directions for making an envelope with the 1-2-3 Punch Board. I like to place my paper so that the inside of the envelope is facing up. This isn't a necessity, but it makes folding the flaps down easier.


Fold your flaps in, but don't adhere them down yet. To make this look like a coin envelope, you'll need to trim the points off of the envelope. Here's a little tip: You only need to trim off the points that are showing, so I'm just trimming the top flap and the flap on the left side. You can see I made a little pencil mark as a guide, so I know where to cut. I want to trim close to center.


 Unfold your flaps, and use the pencil mark as a guide to trim the flap.


 When your flaps are trimmed down, add some adhesive to your flaps to keep them in place.


At this point you can decorate it and add your gift card or you can add some fun circle and twine details to make it look more like a coin envelope.


To make the closure, I used a 1/2" circle punch to punch gold circles. I attached the circles to the envelope with eyelets using a WRMK Crop-a-dile.


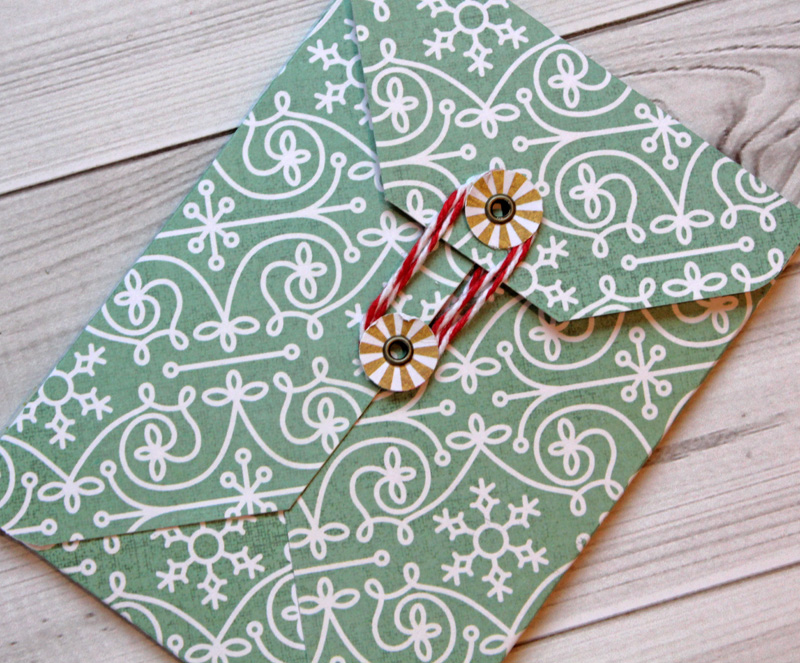
Use a little baker's twine wrapped around the eyelets to fasten the envelope shut. I attached my gift card to a coordinating piece of Silver & Gold paper with some Removable Glue Dots and slipped it into the envelope.


I kept the embellishments simple with a cork tree from the Silver & Gold cork stickers and green washi tape. I like to use an American Crafts Slick Writer to write on washi tape, as it won't smear on the slick surface.


Start to finish, this coin envelope gift card holder took less than 15 minutes, and I think it turned out pretty cute. What's your favorite way to dress up a gift card?

Sunday, November 22, 2015

Using Photo Frames for Journaling

This is a personal blog. All editorial content and projects are intellectual property of Taylor Stamped. I do receive financial compensation and material product from American Crafts to develop my craft posts, but all ideas and opinions are my own. Some links are affiliate links.

Lately I have lots of journaling to do on my layouts. It's always a bit of a challenge to find just the right journaling tag or space to put your journaling. Lately, I've had a lot of fun using photo frames for journaling


For today's layout I started with paper from Pink Paislee's Atlas collection. I'm really in love with the rich tones in atlas. There's lots of great greens and blues in Atlas that are all brought together with a bit of gray.


When we were in Ireland, my husband fell in love with bangers and mash, but this is the first place he ordered it. Usually I'm the one snapping photos, but my husband loved his meal so much that he took a picture of it! Definitely something that needed to be scrapped, and a story that needed to be told. I didn't think the shape of a journaling tag looked right in this space, so I grabbed a photo frame from the Atlas Instagram Card Pack. To turn it into a journaling card, I just took a bit of matching cream card stock and attached it to the back of the photo frame. Now I've got a great big blank space to journal!

I used another card from the Atlas Instagram Card Pack as an embellishment on the page. It was a nice way to tie all of the elements on the page together.


I'm always looking for new ways to add journaling to my page. It seems like I can never have enough journaling cards or tags. Using photo frames for journaling is a really fun and simple way to add more journaling cards to my stash. How do you get creative with your jounaling?

Friday, November 20, 2015

Sectioned Shaker Card

This is a personal blog. All editorial content and projects are intellectual property of Taylor Stamped. I do receive financial compensation and material product from American Crafts and  A Walk Down Memory Lane to develop my craft posts, but all ideas and opinions are my own. Some links are affiliate links.

 My grandpa's birthday is coming up next week, so I needed to create a special card for him. I decided it would be fun to create a shaker card, but not just any shaker card, a sectioned shaker card. I'll show you how to make one today quickly and easily with the We R Memory Keepers Photo Fuse.


I started by cutting "happy" 3 times with a die from the We R Memory Keepers Lifestyle Happy Stamp and Die Set. I used the magnetic mat wit the Evolution for this, as getting the die to stay in place is a lot easier with the magnetic mat.


After cutting, I stamped the matching happy stamp on a piece of paper, through the die cut. The stamped paper can't be attached to the die cut paper just yet, so to make stamping easier, I temporarily adhered the two pieces together with washi tape. 


 Now it's time to create the pockets using the Fuse. I started by cutting a waterfall pocket down to the same size as my stamped on piece of paper. Then I used a little washi tape (again!) to temporarily hold the waterfall pocket in place over the the stamped area. Then, I added a little paper confetti to the pocket, and used the stamped area as a guide to see where I should seal the pocket. I repeated this step until each happy had it's own shaker pocket.


 Once your pockets are all sealed, you just have to assemble everything. I added my sectioned shaker pocket to some We R Memory Keepers Cakes and Candles Paper.


 I love how easy it is to make a shaker card with the Fuse, and creating a sectioned shaker card is just another way to keep shaker cards feeling fresh and new. Have you used the Fuse to create a shaker card? 

Tuesday, November 17, 2015

Many Uses for the Photo Fuse

This is a personal blog. All editorial content and projects are intellectual property of Taylor Stamped. I do receive financial compensation and material product from American Crafts and  A Walk Down Memory Lane to develop my craft posts, but all ideas and opinions are my own. Some links are affiliate links.
It's really no secret that I love my We R Memory Keepers Photo Fuse. It's just that there are so many uses for the Photo Fuse. Today's layout shows two of those ways in one layout.


 On the left hand page of this 2 page layout, I used the Fuse to create a memorabilia pocket and add multiple waterfall photo pockets. The waterfall pockets sit on top of the page protector, so you can flip through your photos without having to pull the layout out of the page protector.


Waterfall pockets are a great way to add multiple photos to a page without compromising on design. I also like to add journaling to the waterfall pockets. My journaling card above is from the Simple Stories Gold Snap Pack. The rest of the paper is from Crate Paper Maggie Holmes Style Board.


I also used the fuse to create a memorabilia pocket for the Belleek Castle pamphlet. You can find a step by step tutorial for using the Fuse to create a memorabilia pocket here.


I mirrored the gold from the journaling card on the left side of the page with a gold title on the right side of my page. I created the "Grand Entrance" title with my Silhouette.

There are so many fun ways to uses the Fuse, these are just 2 of the ways. How do you Fuse? 

Wednesday, November 11, 2015

Give Thanks Free Printable and 2 Color Foil Tutorial

This is a personal blog. All editorial content and projects are intellectual property of Taylor Stamped. I do receive financial compensation and material product from  A Walk Down Memory Lane to develop my craft posts, but all ideas and opinions are my own. Some links are affiliate links.

 Hello! Today I have some Thanksgiving decor to share with you. It is a Give Thanks free printable and 2 color foil tutorial. I love Therm O Web Deco Foil and thought it would make a lovely printable for my kitchen during Thanksgiving.


It's tricky to tell, but "Lord" and "forever" are in silver foil while everything else is foiled in rose gold. In person the difference is subtle, but easy to see. To add Deco Foil to something, you need to start with a print printed with toner ink. I created the following printable that you can download, too!

After I printed my printable out, I covered the words I wanted in silver with Silver Deco Foil. I used some washi tape to hold he foil in place, but honestly, I would skip the washi tape next time. The heat of foiling made it a bit tricky to remove.


Then I covered everything in Rose Gold Deco Foil and ran the entire thing through my laminator.


Just remove the foil sheets and you have a 2 color foiled printable. It's super pretty in person. I wish I could photograph foil well so you could see the pretty shine better!


 This printable is sized to fit in an 8 x 10 frame.


 Have you tried doing more than one color of Deco Foil at a time? What colors would you combine for this project? 

Monday, November 9, 2015

Hot Cocoa Soap

This is a personal blog. All editorial content and projects are intellectual property of Taylor Stamped. I do receive financial compensation and material product from American Crafts  to develop my craft posts, but all ideas and opinions are my own. Some links are affiliate links.

A few years ago I started making my own cold processed soap. Not only does it make my skin feel great, it's also a lot of fun to make! I love crafting, I love science, and this hobby marries those 2 loves beautifully. There are so many different options, too, like Beer Shaving Soap, Summer Mango Butter Soap, and Shea Butter Soap. I've found that handmade soap makes a wonderful gift. Today I'm sharing a recipe for Hot Cocoa Soap that makes a fantastic Christmas gift.


This soap is made in 2 batches that are layered together in the mold to get a 2 toned soap. The darker layer is made with cocoa butter, coffee, and cocoa powder for a rich brown color. The lighter colored layer uses shea butter to be extra moisturizing for the winter months.
 

Wrap it all up in a pretty strip of paper for a simple gift. I used patterned paper from We R Memory Keeper's Silver and Gold collection. 


Here's the recipe for the soap. Please note, this is not the full tutorial for making cold process soap, just the recipe for Hot Cocoa Soap. Please make sure to use the proper procedures for making cold process soap. 
I started by making the darker, cocoa layer.
Coffee and Cocoa Butter Layer:
10 ounces Cocoa Butter
8 ounces Coconut Oil
8 ounces Olive Oil
6 ounces Soybean Oil
3 ounces Castor Oil
11.5 ounces Coffee
4.8 ounces Lye
2 - 3 teaspoons Cocoa Powder (added at trace)
Vanilla Oil (added at trace)
Bring to trace and pour into your soap mold. Let sit while you make the second layer.

Shea Butter Layer:
5 ounces Shea Butter
10 ounces Coconut Oil
10 ounces Olive Oil 
6 ounces Soybean Oil
Vanilla Oil or Peppermint Oil (added at trace)
10.25 ounces water
4.34 ounces Lye 
Bring to trace and pour into your soap mold on top of the Coffee and Cocoa Butter Layer. If you pour carefully the shea butter layer will sit on top of the cocoa butter layer to give you 2 tone soap. Sometimes, if you don't pour carefully, the shea butter layer will sink into the cocoa butter layer. If this happens, don't worry, just keep pouring. The sinking in will make your soap a swirled soap instead, and it will still look really pretty!
I get most of my butters and oils from Amazon, as I've found they have the best prices. There are a few things that are best picked up at your local grocery store, though. Soybean Oil can be found with the vegetable oils, and is an inexpensive oil option. I use it instead of palm oil, as there is some controversy over palm oil farming practices. Castor Oil can be found inexpensively in most pharmacies and is used to stabilize the lather of the bar of soap.

What kinds of gifts do you like to make for Christmas? 

Friday, November 6, 2015

Blessings Banner

This is a personal blog. All editorial content and projects are intellectual property of Taylor Stamped. I do receive financial compensation and material product from American Crafts and  A Walk Down Memory Lane to develop my craft posts, but all ideas and opinions are my own. Some links are affiliate links.
This week I shared how to make a shaker pocket with the We R Memory Keepers Photo Fuse, and a shared a sneak peek my Blessings Banner (if you don't follow me on Periscope, you can find me as @SamanthaT1 on Periscope). Today, I have the finished banner and how I made it.


I started by using the We R Memory Keepers Banner Punch Board to make flag shaped banners from WRMK's Shine Collection paper.


The banners were cut from the 6 x 6 pad, while the letters were cut from a piece of 12 x 12 paper from the shine collection. I designed and cut the letters with my Silhouette Cameo.


I wanted to add a little something extra to the banner, so I decided to make 3 of the flags shaker flags. I used the plastic flag pockets from the FuseAbles Dear Lizzy Banner kit, but you could easily cut and make your own from page protectors as well.


I just placed the banner and some sequins (also from the FuseAbles Dear Lizzy Banner kit) and then used the Photo Fuse to seal the banner closed at the top.


I really love making banners, and the addition of shaker flags to the banner adds an extra bit of fun to banners!


Have you used the Fuse to make shaker pockets yet? They really are one of my favorite things, and can be added to just about anything; cards, layout, mini albums, and even banners!

Thanks for stopping by.

Monday, November 2, 2015

Halloween Instagram Album

This is a personal blog. All editorial content and projects are intellectual property of Taylor Stamped. I do receive financial compensation and material product from American Crafts and  A Walk Down Memory Lane to develop my craft posts, but all ideas and opinions are my own. Some links are affiliate links.

I know Halloween is over, but if you're like me, you want to get those fun Halloween photos scrapped and out of the way so you can focus on Thanksgiving and Christmas projects. Every year, I like to make a mini album from our Halloween photos. This year I decided to create a simple Halloween Instagram album.


I started with embellishments from Pebbles Inc's Boo chipboard stickers and cardboard stickers.


I didn't need much paper since I decided to mostly use full size 4 x 4 photos, so I just grabbed some black and orange patterned paper from my stash. The black paper is from Pebbles Basics and the orange paper is mostly from We R Memory Keepers Cakes and Candles.


I decided to dress up to take my kids trick-or-treating this year. You can read more about my costume on my Facebook page


I think my favorite page is the one below. I took a page that is split for 2 x 2 photos. I filled 2 with paper and added sequins to the other 2. I sealed them shut with my Photo Fuse


 Now that I've finished up my Halloween scrapping, I can start some Thanksgiving projects. In fact, I'll be back at the end of the week with a Thanksgiving banner. Have a great week, and thanks for stopping by!