Monday, April 30, 2012

Stamp School May Release

Tomorrow Stamp School's new stamps for May and new colors will be available here. Last month we honored the ladies in our life, and now May is all about the men. Here's the first card I've made with May's goodies:


I stamped the golf bag image in white ink on Stamp School's Hot Fudge card stock. Then I colored the image in with Faber Castell's Gelatos (if you haven't seen these yet, they're sort of a mix between a crayon, a water color pencil, and paint. I'm currently playing around with lots of different ways to uses them, and I have to tell you they're sooo much fun).

You can check out some other really lovely examples of man cards using this month's releases on Stamp School's Blog and on the Design Team's blogs:

Amber
Rochelle
Vicki

...and here's a look at the whole release that will be available tomorrow:

Dad's Tools


The Men in My Life


Felt, ink, and card stock colors:

Lemon Drop

Orange Fiz


Pink Lemonade


Tangy Orange
 
Happy stamping! 

Friday, April 27, 2012

Not so Mini Album

Today I have what could loosely be called a mini album. It's 6" x 6", so it falls into the mini album category, but I stuffed it so full of photos, that it's a little larger than mini. The whole thing is made from My Mind's Eye's Miss Caroline Dilly Dally Adventures collection. I fell in love with the colors and patterns in this line immediately, and since I had to have almost everything in the collection, I figured it would be put to best use in a large mini album.


I made the covers out of chip board, just to make it a bit sturdier. The blue star piece behind the title is actually an unfinished wood piece that is part of the Miss Caroline line. I used Tim Holtz Broken China Distressed Ink to stain it.

I love when mini albums are interactive, so the photo on the right hand side of the bottom page opens up to show 2 more photos underneath.


 The photo on the top right side flips up to reveal another photo and journaling about the trip.


 My favorite interactive page is the bottom left page. I made little pockets behind the main photo, and one photo pull out from each side (by pulling on the ribbon). The photo on the bottom right spins up around the brad in the right hand corner to reveal another photo underneath.


The journaling/title tags that go with Miss Caroline were perfect for my album, and really helped make everything come together quite quickly. I raided my leftovers from all different projects to scrounge up a few unexpected touches like the layered giraffe sticker on one of my pages, and some fun word stickers to sprinkle throughout the album. It was a great way to use leftovers and enhance the album!

Thanks for stopping by!


Tuesday, April 24, 2012

For the Love of Cropping

I love a good crop. Whether it's on-line or in person, I just can't help but be motivated to get things done. This weekend there's was an impromptu crop over at the Fiskateers site. If you're a Fiskateer,  you should definitely head over and check it out. Challenges don't close until Wednesday night, so there's still time to play along. If you're saying "Fiska-what?" you should also head over and check out the Fiskateers. It's a free community of people who love all things Fiskars (and if you're a paper crafter, sewer, or gardener you definitely own at least one Fiskars scissors, paper trimmer, punch, or gardening tool!).  It's a really fun, creative and supportive group, and you won't be disappointed that you checked them out. I've been having fun working on a few of the crop challenges. Here's a spring layout I made using my favorite Fiskars Border Punch (which just happens to be Fiskars Upper Crest border punch. I used it as an accent on the left hand side of my photos):


I created this layout from some leftover paper I had from another project and some Washi Tape. I used black, blue, and yellow Washi Tape to create the pattern on the top part of the page. There's a lot you can do with Washi Tape, but one of my absolute favorite things is creating my own patterned paper with it. You can check out the chevron paper I made with it here if you didn't see that project when I posted it.


This background was created by placing 3 strips of the same tape next to each other on a diagonal, and then repeating with a new tape until the entire background was covered.


The  patterned paper and journaling tag are from My Mind's Eye's new On The Bright Side Collection. On the bright side is much like it sounds; a bright and bold collection, however it has surprising vintage touches to it as well. 

Thanks for stopping by!

Thursday, April 19, 2012

Chore Chart

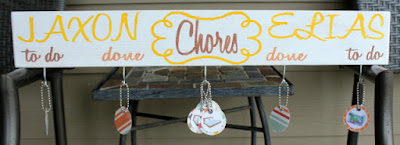
I've been wanting to make a chore chart for my boys (they almost 4 and 5 1/2), but I didn't want a traditional "chart" style. I also wanted something that would look nice hung up in the house. I wanted it to be pretty and functional. I wasn't sure what I wanted until 2 weeks ago when my husband was doing a project and had a bunch of leftover pieces of cedar that were about 2 feet long. The following chore board sprung to mind:


First, I have to say, sometimes things come out as well or even better than you pictured in your mind (...and sometimes they don't). Happily, this is one of those times, I love how it turned out.


I took the bare 2 foot piece of wood and sanded it. Then I painted it with only 1 coat of white paint and sanded it again. I wanted to have a worn look, and with 1 coat of paint the grain shows through nicely.  Then I cut my words from vinyl and used it as a stencil for painting my words.


I added hooks (which I found at my local hardware store) to the board for the chore tags to be hung from. Since my kids are too little for printed words just yet, I found public domain clip art and printed those out on white card stock. I punched out my clip art pictures with Fiskars circle punches and attached them with Craft Glue Dots® to larger circles of Pink Paislee Prarie Hill patterned paper.


I set an eyelet through each chore tag to hopefully keep the medallions from ripping. I used a 4" piece of chain (also found in 3 ft lengths at my local hardware store) to hang the the medallions.


This is not the prettiest picture, but at least you can get an idea of what it looks like hanging on the wall in my house. Each night after my boys go to bed, I'll hang their chores for the next day (make bed, set table, help fold laundry, etc.) on their "to do" hook. When they wake up in the morning they can look at their job for the day, complete it at the appropriate time and move their medallion from the "to do" hook to the "done" hook. The hook in the middle holds all the extra medallions for chores that don't need to be done that day.  My boys are already excited about moving their medallions from the "to do" hook to the "done" hook". One other note about this board if you're thinking about making one for yourself: Some medallions I only have 1 of, for example "help mom sweep", because only 1 child needs to do this at a time. Some medallions I have 2 of, for example, "pick up the play room" will often be assigned to both boys on the same day.

Thanks for stopping by!

Sunday, April 15, 2012

Oh Boy!

I love making mini albums. Which is a little funny to me, because when I first started paper crafting 10 + years ago all I wanted to do was make cards. I loved stamping, and that's all I needed at the time.  I had no desire to branch out into scrapbooking and home decor things. It just seemed like a lot of work. Oh how things have changed! About 4 years ago, I decided to make a mini album of my oldest son's 1st year of life milestones for my sister, parents, in-laws, and grandparents for Christmas (if you're counting, that was 4 mini albums...a pretty ambitious task for a 1st time mini album maker). This one project became my gateway into scrapbooking, mini album making, and home decor item making. A lot of work? Yeah, sometimes. A lot of fun? Always! Being able to preserve the best moments of life was so much fun that I jumped into scrapbooking and haven't regretted it a day since. 

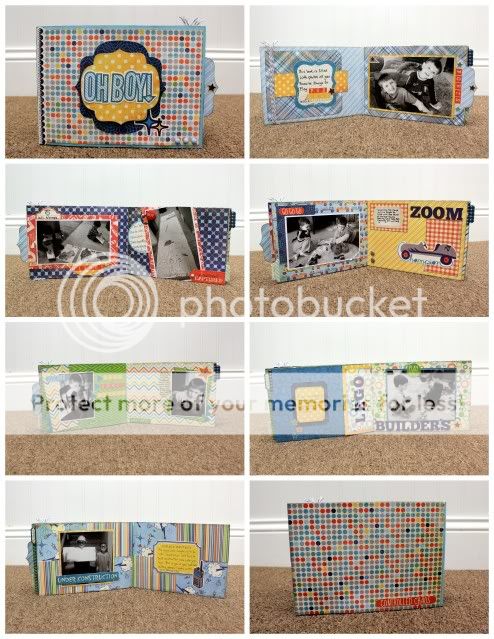
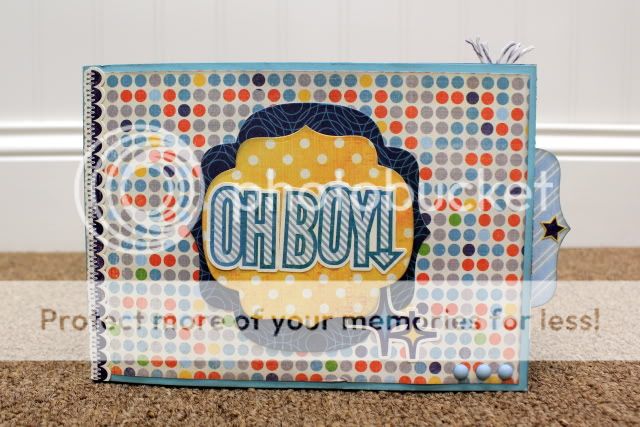
I've come a long way since that first mini album. Instead of buying albums to decorate, I now often make my own. I love being able to customize sizes and shapes. I joke around with my crafty friends that I can make a mini album out of anything: cardboard, paper, journaling tags, name badge holders, envelopes...well you get the picture. For today's album, I had the idea in my head that I wanted to make a mini album that had the look of a book edge. I played around with a few things and came up with this mini album:


Here's a picture of the binding:


To create the cover for this book you'll need a nice strong card stock base. My finished book size is 5" x 7" so I'll be giving directions for that size book, but it's easy to adjust if you'd like a different size.

Take your card stock and cut 1 - 5" x 8 1/2" piece of card stock and 1 - 5" x 6 3/4" piece of card stock.


Score the 5" x 8 1/2" piece of card stock at 7" and 7 1/4" . This will leave you with a 5" x 7" section, a 5" x 1/4"  section between score lines (this will be your spine), and a 5" x 1 1/4" section. 


 Use a strong adhesive like Scor-Tape to attach the 5" x 6 3/4" piece of card stock to the 1 1/4" section from the piece that you just scored. You'll want to attach the 5" x 6 3/4" piece of card stock 1/4" from the spine (1/4" + 6 3/4" = 7"). Not butting this piece directly up to the spine will make it easier for your book to open and close smoothly.

Now you have the cover of your book completely finished. To add pages to your book:


Cut any patterned paper that you like to 5" x 7 1/4". Score the patterned paper at 7". Use a strong adhesive along the 1/4" section of patterned paper and attach it to the inside of the 1/4" spine of your book. Add as many pages as you need to create your mini album.

Then all you need to do is add photos, decorate, and enjoy!


Because my boys seem to change and grow right before my eyes, I made this album about the things that they like to do right now at this point in time. I've done a few mini albums with this theme over the years, and it's really fun to look back to see what's changed and what has stayed the same. 
  
Supplies
Paper and Stickers: Echo Park A Boy's Life Collection Kit
Card Stock: Stamp School Berrylicious
Accessories: Twine, Pebbles Ink Candy Dots, Craftworkcards Candi Dots,

Friday, April 13, 2012

Some Knitting Projects

Every once in a while, I like to stray from my usual postings on paper crafts and branch out into some other project I've created. Today is one of those days. I'm excited to share this knitted project, because it represents a big step for me. You know how I often talk about stepping outside your comfort zone? That's what this project is all about. I've been knitting for about 9 years now, and I'm not being modest when I say that my knitting skills are very basic.Until recently, I could knit pearl, and decrease stitches. That's was about it. In the past, I've stuck to simple things like scarves that I can play around with patterns a bit, but don't have to worry about sizing just right. Two months before Christmas I stumbled on the pattern to make this really cool knit flower.


The pattern contained more than a few stitches I didn't know how to do, but I thought I'd give it a try. I headed to the internet and found a great resource for knitting terms and videos of stitches. I had to watch a some of the videos multiple times. In fact, I sat in front of the computer, needles and yarn in hand, learning the new stitches. After making one, I knew these flowers would be great Christmas gifts for the ladies in my life (Grandmas, Moms, Aunts, good friends, my son's teachers). I sewed pin backs on them so they could be attached to a shirt, coat, or even a purse:


And made cute little cards to attach them to (creating a paper craft portion brought this craft back safely into my comfort zone).


In the end, I made over 25 of these beauties from yarn I already had on hand.


At first I thought the biggest reward of stepping outside of my comfort zone for this projects was being able to give a heartfelt, hand made gift to people I really care about. However, just the other day when I was finishing up another knitting project, I realized the real reward. Taking the plunge and trying some new stitches on those flowers pushed me into the next level of knitting. I wanted to knit a few headband ear warmers, and I didn't even think twice about some of the more complicated stitches.


As you can see from the picture above, I even ventured into knitting with more than one color of yarn for the first time ever... and you know what? It wasn't even that hard. I'd been intimidated by it in the past, but now I knew I could do it. Oh, and a little side note the brown headband is for everyday winter wear and that green and gold headband is for wearing to Packer games next winter. So next time you're thinking about stepping outside your comfort zone, go for it! You never know just how it will help you grow as a crafter.

Thanks for stopping by!

Thursday, April 12, 2012

Customizing a Background

Today I wanted to share a card I made using nesting dies in an unusual way. If you're like me, you own quite a few punches and dies. Often we use the punched/cut out image and toss the negative image. Today I made a card using that negative image as a mask for crating a background on my card.


I created a video so you can see exactly how I did it.


Keep in mind, if you're careful you can use your mask a few times. I used mine a second time to make this card:


A few other things to think about:
I used a stamped image and sponged on ink to create my background, but this type of mask will work just as well with ink mists and sprays.
I centered a single image, but you'll get an entirely different look if you did multiple images along an edge. For example, a mask with 3 circles along the bottom edge would look cool.


Please feel free to leave any questions you may have in the comment section. Thanks for stopping by!

Saturday, April 7, 2012

Father's Day Gift

A Walk Down Memory Lane carries these mini library drawers that are made by 7 Gypsies. Since I first saw them, there's been a little voice in the back of my mind saying, "There's got to be a cool way to use that as a mini album." Well full inspiration finally hit, and while it's not exactly a mini album, I've decided to use it to hold a whole series of mini albums.


This will be a Father's Day gift for my dad. Almost every time we go visit my parents (who live about 7 1/2 hrs away) my boys ask to go to my dad's work. You see, Papa Bruce's work has lots of cool bucket trucks, diggers, and work trucks. They put on their safety glasses and pretend to be drivers. I cut a stencil from vinyl, and added the words "Papa's Work" to the drawer with a bit of paint. Then I set about creating mini tag albums to house in the library drawer. I have 4 albums that will be given with the drawer for Father's Day. As part of the gift, I will continue to make mini tag albums from pictures from future visits to add to the drawer.


This album, of their most recent visit, was made from Bo Bunny's On The Go collection. For a little extra fun I asked my boys what Papa Bruce does at work, and then added their answers to the mini album.


This album was created from My Mind's Eye's Miss Caroline. This was the very first visit to Papa's work. My boys were so little (translation: sort attention spans) that I only have 2 pictures from this visit to Papa's work, but the beauty of these small tag albums is that 2 pictures are enough to make a meaningful album.

This album was created from Echo Park's This & That Charming. Another bonus to these tag albums is that you can make them from leftover scraps from other projects. I created a few layouts from my This & That collection pack and then created this album.

I'd also mention that tag albums are a great way to start if you want to try your hand at a mini album, but feel a little overwhelmed by the idea. You can buy a package of pre-made tags and then add as many tags as you need to have the right number of pages.

Thanks for stopping by today!

Monday, April 2, 2012

New Bike

A few weeks ago my youngest got his first "big boy" bike. This is also his first bike that isn't a hand me down from big brother. I took him to the store to shop, and he knew exactly which bike he wanted.


I used Pink Paislee Prairie Hill paper and stickers for this layout. I really like the colors and patterns in this line, but the theme is a geared a bit towards sunny days and flying kites. It was neither all that sunny nor were we flying kites that day, so I chose just a few of the stickers from the line. I used a Maya Road journaling tag to tell the story of the bike. 


I layered some stickers and buttons down in this corner. the peach colored sticker is actually applied on top of an orange button to give it a little extra dimension.

Thanks for stopping by today!