Wednesday, May 14, 2014

Soccer Layouts

Today I have 2 different soccer layouts both made with Echo Park's Goal


I don't know about you, but I feel like I have been scrapping soccer team pictures for.ev.er.  Both my boys play rec soccer in the fall and spring.  I feel like everything looks the same, so I was pleased when this colorful, fun collection came out from Echo Park.  They definitely used much more color than most soccer lines, and I love that it's different then anything else I've used.

I kept it simple by layering up some of the matching stickers with foam dimensional adhesive.  Nothin' fancy here folks just stickers, paper, and some metal star embellishments.


Oh yeah, and a little washi tape.  I wanted something up in the top corner, but a rectangular journaling tag just wouldn't work, so I just took my scissors and snipped the bottom into a fishtail.  Problem solved. 

I don't think I like my second layout quite as much, but that's just sometimes how it is. The orange above and below the soccer ball paper is washi tape.  Again, I kept it pretty simple with some stickers, washi, and journaling cards. 


Now I have 2 more soccer team photo layouts to add to the book.
Thanks for stopping by!

Friday, May 9, 2014

Moxxie Muse

I have a fun announcement to make today. I am now a Moxxie Muse (that's what they call their design team).  If you're familiar with Moxxie, you know why I'm so excited to be part of the design team.  If you're not familiar with Moxxie, it is a theme-based scrapbook company, located in the town of Muscatine, IA.  Moxxie debuted at CHA in 2006. Moxxie products are 100% made in the USA, some of them right in Iowa! Moxxie mainly manufactures double sided paper and stickers, but also has several lines that include diecuts, rubons, chipboard, and buttons! Moxxie is owned by Jennifer Wilson.  Now that I've told you about Moxxie, it's time to show you a layout I just made with Moxxie's Child's Play


We're blessed to have my oldest son's best friend as a next door neighbor.  A few days ago it was beautiful outside and they were out playing.  I just couldn't help sneaking out there with my camera and snapping a few photos. 


I thought the fun play paper would make a great background for my bright and sunny photos. Instead of using a journaling tag or spot on this layout, I just drew some lines right on the patterned paper with a black pen and journaled on the lines. 

  
 I can't wait to share more of what I love about Moxxie with you over the course of the next year.
Thanks for stopping by!


Wednesday, May 7, 2014

Superhero Training Camp Party

My youngest turned 6 today.  6! We're planning what should be a pretty fun party for Saturday.  We'll have a little over a dozen boys running around our house (hopefully outside, weather permitting) for a Superhero Training Camp Party. Today I thought I'd share the items that I made/altered/paper crafted for the party. If you follow me on my Facebook Page, you may have seen a few sneaks of these.  Oh, and I've found that in the world of birthday parties just about everything has been done before, so if something looks familiar, I'm not trying to copy someone without giving them credit, I promise!

First up is the favor for a little game we're going to call Stomp the Villian:


We will be putting pictures of 14 different villains printed on 8 1/2" by 11" paper on the ground in a circle (think musical chairs style).  We'll play music, and the kids will walk around the circle. When the music stops, each kid must stomp (jump on) a villain.  Then the adult running the game picks a card (I printed all the same villains from the circle onto playing card sized paper) and announces that the villain on that card was captured, "Batman defeated the Joker", or "Wolverine defeated Magneto".  The kid standing on that picture has won that round. He picks up the picture from the ground and turns it in for a pair of villain/superhero magnets (if he captures Dr. Zoom, for example, he'll get a magnet pair of Dr. Zoom and The Flash).  I found glass 1/2 beads and magnets that were 1 1/4" so these are nice and big.


These are the take home favor boxes.  I picked these up on sale months ago.  We've stuffed them with fun superhero favors like candy, stickers, tattoos, pencils, etc. I kept these simple by just gluing on pictures of different superheros to the front...I can hardly call it paper crafting, but I did use paper and glue, so I'm including them here.

I've saved my favorite project for last.


We love doing scavenger hunts for birthday games.  These batsignals will be the prize at the end of the hunt!  These were really easy to make since Silhouette has Batman files in their online store.


I cut the bat from black vinyl to place over the plastic of the flashlight.  They won't shine in a bat shape, but the bat logo makes them look extra cool!


For the tags, I just showed my birthday boy the different Batman print and cut shapes, and he picked out the one he liked.  A used foam adhesive to attach them to black or silver tags, and added a little detailing with a black or silver pen.  Super simple, and so cute!

That's it for today, but definitely not it for the party fun. I'll make sure to share some more after the party is over! 

Monday, May 5, 2014

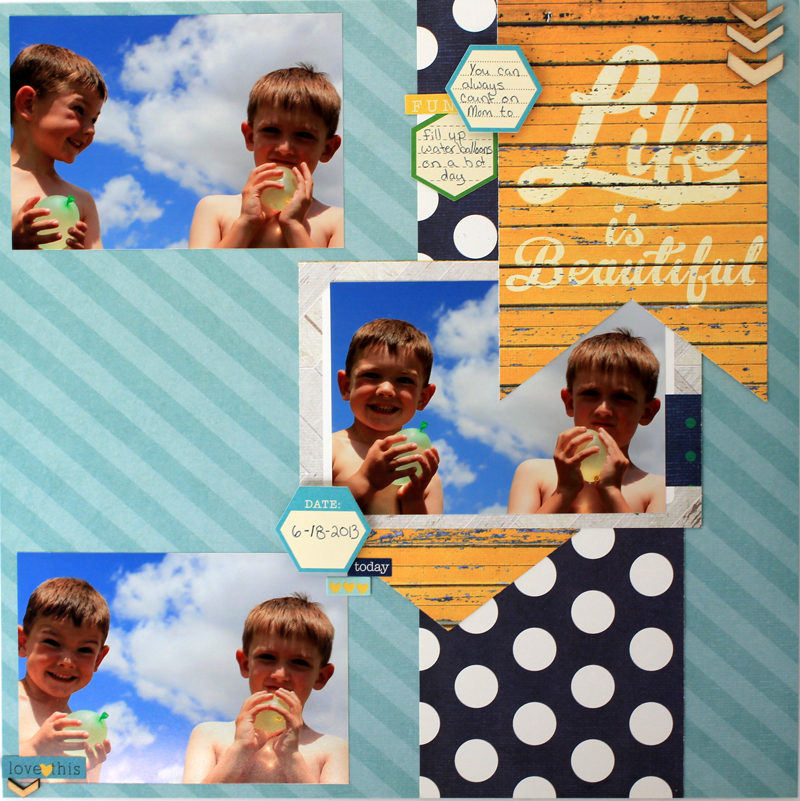
Life With Water Balloons

Life with water balloons on a hot summer day is beautiful, and I have the photos to prove it.


A few notes: My youngest son's face in these photos is priceless.  Do you see that mischief? He's always up to something!  Also, I'm usually the one who suggest water balloons, because encouraging a little mischief once in a while is a good thing.  Also, I'm really looking forward to some beautiful sunny days like the one in my layout.


The paper is from Simple Stories A Charmed Life.  I was really drawn to the blues and yellows in this collection.  It has a bright but weathered feel, and was a great fit for these photos. 


Thanks for stopping by!

Saturday, May 3, 2014

First Photo Ultrasound Layout

Happy National Scrapbook Day! Thanks for coming to check out my Pebbles NSD project. When you're done checking out my layout make sure to scroll down to the bottom of the page to see the list of other Pebble's DT members participating in the hop, and details on how to enter to win the Pebbles NSD giveaway.
For NSD, I thought I'd create a baby layout.  Did you know that I didn't start scrapbooking until my youngest was over a year old? Occasionally I go back in time and play catch-up on photos from before I scrapbooked.  The very first photo of my youngest is a pretty important photo, and deserved a page.


 Pebbles Special Delivery was the perfect collection for scrapping this photo.  At the time we didn't know he would be a boy, but since I scrapped this almost 6 years later, I had the luxury of knowing to do a very boyish page.


 My ultrasound photo was fairly thin, so I used a photo overlay not only as a design element, but as extra protection for the photo.


 I built the rest of the layout from journaling cards.  I added a few extra stickers, rub ons, and embellishments to the cards, but overall I kept the layout pretty clean and simple. 


 Oh! and I can't finish without pointing out those Thickers. They may just be my most favorite Thickers ever. There's just something about them that I love.

Now, I know you'll want to check out what the rest of the team has created for today. Below the sneak peek you'll find each of the designers names.  Just click on a name to be taken to their NSD project.

Pebbles NSD Graphic

Don't forget the giveaway: Visit each Design Team member's website and leave a comment. Once you're done, visit Pebbles and enter to win $200 in Pebbles products so that you can get creating on your own!

NSD Giveaway


...and don't forget to enter to win an awesome prize!


Tuesday, April 29, 2014

Sunset on the Island Layout

Last month I got to take a vacation with my sister to visit my grandparents in one of my very favorite places in the US: St. Simon's Island, Georgia.  I got to relax a lot, make some lovely memories, and of course I spent a little time photographing the beauty of the island.  Today I have a 2 page layout of photos I took during a sunset walk.  This is Sunset on the Island:


Echo Park's Summer Adventure came into A Walk Down Memory Lane about the same time I got back from my trip. The nautical themes and rich colors seemed like a nice fit for my photos.


This photo of the bridge at sunset was too lovely not to enlarge.  It's not very often that I scrap really big photos, but since it takes up so much space, I decided to keep the rest of the page fairly simple.  I layered the picture of resident pelican in front, and if you take a close look at that photo, you can see the same bridge at sunset behind him.  


I echoed the colors of the paper collection with my alphas for the title, and added half a sun sticker to make it look like it was setting.  


 The other half of the layout is more of the photos I took of some of our favorite places at sunset. 


 It was definitely a struggle to keep these pages from feeling too overworked between the patterned paper and large photo on the left side of the layout, but in the end, I think I struck a pretty decent balance.

Thanks for stopping by!

Sunday, April 27, 2014

Birthday Gelato Gesso Resist Card

I thought it might be fun to share a little mixed media card tonight.  I don't work with mixed media a lot, but it's so much fun to get my hands messy and play around that I really should do it more!  This is a birthday Gelato gesso resist card that I created.


I started by placing the Studio Calico Inter Circles mask on a piece of card stock. I applied a generous amount of gesso to the card stock using the stencil.  When the gesso dried I added color with my Gelatos.  There's nothing more fun than coloring with those chapsticky crayons!  I used a baby wipe to blend the Gelatos a bit and remove the gelatos from the gesso, creating a resist where it was stenciled on.  Finally I finished it off with one big Tim Holtz Blueprints birthday stamp. If you try to stamp over a gesso resist, make sure to use a permanent, waterproof ink, or your ink will smear and rub off of the gesso treated area.  I used Ranger's Archival ink in brown for my card. 


That's it for me and my card today.  I'm off to wash my hands now! Thanks for stopping by.