The July issue of (the totally free) Create Magazine is now available. It's a beautiful magazine full of ideas, sketches, and lots of pretty projects and you won't regret taking some time to check it out! This month We R Memory Keepers is one of the companies being featured, and I have 2 projects in the magazine. You can find this layout:
on page 95, and you can also find a card I created on page 106. On the layout above, you'll find that the O'Brien's Tower pamphlet is actually in a memorabilia pocket I created with the WRMK Photo Fuse. You can easily slide the pamphlet out to read the whole thing. I thought I'd share a quick photo tutorial of how I managed to make this pocket. This pocket is a bit different than a standard Photo Fuse pocket as it sits on top of the page protector and doesn't go all the way through to the back side of the layout.
Here's what the finished version of the layout I used for this tutorial looks like:
The Cliffs of Moher pamphlet is what is in a memorabilia pocket. To make a memorabilia pocket you'll start by creating you layout and adhering all your photos, but not your item to go in the memorabilia pocket.
Above is my layout with everything laid out and attached. You can see I've placed my memorabilia where I want it (but not attached it), so I can get the layout of my layout correct.
The next step is to measure the memorabilia. Add about 1/4" to your measurements for the size of your pocket. So if my memorabilia measures 4"x 8", I'll want my pocket to be about 4 1/4"x 8 1/4".
Cut a page protector down to your measurements. I used a regular 12 x 12 WRMK page protector and cut a 4 1/4" x 8 1/4" piece from it. You just need a single sheet of plastic, you don't need a pocket of plastic.
Your plastic piece should now be just slightly larger than your memorabilia.
Put your finished layout in the page protector that it will live in in your scrapbook. Place your memorabilia on top to get your spacing right. Use a piece of washi tape along the top side of your piece of plastic to temporarily adhere it in place, where you will be creating the permanent pocket.
Remove your memorabilia, but leave your piece of plastic taped on.
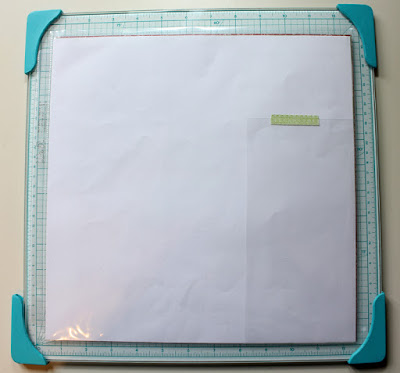
Slide a piece of scratch paper into your page protector on top of your layout. This will protect your layout from any damage when you fuse your pocket in place.
Now you can use your Photo Fuse tool to seal the bottom and sides of your plastic to your page protector, creating a pocket that is open on the top.
Remove your scratch paper and washi tape and slip your memorabilia into the pocket.
If you have any questions about creating a memorabilia pocket of your own, leave me it in the comments and I'll be sure to get back to you. Thanks so much for stopping by, and don't forget to check out July's issue of Create Magazine!


No comments:
Post a Comment