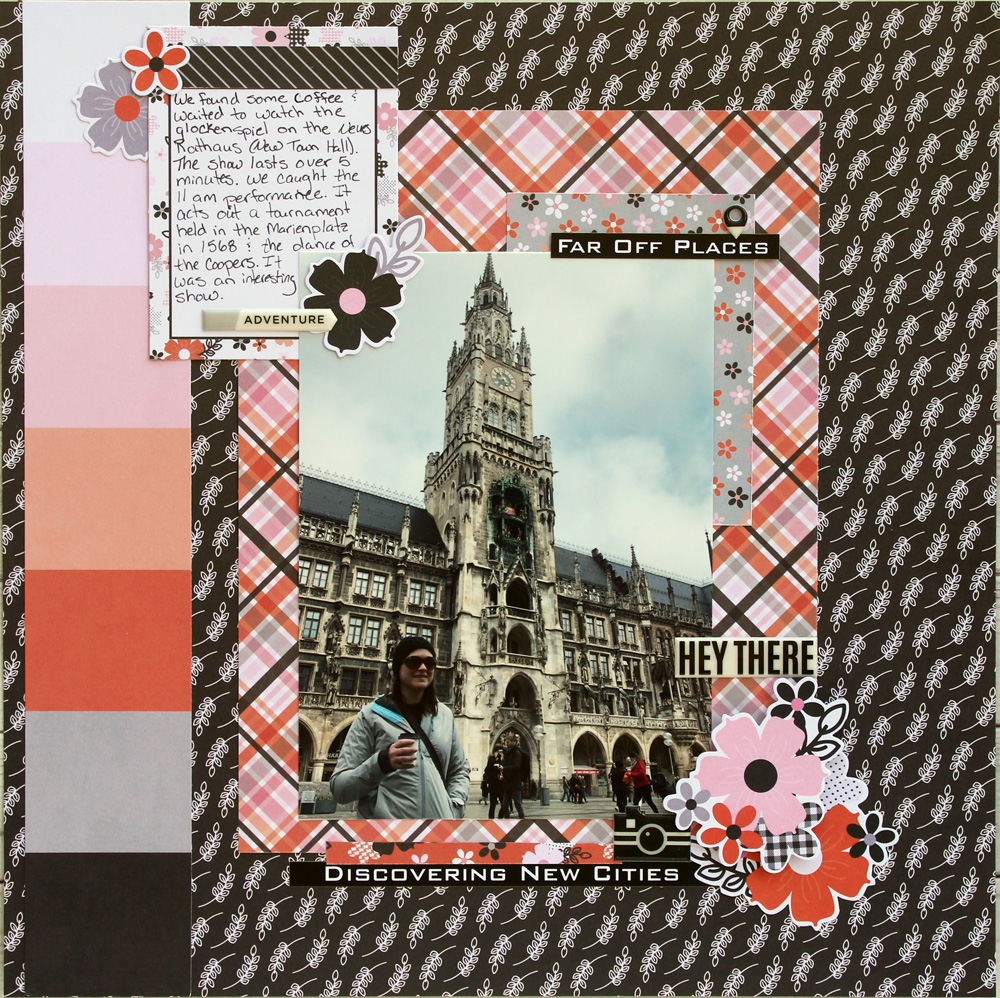
Happy October! A new month means a new kit from Scrapbooking Store. I fell in love with this kit and made multiple layouts from it. Today I'm sharing a Munich travel themed scrapbooking layout created from the October kit.
The main kit contains paper and die cuts from Simple Stories Happy Haunting. As you can probably tell from the name, it's actually a Halloween themed line. I did, in fact, make one Halloween layout with it, but I fell in love with the unique color combos in this collection.
I felt like the unique mix of orange, black, and pink made for a perfect color combo to scrap some of our recent photos from Munich, Germany.
The patterns in this collection are gorgeous, too. There are lots of spider webs, and ghosts, and other Halloween themed papers, but there are also gorgeous stripes, pretty plaids, lots of fun dots, and even some florals. Usually, one side of the paper is Halloween themed, and the other is a generic print.
Likewise, the die cuts are a mix of Halloween themed words and icons and floral die cuts. If you opt for the upgrade part of the kit, you'll get some cute Halloween themed puffy stickers, some Heidi Swapp puffy stickers (that I used on this layout), and some fun rhinestones.
October's kit from Scrapbooking Store was such a fun surprise. I was expecting only Halloween themed papers and embellishments, but I got Halloween and oh so much more!
I wrote this post while participating on the Scrapbooking Store Design Team.
Tuesday, October 1, 2019
Wednesday, September 25, 2019
Packer Layout
In this house, we're Packer Fans. I grew up in Wisconsin, and the rest of my household has been happy to adopt my football loyalty. This year my husband and oldest son took the 16-hr round trip trek so my oldest could attend his first Packer Game at Lambeau. So, of course, today I have a Packer layout.
I found this really great Packers Pride Football paper pack from Scrapbook Customs. Honestly, I usually have a hard time using paper that is so heavily themed, but this layout came together really quickly. This collection was so easy to work with!
I picked a few of my favorite photos that they sent me that day. Since I didn't get to go along (I was a little envious, but I still remember my first Packer game with my Dad, so making this a father son outing just seemed right), they made sure to take and send lots of photos. I also made sure one of the tickets ended up on the layout. Scrapping bits of memorabilia like tickets or maps is a great way to make sure those little bits of nostalgia don't get lost over the years.
I hope your fall is starting off as wonderful as ours is...and Go, Pack Go!
I found this really great Packers Pride Football paper pack from Scrapbook Customs. Honestly, I usually have a hard time using paper that is so heavily themed, but this layout came together really quickly. This collection was so easy to work with!
I picked a few of my favorite photos that they sent me that day. Since I didn't get to go along (I was a little envious, but I still remember my first Packer game with my Dad, so making this a father son outing just seemed right), they made sure to take and send lots of photos. I also made sure one of the tickets ended up on the layout. Scrapping bits of memorabilia like tickets or maps is a great way to make sure those little bits of nostalgia don't get lost over the years.
I hope your fall is starting off as wonderful as ours is...and Go, Pack Go!
Labels:
Scrapbook Customs
Wednesday, September 4, 2019
First Day of Middle School Layout
Scrapbooking Store's September kit is out and it is perfect for scrapping those back to school photos. So far, I've created 3 different layouts. Two of which you'll have to check out on the Scrapbooking Store's social media accounts, and the third I'm here to share today with this first day of middle school layout.
I'm loving the rich colors in this kit. The colors are a little deeper than bold primaries, so the look is great for older kids and first day of school layouts that want to be a bit more sophisticated.
The big deal with middle school (besides being in a new part of the school) is that they get lockers with a lock on them. There always seems to be a bit of a learning curve with this, and it seems to be the thing the kids worry the most about. I thought it would be fun to use one of the locker chipboard stickers from the Upgrade to September's kit to add that as an embellishment on the layout. P.S. He's mastered his locker no problem.
Thanks to the Scrapbooking Store's September kit, this may just be the fastest I've gotten my kiddos' first day of school photos scrapped!
I wrote this post while participating on the Scrapbooking Store Design Team.
I'm loving the rich colors in this kit. The colors are a little deeper than bold primaries, so the look is great for older kids and first day of school layouts that want to be a bit more sophisticated.
The big deal with middle school (besides being in a new part of the school) is that they get lockers with a lock on them. There always seems to be a bit of a learning curve with this, and it seems to be the thing the kids worry the most about. I thought it would be fun to use one of the locker chipboard stickers from the Upgrade to September's kit to add that as an embellishment on the layout. P.S. He's mastered his locker no problem.
Thanks to the Scrapbooking Store's September kit, this may just be the fastest I've gotten my kiddos' first day of school photos scrapped!
I wrote this post while participating on the Scrapbooking Store Design Team.
Labels:
Authentique,
Scrapbooking Store
Friday, August 23, 2019
Rustic Wedding Card
My husband was in need of a wedding card for a coworker of his, so today I have a simple rustic wedding card to share with you.
I started with a little bit older collection from Paper House called Wedding Day. The color palette is fairly neutral with soft touches of blue, yellow, brown, green, and pink. There are lots of wood and burlap details to this collection lending to an overall rustic feel.
I combined stickers from the collection with stickers from Paper House's To Have & To Hold Card Stock Sticker Pack for embellishments. I especially liked that the "Two become one" sticker has a shiny silver finish to it. It's a nice detail that makes the card really pop.
Speaking of popping, I used a little dimensional adhesive to pop the wedding cake sticker up just a little. I also used a bit of dimensional adhesive between the cream wood grain layer and the top blue wood grain layer of patterned paper.
Remember you can use code PH19SAMANTHA when you purchase anything from Paperhouseproductions.com to get 20% off your entire purchase.
I wrote this post while participating on the Paper House Design Team.
I started with a little bit older collection from Paper House called Wedding Day. The color palette is fairly neutral with soft touches of blue, yellow, brown, green, and pink. There are lots of wood and burlap details to this collection lending to an overall rustic feel.
I combined stickers from the collection with stickers from Paper House's To Have & To Hold Card Stock Sticker Pack for embellishments. I especially liked that the "Two become one" sticker has a shiny silver finish to it. It's a nice detail that makes the card really pop.
Speaking of popping, I used a little dimensional adhesive to pop the wedding cake sticker up just a little. I also used a bit of dimensional adhesive between the cream wood grain layer and the top blue wood grain layer of patterned paper.
Remember you can use code PH19SAMANTHA when you purchase anything from Paperhouseproductions.com to get 20% off your entire purchase.
I wrote this post while participating on the Paper House Design Team.
Labels:
Paper House
Thursday, August 15, 2019
Dog Layout
In June we added a new family member. Today I'm sharing a dog layout about our sweet Kevin the basset hound.
I have a lot of partial collections sitting in my craft room, so I've been trying to use up my stash before buying too much new stuff. The paper and most of the stickers I used for this layout are from an older Echo Park collection called Bark.
I had already used about half of the paper and stickers on other layouts, so my goal was to make a cute layout from what I had left.
I supplemented with some word and pet themed stickers from Paper House that coordinated with the colors from the Bark paper.
We are so in love with this sweet, silly puppy, so I thought it would be fun to make a journaling card that focused on some of the reason we love him (from his long ears to his wiggly butt and his goofy personality).
Thanks for letting me share my dog layout and my sweet Kevin with you today!
I have a lot of partial collections sitting in my craft room, so I've been trying to use up my stash before buying too much new stuff. The paper and most of the stickers I used for this layout are from an older Echo Park collection called Bark.
I had already used about half of the paper and stickers on other layouts, so my goal was to make a cute layout from what I had left.
I supplemented with some word and pet themed stickers from Paper House that coordinated with the colors from the Bark paper.
We are so in love with this sweet, silly puppy, so I thought it would be fun to make a journaling card that focused on some of the reason we love him (from his long ears to his wiggly butt and his goofy personality).
Thanks for letting me share my dog layout and my sweet Kevin with you today!
Labels:
Echo Park,
Paper House
Wednesday, August 7, 2019
Custer Peak Layout
This summer my family and I took a long weekend in the Black Hills of South Dakota to 4-wheel and sight see. We made a trek up to the top of Custer Peak for some breathtaking views and great photo opportunities. Today I have a Custer Peak layout from that day.
For this layout I used the Scrapbooking Store's August kit. The main kit's papers and stickers are from Echo Park Good Day Sunshine. The kit is full of saturated summer colors and fun summer themes (like popsicles, picnics, lemonade stands, campers, and wagons).
My only complaint with the kit is that there is only 1 sheet of every paper. The kit is so good that I'm having a hard time deciding if I should use the A side, the B side, or half of each side!
The alphabet stickers I used are part of the upgrade kit. They are some of my favorite alphas and blend perfectly with the collection.
I have quite a few more photos to scrap from this trip, and I'll definitely be using all of my Scrapbooking Store August kit up on these and other summer photos!
I wrote this post while on the Scrapbooking Store design team.
For this layout I used the Scrapbooking Store's August kit. The main kit's papers and stickers are from Echo Park Good Day Sunshine. The kit is full of saturated summer colors and fun summer themes (like popsicles, picnics, lemonade stands, campers, and wagons).
My only complaint with the kit is that there is only 1 sheet of every paper. The kit is so good that I'm having a hard time deciding if I should use the A side, the B side, or half of each side!
The alphabet stickers I used are part of the upgrade kit. They are some of my favorite alphas and blend perfectly with the collection.
I have quite a few more photos to scrap from this trip, and I'll definitely be using all of my Scrapbooking Store August kit up on these and other summer photos!
I wrote this post while on the Scrapbooking Store design team.
Labels:
Echo Park,
Scrapbooking Store
Monday, July 29, 2019
Mommy Lhey Planner To Do List
I've never been a "planner girl". I love the trend, and I love all the gorgeous planner spreads out there, but this lady needs all of her appointments on her computer and in her phone. I need to schedule reminders that pop up for me on my phone. But....I got this gorgeous Paper House Mommy Lhey planner, and I really wanted to find a way to utilize it.
Then it hit me: I can use it to replace my current To Do list. Here's a picture of my current way of keeping a To Do list.
It's a dry erase magnet board that I keep on my fridge. It works alright, but I'm pretty excited to step up my game with my new mini planner. I'm starting with August and thought I'd share what I'm doing. It's a bit rough, and I'm sure I'll change things up as I learn more what I need, but here's the start.
Here's my monthly snapshot. I'm not sure what I do only monthly, so this will get filled out a bit more as I figure it out. Then, I can carry those things over from month to month. On the left hand side I have 2 lists. The top list is my "to do" some time in the month (or possibly even carry over into the next month). The bottom list is my "to craft" this month (and a few big projects that will carry over to the next month).
And, finally, here is my first week spread. I love checking things off my list, so I'll be checking my done items off daily. While it's not the prettiest planner spread, it's definitely what will work for me.
If you want to pick up your own Mommy Lhey Paper House Planner use code PH19SAMANTHA at checkout to get 20% off your entire order.
I wrote this post while working for the Paper House Creative Team.
Then it hit me: I can use it to replace my current To Do list. Here's a picture of my current way of keeping a To Do list.
It's a dry erase magnet board that I keep on my fridge. It works alright, but I'm pretty excited to step up my game with my new mini planner. I'm starting with August and thought I'd share what I'm doing. It's a bit rough, and I'm sure I'll change things up as I learn more what I need, but here's the start.
Here's my monthly snapshot. I'm not sure what I do only monthly, so this will get filled out a bit more as I figure it out. Then, I can carry those things over from month to month. On the left hand side I have 2 lists. The top list is my "to do" some time in the month (or possibly even carry over into the next month). The bottom list is my "to craft" this month (and a few big projects that will carry over to the next month).
And, finally, here is my first week spread. I love checking things off my list, so I'll be checking my done items off daily. While it's not the prettiest planner spread, it's definitely what will work for me.
If you want to pick up your own Mommy Lhey Paper House Planner use code PH19SAMANTHA at checkout to get 20% off your entire order.
I wrote this post while working for the Paper House Creative Team.
Labels:
Mommy Lhey,
Paper House,
Planner
Subscribe to:
Posts (Atom)