Friday, July 8, 2016

Lots of Patterns

Happy Friday! I'm on the tail end of vacation, but wanted to share a quick layout. I really love mixing and matching patterned papers. Today I thought I share a layout that has lots of patterns in it, and talk a little bit about my thought process and why I think they all work together.


I never want the important stuff (like my photos and journaling) to get swallowed up by all the busy patterns. I've found one of the best ways to make your photo pop on a layout is to make sure the mat the photo. For this layout, I chose a bright color to help the photo stand out. Clustering embellishments around the photo also helps draw the eye to the photo.


I started this layout with the fun, bright striped paper from Elle's Studio. It has a lot of colors going on, so I wanted one of my other patterned papers to be more neutral. The grey star paper is still patterned, but reads a bit more like a neutral since it's light grey on dark grey.


All of the embellishments also pull their color palette from the stripped paper. To keep things looking cohesive, I chose to mirror the stars from the grey paper in some of the papers (like the strip below).


I love working with lots of patterns with scrapbooking. What's your style?

Tuesday, July 5, 2016

Sweet Summer Mini Alphabet Punchboard Banner

This is a personal blog. All editorial content and projects are intellectual property of Taylor Stamped. I  receive financial compensation and material product from American Crafts to develop my craft posts, but all ideas and opinions are my own.
I got my hands on the new We R Memory Keepers Mini Alphabet Punch Board, and have had some time to play around with it now. You guys, it is so much fun! There are so many ways to use these smaller letters; cards, layouts, party decor...and today I'm using it to make a Sweet Summertime Mini Alphabet Punchboard banner.


This board works just like the original Alphabet Punch Board, but starts with 1 1/2" x 2 1/2" rectangles of paper for a smaller set of letters. It's super easy to use, and becomes really intuitive after a few letters...but don't worry if it doesn't become intuitive, there's a step by step guide for making each letter.


It only took me a few minutes to create my letters for my Sweet Summer banner with the Mini Alphabet Punch Board. Since creating the letters was so fast, I decided to dress them up with a few summery icons.


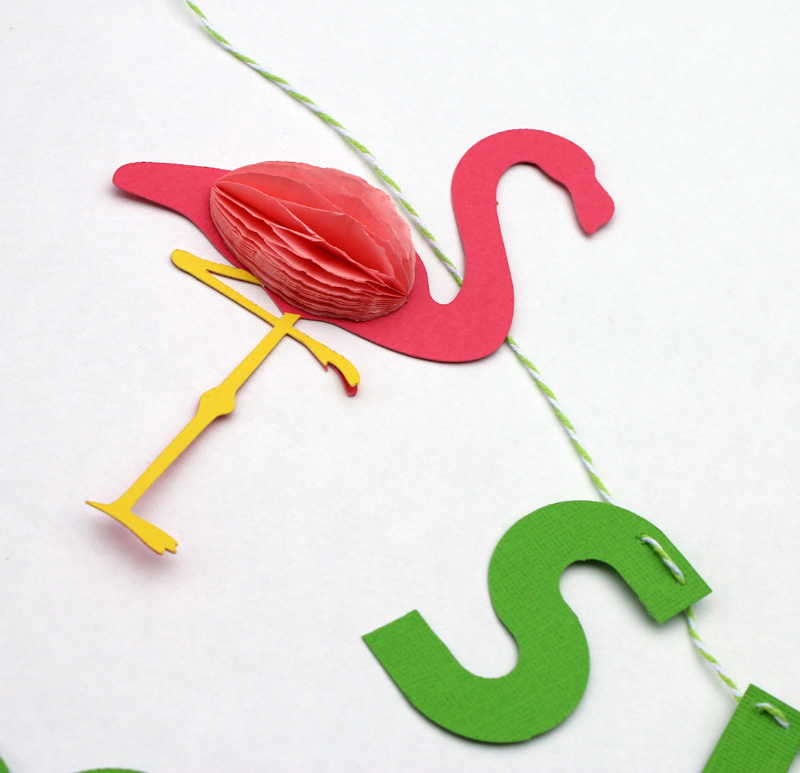
I used my Silhouette Cameo to cut some flamingos and pineapples, because what says summer more than flamingos and pineapples?


Then I added some fun dimension to them with the We R Memory Keepers Honeycomb Stencils and some Honeycomb paper (yellow for my pineapples and pink for my flamingos). They turned out so cute! A little honeycomb paper adds so much.


I pierced little holes through each letter, and used some bakers twine to string it all up. Now I have a bright new summer banner to hang up.


If you're loving this new Mini Alphabet Punchboard, you can pick it up from HSN on July 6. HSN is having a 24 hour craft event on July 6, and there will be live demonstrations during the day of this super fun and versatile new tool. You'll be able to see live how easy it is to use (and order one for yourself!). 

Friday, July 1, 2016

Stamping on Yupo

I've talked about creating a marbled background with Yupo paper, die cutting Yupo paper, creating an alcohol drop ink background on Yupo, now today I want to talk about stamping on Yupo.


I started my card by creating a marbled Yupo background with Copic markers. Then I used and Echo Parke die to die cut the edge. Finally, I stamped a simple greeting on the card.


 Since Yupo is a plastic paper, you can't use just any ink on the card. I have tried a few different kinds and found that Ranger Archival Ink works the very best. Give your stamped greeting or image a full 20 minutes to dry, and you'll be good to go! I did try Stazon Ink, and that worked as well. However, if you want to color an image in with Copic markers after stamping on Yupo do not use Stazon. Stazon and Copics don't play well together, and you can ruin your Copic marker.


As you can see, there are lots of fun ways to use Yupo! Have you tried any of these techniques yet?

Wednesday, June 29, 2016

Mixing Collections

Today I'm mixing collections a bit to create the 2 page layout I wanted. I often mix in embellishments from a different paper collection, but it's not terribly often that I use two different paper collections for one layout.


To compliment my photos of our visit to Newgrange, I wanted a mix of blues and greys. To accomplish that, I pulled papers from both American Crafts True Stories and Pink Paislee Atlas. To make everything flow nicely, I made sure to use embellishments from both collections as well.


We had a bit of a drive to Newgrange from Northern Ireland, so we got up early to be part of one of the first tours of the day. The fun little coffee cup "its a new day" die cut from True Stories was just too cute to pass up, and fits as a nice little reminder of our early start.


Do you like mixing collections, or do you usually stick to paper all from the same collection when you scrap?

Monday, June 27, 2016

Sharing Some Fun News

Today I have some really fun news to share. Starting August 1, I will officially be part of the SRM design team. I love SRM's products and can't wait to spend the next year sharing with you all the fun ways to use SRM's stickers, stamps, containers, vinyl, and so much more! There are some really fantastic designers on the design team, and I am honored to be working with them. I thought it would be fun to spend a little time today sharing some of my very favorite projects that I've made in the past using SRM's products.


While SRM does much more than stickers, stickers are always what I think of first. There are just so many ways to use them. They're perfect for making tags like on the topiary pictured above.


SRM's calendar stickers are some of my favorite. I love using them to make little pocket calendars from name tag badges. 

http://taylorstamped.blogspot.com/2011/06/fathers-day-card-alternative.html

Finally, I wanted to share these decorated candy tubes. Excuse the picture, this is a very old project (I've loved SRM for a long time!). Not only does the project above uses SRM stickers, but SRM clear tubes, too. 

Thanks for letting me share my excitement with you! Don't forget to head on over to the SRM blog to see all of the new SRM Design Team.

Friday, June 24, 2016

Marbled Die Cut

Last week I shared a tutorial on how to make a marbled background with Yupo paper and Copic markers. Today I wanted to show that you can also die cut the marbled paper and make pretty marbled die cuts from Yupo paper as well.

 
I created the simple marbling with 3 Copic Markers on Yupo paper. Then I ran it through my Evolution Advanced Diecut machine. I find it's best to use a metal shim plate with the Yupo paper. Since it's a plastic paper you get a cleaner cut if you use a metal shim to cut against.


I used my die cut as the centerpiece for my card, since the marbling is just so pretty. I added a stamped sentiment from Altenew's Halftone Happy set. I added a little extra interest by scoring a frame around the die cut and layering it up on a pop of colored card stock. Since Yupo is a slick paper, I used some Micro Glue Dots® to attach my diecut to the card. Some Pop Up Glue Dots® between paper layers help add some dimension to the card.

Have you tried out this technique yet? I'd love to hear how you used you Copics with Yupo Paper.


This is a personal blog. All editorial content and projects are intellectual property of Taylor Stamped. I do receive financial compensation and material product from  Glue Dots® to develop my craft posts, but all ideas and opinions are my own.

Tuesday, June 21, 2016

So Rad Guinness Storehouse Layout

Well, I am officially done scrapping our trip to Ireland. One year and two books later, I am finished! However, I still have a handful of layouts to share with you from the trip. Today I have a 2 page layout from our trip to share. Here's my Simple Stories So Rad Guinness Storehouse Layout.


We spent our last day and night in Ireland in Dublin. The Guinness Storehouse tour was one of the few things on the trip my husband really wanted to do, so we headed straight there before doing anything else in Dublin. It's the most visited spot in Ireland (so I've been told), and it was easy to see why. It's a beautiful building in an equally beautiful part of Dublin. It's a self led tour, and there is plenty to see, do and learn!


The building had a great modern industrial feel to it, so I definitely needed a paper collection that had a masculine, but still fun, feel to it. Simple Stories So Rad fit my needs perfectly. As you might know, I really love to use chipboard frames to make journaling spots on my layouts. I used that trick here, and layered t hem up a bit for a little extra dimension. Due to the industrial feel of the photos, I kept my embellishments really minimal, and cut my paper layers in lots of clean, straight lines to blend with the feel of the photos.


So Rad is a great collection, not just for scrapping men and boys but also for these industrial type photos!