This is a personal blog. All editorial content and projects are
intellectual property of Taylor Stamped. I do receive financial
compensation and material product from American Crafts to develop my craft posts, but all ideas and opinions are my own. Some links are affiliate links.
Last week We R Memory Keepers announced their new line of mini piñatas, and let me tell you, they are just as cute and fun as they sound! They come in lots of different shapes, and there are so many colors of fringe tape to decorate them with! Today I'm sharing my first mini piñata, a Christmas Mini Piñata.
One of my nephews (who happens to be a great sport) gets money from us for almost every birthday and Christmas. A few years ago, we started getting creative with how we give it to him. It's been so much fun every year trying come up with silly, fun new ways to give him his money. This year there was no question...he's getting his money in a mini piñata.
The hardest decision was what kind of mini piñata. There are so many fun shapes. I went back and forth between making a circle piñata into a basketball (he's a fantastic basketball player), or decking a donkey piñata out for Christmas. As you can see, I decided to go with the Christmas donkey. Now, it's a little heavy, but $25 worth of quarters will fit inside. There's plenty of room, it's just the weight that you have to keep an eye on. We definitely could have put paper money in here, but we decided coins would be funnier.
Start by filling your piñata and tying on any strings. There are places to tie a string for hanging (which I chose not to use for this project) and places to tie the pull tab/tassel. You can tie the the tassel up tight to the piñata or leav it hanging lower depending on the look you're going for.
Then, you can go to town decorating it by layering up the fringe tape. There's adhesive already on the fringe tape, so all you have to do is peel and stick. It's so easy! Whenever possible, it's easiest to work from the bottom up. I wrapped each leg individually, and then just worked my way up the body to the head and ears. I wanted to give him some eyes, so I added a white Pebbles Candy Dot to each side and drew a black center on it with a marker.
I'll be sharing some more ideas with these fun new mini piñatas over the next few weeks, but I'd love to hear what you think about them? What would you uses them for?
Monday, December 14, 2015
Thursday, December 10, 2015
Hot Cocoa Christmas Ornaments and Free Printable
This is a personal blog. All editorial content and projects are
intellectual property of Taylor Stamped. I do receive financial
compensation and material product from American Crafts and A Walk Down Memory Lane to develop my craft posts, but all ideas and opinions are my own. Some links are affiliate links.
I want to start out by saying there are lots of variations of these hot cocoa ornaments all over the internet. I'm not sure who came up with them originally, but they are super fun! Every year my boys like to make something for extended family. This year we thought it would be fun to make these hot cocoa Christmas ornaments, and I created a free printable with directions to hang on them.
Making these is super easy. I used these plastic fallible ornaments. Just use a funnel to fill them with 1/4 cup of hot cocoa mix (or enough for 1 serving). Then add some sprinkles and dehydrated marshmallows for a bit of yumminess and color.
The fun part is customizing these. We used red and green sprinkles, candy cane shaped sprinkles (that are peppermint flavored), and for the Disney fans in our life we used Mickey Mouse shaped sprinkles. I loved watching my kids think about who was going to get each one!
I wanted to add a small tag to the ornaments with the directions for mixing up a cup. I've included it here, so you can print it out to use for yourself. It's sized for a 1 3/4" circle punch or die.
And here's the back side of the tag that has some simple directions for enjoying a cup of cocoa.
If you give these a try, I'd love to hear about how you customize your hot cocoa ornaments!
I want to start out by saying there are lots of variations of these hot cocoa ornaments all over the internet. I'm not sure who came up with them originally, but they are super fun! Every year my boys like to make something for extended family. This year we thought it would be fun to make these hot cocoa Christmas ornaments, and I created a free printable with directions to hang on them.
Making these is super easy. I used these plastic fallible ornaments. Just use a funnel to fill them with 1/4 cup of hot cocoa mix (or enough for 1 serving). Then add some sprinkles and dehydrated marshmallows for a bit of yumminess and color.
The fun part is customizing these. We used red and green sprinkles, candy cane shaped sprinkles (that are peppermint flavored), and for the Disney fans in our life we used Mickey Mouse shaped sprinkles. I loved watching my kids think about who was going to get each one!
I wanted to add a small tag to the ornaments with the directions for mixing up a cup. I've included it here, so you can print it out to use for yourself. It's sized for a 1 3/4" circle punch or die.
Click here to download the Have a cup of cheer! printable.
And here's the back side of the tag that has some simple directions for enjoying a cup of cocoa.
Click here to download the Cup of Cheer directions.
Just tie the tag on with a bit of ribbon or twine. We used a little bit of everything from my stash for ribbon. Most of it came from and open pack of American Crafts Christmas value ribbon that I had.= My kids helped cut out the tags and cut ribbon, and then all I had to do for them was to tie a knot in the end of the ribbon.
If you give these a try, I'd love to hear about how you customize your hot cocoa ornaments!
Labels:
American Crafts,
Printable
Monday, December 7, 2015
Echo Park Bark Layout
This is a personal blog. All editorial content and projects are
intellectual property of Taylor Stamped. I do receive financial
compensation and material product from A Walk Down Memory Lane to develop my craft posts, but all ideas and opinions are my own. Some links are affiliate links.
I'm taking a quick break from winter and holiday scrapping to scrap a few photos with some new pet paper I got my hands on. Today I have an Echo Park Bark layout featuring our water loving dog, Steve.
Steve joined our family this summer, and these are some photos from the first time we took him camping. He loves the water and couldn't wait to jump in to the lake to swim and play fetch.
I had printed these photos out almost immediately, but hadn't scrapped them yet since I hadn't found the right paper. When Bark came into A Walk Down Memory Lane, I knew right away what I wanted to do with it.
The patterns in Bark are really fun, but what I especially love are the colors. It my world it doesn't get much better than shades of blue mixed with orange. The pops of other colors like brown, yellow, and red are just an extra bonus...and don't forget to check out the super fun sticker sheet that matches the collection!
Now, if you're more of a cat lover (or have both dogs and cats), don't worry. Echo Park as a really cute cat line called Meow, too! I'll be back later this week with some more holiday projects. Have a great week!
I'm taking a quick break from winter and holiday scrapping to scrap a few photos with some new pet paper I got my hands on. Today I have an Echo Park Bark layout featuring our water loving dog, Steve.
Steve joined our family this summer, and these are some photos from the first time we took him camping. He loves the water and couldn't wait to jump in to the lake to swim and play fetch.
I had printed these photos out almost immediately, but hadn't scrapped them yet since I hadn't found the right paper. When Bark came into A Walk Down Memory Lane, I knew right away what I wanted to do with it.
The patterns in Bark are really fun, but what I especially love are the colors. It my world it doesn't get much better than shades of blue mixed with orange. The pops of other colors like brown, yellow, and red are just an extra bonus...and don't forget to check out the super fun sticker sheet that matches the collection!
Now, if you're more of a cat lover (or have both dogs and cats), don't worry. Echo Park as a really cute cat line called Meow, too! I'll be back later this week with some more holiday projects. Have a great week!
Labels:
Echo Park
Friday, December 4, 2015
Thanksgiving Layout
This is a personal blog. All editorial content and projects are
intellectual property of Taylor Stamped. I do receive financial
compensation and material product from American Crafts and A Walk Down Memory Lane to develop my craft posts, but all ideas and opinions are my own. Some links are affiliate links.
Okay, so I know Thanksgiving is over, but I couldn't wait to scrap some Thanksgiving photos. After 14 Thanksgivings in a row at my in-laws, we had no plans for Thanksgiving this year (my in-laws traveled to Florida to visit my sister-in-law). I love to cook, so we decided to do it up big at home and have a Thanksgiving feast in our PJ's. A Thanksgiving like that deserves to be scrapped right away. Here's my Thanksgiving layout.
Almost everything in this layout is from Imaginisce's Give Thanks collection. It's got the beautiful deep, rich colors of a traditional fall collection, but I love that it weaves in a lot of Thanksgiving and family gathering themes, not just fall themes.
This adorable turkey is about the only element not from the Give Thanks collection. It's a doodle-pop sticker from Doodlebug. I took one look at that sticker and knew I had to use it on a layout. Good thing it fit so well!
We had a lovely Thanksgiving (and really long break, as we had snow days Monday and Tuesday!) and now I have the layout to prove it. Since our Thanksgiving is usually so rooted in tradition, it's fun to have a layout reminding us about that one time it was different. What are your Thanksgiving traditions?
Okay, so I know Thanksgiving is over, but I couldn't wait to scrap some Thanksgiving photos. After 14 Thanksgivings in a row at my in-laws, we had no plans for Thanksgiving this year (my in-laws traveled to Florida to visit my sister-in-law). I love to cook, so we decided to do it up big at home and have a Thanksgiving feast in our PJ's. A Thanksgiving like that deserves to be scrapped right away. Here's my Thanksgiving layout.
Almost everything in this layout is from Imaginisce's Give Thanks collection. It's got the beautiful deep, rich colors of a traditional fall collection, but I love that it weaves in a lot of Thanksgiving and family gathering themes, not just fall themes.
This adorable turkey is about the only element not from the Give Thanks collection. It's a doodle-pop sticker from Doodlebug. I took one look at that sticker and knew I had to use it on a layout. Good thing it fit so well!
We had a lovely Thanksgiving (and really long break, as we had snow days Monday and Tuesday!) and now I have the layout to prove it. Since our Thanksgiving is usually so rooted in tradition, it's fun to have a layout reminding us about that one time it was different. What are your Thanksgiving traditions?
Labels:
Doodlebug,
Imaginisce
Tuesday, December 1, 2015
Rudolph The Red Nose Reindeer Krispie Treats
This is a personal blog. All editorial content and projects are
intellectual property of Taylor Stamped. I do receive financial
compensation and material product from American Crafts to develop my craft posts, but all ideas and opinions are my own. Some links are affiliate links.
Part of our holiday fun every year is watching Christmas movies on TV. I love making special treats for our little viewing parties. For Rudolph I made some Rudolph the Red Nose Reindeer Krispie Treats. While I'm not a food blogger, I do love all kinds of crafting, and sometimes that crafting occurs with food...I even used paper straws from my paper crafting stash for this project!
I only wanted a small batch (1 serving per person, no leftovers!) so I made a small batch of Krispie treats (the batch makes 4 total).
8 x 8 Pan of Krispie Treats
1 Tbs Butter
2 1/2 Cups Mini Marshmallows
3 Cups Rice Krispies Cereal
Melt the butter and marshmallows in pan over medium heat. Add rice krispies and mix until combined. Press into a greased 8 x 8 pan.
While the bars are still warm, pop them out of the pan and cut them. I cut mine in half (shown above) and then in half again (shown below). After cutting them into 4 pieces, I shaped them a bit more to make them a little more rounded at the bottom and pressed on the top to make "ears". Then I inserted a paper straw.
To decorate these, all I used was some chocolate. Melt about 1/2 cup chocolate chips and 1tsp Crisco. Pipe the chocolate on to create the antlers and eyes. Use some as well to stick a red M & M on for Rudolph's nose.
My kids loved these, and I hope you do too! I'd love to hear about your favorite Christmas movies and what you do when you watch them.
Part of our holiday fun every year is watching Christmas movies on TV. I love making special treats for our little viewing parties. For Rudolph I made some Rudolph the Red Nose Reindeer Krispie Treats. While I'm not a food blogger, I do love all kinds of crafting, and sometimes that crafting occurs with food...I even used paper straws from my paper crafting stash for this project!
I only wanted a small batch (1 serving per person, no leftovers!) so I made a small batch of Krispie treats (the batch makes 4 total).
8 x 8 Pan of Krispie Treats
1 Tbs Butter
2 1/2 Cups Mini Marshmallows
3 Cups Rice Krispies Cereal
Melt the butter and marshmallows in pan over medium heat. Add rice krispies and mix until combined. Press into a greased 8 x 8 pan.
While the bars are still warm, pop them out of the pan and cut them. I cut mine in half (shown above) and then in half again (shown below). After cutting them into 4 pieces, I shaped them a bit more to make them a little more rounded at the bottom and pressed on the top to make "ears". Then I inserted a paper straw.
To decorate these, all I used was some chocolate. Melt about 1/2 cup chocolate chips and 1tsp Crisco. Pipe the chocolate on to create the antlers and eyes. Use some as well to stick a red M & M on for Rudolph's nose.
My kids loved these, and I hope you do too! I'd love to hear about your favorite Christmas movies and what you do when you watch them.
Labels:
American Craft,
Food
Monday, November 30, 2015
Coin Envelope Gift Card Holder Tutorial
This is a personal blog. All editorial content and projects are
intellectual property of Taylor Stamped. I do receive financial
compensation and material product from American Crafts and A Walk Down Memory Lane to develop my craft posts, but all ideas and opinions are my own. Some links are affiliate links.
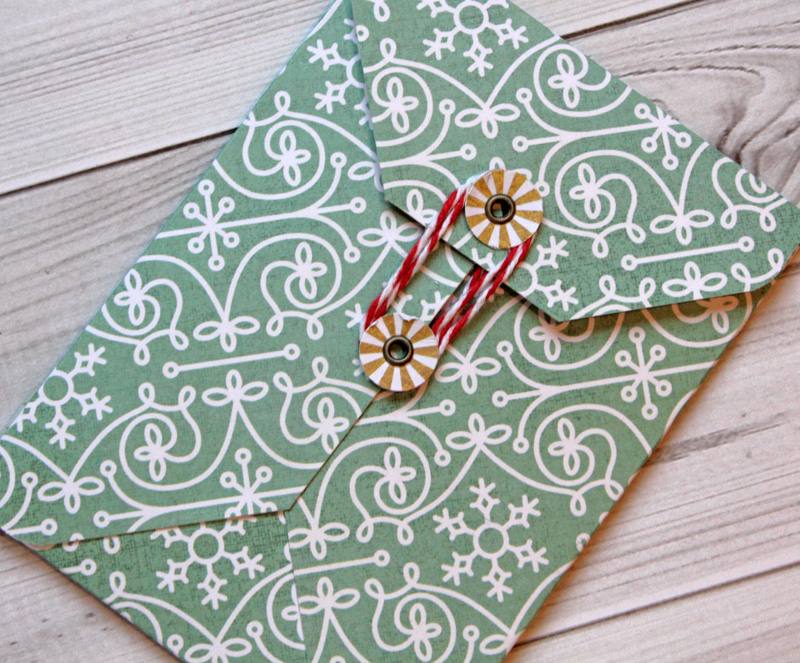
I give a lot of gift cards for gifts, especially during the Christmas season. But just because I'm giving a gift card, it doesn't mean I can't have some fun wrapping it. I try hard to make different types of holders all the time. I'm sharing a new style for me. Today I have a coin envelope gift card holder tutorial. Both sides of this holder style are super cute. Here's the front:
and here's the back:
To make this I used my We R Memory Keepers 1-2-3 Punch Board and paper from Silver and Gold by We R Memory Keepers.
I decided to make the envelope 3 x 4 1/2.
Just follow the directions for making an envelope with the 1-2-3 Punch Board. I like to place my paper so that the inside of the envelope is facing up. This isn't a necessity, but it makes folding the flaps down easier.
Fold your flaps in, but don't adhere them down yet. To make this look like a coin envelope, you'll need to trim the points off of the envelope. Here's a little tip: You only need to trim off the points that are showing, so I'm just trimming the top flap and the flap on the left side. You can see I made a little pencil mark as a guide, so I know where to cut. I want to trim close to center.
Unfold your flaps, and use the pencil mark as a guide to trim the flap.
When your flaps are trimmed down, add some adhesive to your flaps to keep them in place.
At this point you can decorate it and add your gift card or you can add some fun circle and twine details to make it look more like a coin envelope.
To make the closure, I used a 1/2" circle punch to punch gold circles. I attached the circles to the envelope with eyelets using a WRMK Crop-a-dile.
Use a little baker's twine wrapped around the eyelets to fasten the envelope shut. I attached my gift card to a coordinating piece of Silver & Gold paper with some Removable Glue Dots and slipped it into the envelope.
I kept the embellishments simple with a cork tree from the Silver & Gold cork stickers and green washi tape. I like to use an American Crafts Slick Writer to write on washi tape, as it won't smear on the slick surface.
Start to finish, this coin envelope gift card holder took less than 15 minutes, and I think it turned out pretty cute. What's your favorite way to dress up a gift card?
I give a lot of gift cards for gifts, especially during the Christmas season. But just because I'm giving a gift card, it doesn't mean I can't have some fun wrapping it. I try hard to make different types of holders all the time. I'm sharing a new style for me. Today I have a coin envelope gift card holder tutorial. Both sides of this holder style are super cute. Here's the front:
and here's the back:
To make this I used my We R Memory Keepers 1-2-3 Punch Board and paper from Silver and Gold by We R Memory Keepers.
I decided to make the envelope 3 x 4 1/2.
Just follow the directions for making an envelope with the 1-2-3 Punch Board. I like to place my paper so that the inside of the envelope is facing up. This isn't a necessity, but it makes folding the flaps down easier.
Fold your flaps in, but don't adhere them down yet. To make this look like a coin envelope, you'll need to trim the points off of the envelope. Here's a little tip: You only need to trim off the points that are showing, so I'm just trimming the top flap and the flap on the left side. You can see I made a little pencil mark as a guide, so I know where to cut. I want to trim close to center.
Unfold your flaps, and use the pencil mark as a guide to trim the flap.
When your flaps are trimmed down, add some adhesive to your flaps to keep them in place.
At this point you can decorate it and add your gift card or you can add some fun circle and twine details to make it look more like a coin envelope.
To make the closure, I used a 1/2" circle punch to punch gold circles. I attached the circles to the envelope with eyelets using a WRMK Crop-a-dile.
Use a little baker's twine wrapped around the eyelets to fasten the envelope shut. I attached my gift card to a coordinating piece of Silver & Gold paper with some Removable Glue Dots and slipped it into the envelope.
I kept the embellishments simple with a cork tree from the Silver & Gold cork stickers and green washi tape. I like to use an American Crafts Slick Writer to write on washi tape, as it won't smear on the slick surface.
Start to finish, this coin envelope gift card holder took less than 15 minutes, and I think it turned out pretty cute. What's your favorite way to dress up a gift card?
Labels:
Glue Dots,
We R Memory Keepers
Sunday, November 22, 2015
Using Photo Frames for Journaling
This is a personal blog. All editorial content and projects are
intellectual property of Taylor Stamped. I do receive financial
compensation and material product from American Crafts to develop my craft posts, but all ideas and opinions are my own. Some links are affiliate links.
Lately I have lots of journaling to do on my layouts. It's always a bit of a challenge to find just the right journaling tag or space to put your journaling. Lately, I've had a lot of fun using photo frames for journaling
For today's layout I started with paper from Pink Paislee's Atlas collection. I'm really in love with the rich tones in atlas. There's lots of great greens and blues in Atlas that are all brought together with a bit of gray.
When we were in Ireland, my husband fell in love with bangers and mash, but this is the first place he ordered it. Usually I'm the one snapping photos, but my husband loved his meal so much that he took a picture of it! Definitely something that needed to be scrapped, and a story that needed to be told. I didn't think the shape of a journaling tag looked right in this space, so I grabbed a photo frame from the Atlas Instagram Card Pack. To turn it into a journaling card, I just took a bit of matching cream card stock and attached it to the back of the photo frame. Now I've got a great big blank space to journal!
I used another card from the Atlas Instagram Card Pack as an embellishment on the page. It was a nice way to tie all of the elements on the page together.
I'm always looking for new ways to add journaling to my page. It seems like I can never have enough journaling cards or tags. Using photo frames for journaling is a really fun and simple way to add more journaling cards to my stash. How do you get creative with your jounaling?
Lately I have lots of journaling to do on my layouts. It's always a bit of a challenge to find just the right journaling tag or space to put your journaling. Lately, I've had a lot of fun using photo frames for journaling
For today's layout I started with paper from Pink Paislee's Atlas collection. I'm really in love with the rich tones in atlas. There's lots of great greens and blues in Atlas that are all brought together with a bit of gray.
When we were in Ireland, my husband fell in love with bangers and mash, but this is the first place he ordered it. Usually I'm the one snapping photos, but my husband loved his meal so much that he took a picture of it! Definitely something that needed to be scrapped, and a story that needed to be told. I didn't think the shape of a journaling tag looked right in this space, so I grabbed a photo frame from the Atlas Instagram Card Pack. To turn it into a journaling card, I just took a bit of matching cream card stock and attached it to the back of the photo frame. Now I've got a great big blank space to journal!
I used another card from the Atlas Instagram Card Pack as an embellishment on the page. It was a nice way to tie all of the elements on the page together.
I'm always looking for new ways to add journaling to my page. It seems like I can never have enough journaling cards or tags. Using photo frames for journaling is a really fun and simple way to add more journaling cards to my stash. How do you get creative with your jounaling?
Labels:
pink paislee
Subscribe to:
Posts (Atom)