If you're looking for an absolutely beautiful collection, check out The Sweetest Thing by My Mind's Eye. There are 4 different lines within the collection, I used the more masculilne line to create the following layouts.
There are wonderful die cuts and awesome buttons in this line.
There are some great layered stickers too.
Thanks for stopping by!
▼
Friday, September 28, 2012
Wednesday, September 19, 2012
For The Record 2
We had photos taken this summer with my husband's side of the family. About the same time the sneak peeks came out for Echo Park's For The Record 2 collection. I knew I was going to do a photo collage with For The Record 2. It's truly perfect for that. Of course, I scooped up the collection pack right away and the chipboard stickers.
...and a few close-ups
After finishing my photo collage I had plenty of paper and embellishments left over, so I created a layout too...and I still have enough left over to create more!
Thanks for stopping by!
Wednesday, September 12, 2012
LEGO
My boys, especially my oldest, love LEGOS. I am continually amazed by the creativity that they spark in my my kids, so when there was a LEGO building competition at an area fair this summer, we thought it would be a fun thing to participate in. Both boys had a really good time, and (proud mama moment coming up), my oldest even won 1st place in his age division. Of course, I had to scrap the whole thing...and wouldn't you know, Creative Imaginations makes a whole line of Lego Papers and stickers.
I have to be honest, while this paper is really cool, it was a little hard to work with. I'm used to working with lots of patterned paper, and while this paper has the pattern (and even texture) of LEGO blocks, they're all solid color pieces of paper. I do like how the 2 page layout turned out a bit more than my 1 page layout.
My oldest is pretty shy, so I was super proud of him for being able to talk about what he was building to the judge.
Normally I avoid using the same large embellishments on similar pages, but since each of these pages will be going in my boys' own separate books, I just couldn't resist using this cool chipboard title on both pages.
Did I mention my kid's love LEGOS? Just in case you're in any doubt, we just got done celebrating my oldest's birthday. He wanted a LEGO birthday, so I made these t-shirts for them using my Silhouette and a little Silhouette Vinyl.
Thanks for stopping by today!
Tuesday, September 4, 2012
Farm Boys
My in-laws live on a small farm with lots of animals. When you're a little boy, life doesn't get much better than getting dirty on the farm. Every time we set foot at their house, the first thing out of my boys' mouths is, "Can we go play on the bales?" Of course, I had to photograph and scrap this summer fun.
I ended up with 3 total layouts. 1 of my oldest, 1 of my youngest, and one of them both together. I decided to do all my journaling on the one of them both together, so I was able to get a little extra creative on the layouts that I didn't journal on. Today, I'd like to share the 2 layouts without journaling. If you'd like to see the 3rd layout, you'll be able to find it on Thursday over on the AWDML Blog.
I wanted to have a little fun with this first layout and pay homage to where we live. Those Iowa stickers from Reminisce are a whole lot of fun, and this layout was the perfect time to use them. Let me point out something that's a little outside my norm for scrapping. See that sky paper I used for the base? Not something I would usually have on hand, let alone use. You see, the back side of the Blue Sky October Afternoon Woodland Park paper is a beautiful pattern. That's the side I would normally use...but for this layout, it just seemed to work. I paired that paper with Moxxie's Farm Livin' collection, and distressed the edges.
For the second layout, I decided to use the wood grain papers from My Mind's Eye's On the Bright Side collection.
I paired that with some stickers from Making Memories, Simple Stories, and Echo Park, plus a button from Bazzill. All in all, it's a pretty good fit for the photo, and I got to use up some leftover stickers from other projects.
Thanks for stopping by!
Monday, September 3, 2012
Making a Few Embellishments
Once in a while, I like to just stock up on some hand made embellishments. Today I thought I'd make a couple quick flowers from Glue Dots® and some May Arts ribbon.
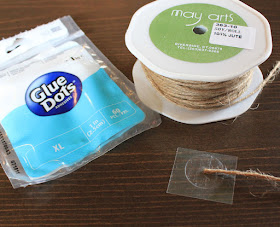
To make the first embellishment, I paired some Jute with an XL Glue Dot®
To start, take the top piece of paper off of an XL Glue Dot®. Stick the end of your jute or twine firmly to the center of the Glue Dot®.
Next, start wrapping the jute around your center point working in a circle from the center out. Press the jute firmly to Glue Dot® as you wrap. When you're all done it should look something like this:
To give it a little more pizazz, I used a Mini Glue Dot® to adhere a button to the center of the embellishment.
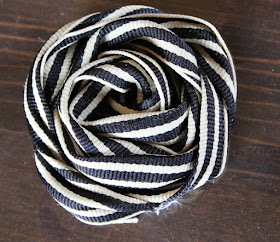
For my second embellishment I used a more traditional ribbon and an XXL Glue Dot®
This ribbon from May Arts is 1.5 inches wide, but you can use any width ribbon you'd like.
This project starts the exact same way as the one above. Adhere the end of your ribbon firmly to the center of your XXL Glue Dot®
However, when working with ribbon, you'll want to twist the ribbon a bit while wrapping it around the center starting point.
Keep twisting and wrapping until you hit the end of the Glue Dot®. You can tuck your raw end under some of the other ribbon around the edge to hide it.
Once again, I added a button to the center to finish off my embellishment. You can use these embellishments right away, or you can leave them on the plastic backing and set them aside to use on a future project.
Thanks for stopping by!


