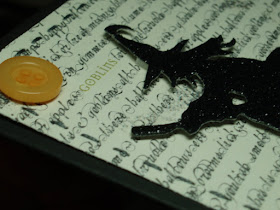
Get out your ghosts and goblins, it's Halloween week! It's been a truly busy few weeks for me, and I really haven't even thought about making Halloween cards. Then, last week, my redemption came in the mail. I won a Making Memories Vintage Findings Halloween Kit from the Making Memories blog! Not only is this kit gorgeous, fun, and spooky, it also comes with everything I needed (minus a few base pieces of card stock) to make a few fun Halloween cards. I've got 2 for you today, and am hoping to post 1 or 2 more this week.
First up is a fun Halloween Damask print that I covered in stickles. I think the glitter really makes it pop. I also used a Fiskars Pearls of Wisdom Corner Squeeze punch (also a blog prize from the wonderful ladies over at Fiskateers).Second is a sparkly (and spooky) witch. I love the paper in the background, and don't you just love those black, sparkly brads?The only non-kit items here are the ribbon and the thread.
▼
Monday, October 26, 2009
Tuesday, October 20, 2009
Tuesday's Terrific Techniques and Tips: Punch Care
Today I thought I'd share a tip instead of a technique. I love using punches on my cards. Lately I've been getting a lot of questions about sharpening punches. I have good news, you probably have everything you need to clean and lubricate your punches right in your kitchen!
To sharpen a dull punch, just punch through a piece of tinfoil folded in half (creating a double layer of tinfoil). Repeat this a few times, and you should have a much sharper punch.
To lubricate a stiff or sticky punch, just punch it through a piece of wax paper folded in half (creating a double layer of wax paper). Repeat this a punch a few times and you should have a more lubricated punch. You may want to punch through some scrap paper a few times before you use it on nice paper as sometimes the wax paper leaves a residue on the punch.
Finally, I'll leave you today with a card made using Stampin' Up!'s curly label punch, word window punch, and large oval punch.
Sunday, October 18, 2009
Fun Weekend
I had a busy, but very fun weekend. I had a blast teaching a Christmas card class at A Walk Down Memory Lane on Saturday. I had so much fun meeting 5 new stampers. From there my husband and I dropped our boys off at my in-laws to spend the night, so we could go out with some friends to celebrate my husband's 30th Birthday (Happy Birthday, Dave!). And today, I even managed to fit in some paper crafting time. Definitely a fun weekend!
Today's card is one from my Christmas card class yesterday. I love it because it's simple, yet a little unexpected, and easy to replicate for multiple Christmas cards.
The green center is popped up on a foam adhesive dot to add dimension, and then layered onto the red stamped image. The entire stamped image is actually stamped on the inside of the card and is visible through a hole punched in the outer layer of the card.
The red border is wrapped around the edge like a book binding and therefore is visible on the back side too.
I hope you all had a fun weekend too!
Supplies:
Stamps: CL237 - Hero Arts
Ink: Real Red and Old Olive - Stampin' Up!
Paper: American Crafts
Accessories: 1 3/4" Circle Punch, 1 3/8" circle punch - Stampin' Up!
Apron Lace Punch - Fiskars
Dew Drop - Robins Nest
Thursday, October 15, 2009
Lots of Fun Classes
Lately it feels like I've been spending most of my free time working on projects for my upcoming classes. I just finished up my samples for a Masculine Card Class I will be teaching on Saturday, November 7. So many people find it hard to make cards for the men in their lives, so this is a class dedicated to those hard to make cards. What's fun about this class is that it also focuses on specific tricks and techniques that people may not have tried before. For example, the card I'm going to show you today is from that class and focuses on a fun bleaching technique.As you can see, I don't believe masculine cards need to be all tools, cars, and dirt (though some of my man cards definitely do fall under that category). They can just be lovely elements put together in a way that hints at masculinity. I hope this inspires you to create some of those tough man cards, and if you're in the area feel free to sign up for the class at A Walk Down Memory Lane. Now, I'm off to prep some class kits for a Christmas Card Class for Saturday!
Tuesday, October 13, 2009
Tuesday's Terrific Technique: Tile photo and recipe card holders
Welcome to another Tuesday's Terrific Technique. Today's tutorial is a great little gift I like to hand out, especially at Christmas. I'm going to show you 2 different versions; one using stamps and markers and one using vinyl. So, here it is, a recipe card (or photo) holder:
You will need:
2x2 stone tile (sold at most hardware/do it yourself stores in sheets of 36)
Clothespin
Strong adhesive (I used E600)
Vinyl OR Staz-on ink, a stamp, and Sharpie Markers
Ribbon
When you find the tiles, they will look like the picture above.
Remove 1 tile from the sheet and wipe it clean with a damp paper towel.
To stamp on the tile you will stamp an image in stazon ink directly onto the tile.
Color the image in with Sharpie markers. There is no need to seal the tile.
To use vinyl on the tile, cut out an image in vinyl.
Adhere the vinyl directly to the tile.
When you have the image you want on on the tile (in either ink or vinyl), adhere a clothespin to the back of the tile with a strong adhesive. Allow time for the glue to dry completely.
Tie a ribbon onto the clothespin, and you have a completed gift!
Wednesday, October 7, 2009
So many things for 1 little post
I think I'll start with my contest submission. American Crafts' Blog is having a food inspired layout/card contest. I decided to play along this week and also showcase a little fun I get to have. Occasionally, I get to do a little scrapbooking for Make-A-Wish. Just in case you're not familiar with Make-A-Wish, here's a 1 sentence synopsis of what they do: Since 1980, the Make-A-Wish Foundation has granted the wishes of more than 171,000 children - one wish every 40 minutes. So, my page for today combines the American Crafts' contest with a Make-a-wish page:
Supplies(all are American Crafts unless otherwise stated):
Paper: Spring/Summer - Preserves
Spring/Summer - Scones
Everyday - Word (backside)
Flair: Everyday - Friends
Thicker Stickers: Foam Root Beer Float Pink
Glitter LAX Powder
Rhinestones - Basics clear Rhinestones by Kaiser Craft
But this post isn't done yet... Look what I got in my mailbox today:
This is a scissors with my Fiskateer number (#6363) engraved on the blade. All this just because a few months back I joined the Fisk-a-teer community. Are you a Fisk-a-teer? I love, love, love being part of this community! The Fisk-a-teer community is a group of wonderful craft enthusiest who especially love Fiskars products. And really, who doesn't have at least one Fiskars tool in their craft arsenal? At the Fisk-a-teers community, they hold crops, have contests, have a fantastic blog and message board area, and a fun gallery too. If you want to become a Fisk-a-teer too, you can send an e-mail to Rebecca at rpeck@Fiskars.com and tell her you'd like to be a Fisk-a-teer, and that Samantha #6363 sent you. They like to "meet" all of the new fisk-a-teers personally and let you know what the site is all about. This is a great community for all crafters; paper, yarn, and fabric alike.
Well, if you got though that very long post, you deserve a hand! Thanks for sticking with me today.
Tuesday, October 6, 2009
Tuesday's Terrific Technique: Paper Bouquet
It is raining and just plain icky out today, but I had a sunny surprise when a beautiful bouquet of flowers showed up at my front door. My wonderful husband sent them just because. Inspired by his flowers, I thought I'd give you a break from embossing tutorials to show you how to make this pretty paper bouquet:
You will need:
Scallop Circle Punch or Die
Scissors
Double Sided Patterned Paper (here I used paper from Daisy Bucket Designs)
Floral Wire
Adhesive
First, punch out or use a cutting machine to cut/punch a scalloped circle.
The circles I used for this bouquet are 1 3/4"
Next, you will cut out 2 of the scallops from the circle as pictured above. You may discard the cut out piece. You will only need the circle.
Put adhesive on the 2 outermost scallops and adhere by overlapping the 2 outermost scallops on the opposite side of the gap. You should now have a cone shaped flower.
Bend the petals out slightly.
Take floral wire and curl the end into a small spiral shape (this will be the center of your flower).
Thread the floral wire though the tip of the flower.
Repeat the steps to create additional flowers, until your bouquet is the desired size. I have 2 dozen flowers in my bouquet. You can cut the floral wire to varying lengths to add more depth to your bouquet.
Here are a few more pictures of the finished product.
Monday, October 5, 2009
Finally!
There's a project I've been wanting to do for quite a while. Finally, I got everything I needed to make it. Then, I finally got the time to actually complete it early last week. Last week was so cloudy, dreary, and rainy, that I couldn't get a proper picture of it. Finally, the sun came out on Saturday, but it was World Card Making Day, so I shared a card instead. Finally! Today I get to share it with you. I'll post the pictures first and then a little info and the supplies after the pictures.I love how this canvas turned out. I'm in the process of turning a wall inside my house into my own personal little art gallery where I can put pretty canvases like this one and framed lay outs. This is going to be my first piece to go up! It's pretty simple to do. Get a canvas. Paint the edges of the canvas, if you want a different color than white. I used tan Studio Paint. Create a layout. Adhere your pieces with mod podge. Make sure to allow lots of drying time to decrease air bubbles and wrinkles. Seal the whole thing with mod podge when you're done, and ta-da! Your own piece of artwork for the wall. I also decided to stamp a little sentiment on my paper ("We are family"). If you want to do any stamping, make sure to use something like Staz-on, so your ink won't run when you seal the picture with mod podge.
Supplies
Art Canvas
Spring Fling papers from Pink Paislee
"We are Family" stamp from Unity Stamp Company
Brown Staz-on Ink
Mod Podge
Tan Studio Paint
Supplies
Art Canvas
Spring Fling papers from Pink Paislee
"We are Family" stamp from Unity Stamp Company
Brown Staz-on Ink
Mod Podge
Tan Studio Paint
Saturday, October 3, 2009
Happy World Card Making Day
What did you do today? Did you get a chance to celebrate World Card Making Day? I had a great day teaching a card class at my local scrap book store, A Walk Down Memory Lane (AWDML). The best part about the class? My Mother-in-Law was finally able to make it to one of my card classes. I love sharing my passion for paper crafting, but it always seems that much more fun when I get to share it with family and close friends. Not to leave anyone out, one of my sister-in-laws also attended, which I enjoyed immensely too. This was her second official class with me, and it's been fun to watch how quickly her paper crafting skills are developing.
Now, in honor of WCMD, I shall share a card with you. It's a fun sneak peak of the Christmas Card class I will be teaching, on October 17. You can click here for class info. Now for the card:Since it's a sneak peak, I won't give you too many details about the card, but...did you notice the ornaments on the tree? They are red, embossed, AND sparkly! I love how the glitter makes this card pop. There's even some stamping on the inside of this card to give it an extra hand-made for the holidays feel.
I hope you all had a wonderful WCMD, and even got a chance to make a few cards of your own.